


DeWayne Hayes
-
Posts
73 -
Joined
-
Last visited
Content Type
Profiles
Forums
Events
Blogs
Gallery
Store
Everything posted by DeWayne Hayes
-

Tried new finishing technique with Mop & Glo
DeWayne Hayes replied to DeWayne Hayes's topic in Leatherwork Conversation
I just love the look AND feel of waxed leather - like a nice pair of dress shoes. So, I consider this combo of wax and M&G to be a great "best of both worlds" ... I'm not exactly getting the feel of pure wax, but I'm getting almost the same shine, with the great value add of waterproofing provided by the acrylic. Good combo and easy, durable finish for novices like myself. I've just been going back and doing all my holsters and knife sheaths. Easy to add to an old project. -
Tried new finishing technique with Mop & Glo
DeWayne Hayes replied to DeWayne Hayes's topic in Leatherwork Conversation
Does the M&G over the black shoe polish keep the shoe polish from rubbing off on clothing? I'm guessing it does. -
Tried new finishing technique with Mop & Glo
DeWayne Hayes replied to DeWayne Hayes's topic in Leatherwork Conversation
Just for testing purposes, I reapplied a second coat to the test holster just now, and it dried nicely, depositing even more acrylic, I'm sure. Always scary when that watery mess goes on and turns the leather dark in spots, but within minutes it's dried and back to normal. And yes, I never was into the red dots, but my aging eyes are finding them to be quite helpful! Made this holster specifically to accommodate the optic. D -
Made another holster for one of my long barrel Glocks and this time I tried a different finishing technique. Usually, I stain with Fiebings Pro Dye, then the next day apply Fiebings Leather Balm + Atom Wax. I love the waxy sheen but a wax finish is not particularly water repellent, and for an outdoor holster (woods gun), I felt like I needed to do more. I experimented on an older messed up holster finished with the Balm/Wax and mixed up a dish of Mop & Glow diluted 50/50 with water. I really wasn't sure how the watery M&G would react on top of a waxy finish. Would it just roll off? As you know, water and wax aren't supposed to mesh. To my absolute delight, it went on wet with a foam brush, then fairly quickly soaked in and deposited the acrylic layer perfectly, with no streaking or any negative side effects. no color change. Feels like a Mop & Glo finish now, but buffed right back to a pretty nice sheen. Not an intense waxy gloss, but somewhere in between. I was delighted. This stuff definitely beads water better than the wax alone. In other words, if I let water sit on the pure wax, it doesn't take long to penetrate the leather. With the M&G, the water beads and will eventually penetrate, but I have longer to wipe it off without penetration. That's about as good as I need. If I get caught in rain, I want to be able to wipe off the leather and then cover it up without staining. Now, here's another benefit I found. This particular double shoulder I got from Tandy leather. About half the shoulder was really nice and smelled of that delicious veg tan, baseball glove new shoe smell - the rest was more wrinkly and had a distinct farmyard smell after wet molded (smelled like cow sh*t to be honest). Not nice. The messed up holster I tested on was the worst, for some reason - really a nasty odor. So, I used the M&G on the inside of the holster too, applied with a brush. Dried nicely, and apparently sealed in the stink, because now the holster just smells slightly lemony! No more cattle yard smell. I think this is an interesting tool for both topcoats and interiors - I'm happy with it! If anything, I think the wax layer helps prevent the M&G from streaking, and that alone is worth it, in my opinion.

-
Question about leather stiffener
DeWayne Hayes replied to DeWayne Hayes's topic in How Do I Do That?
I have, and actually fabricated one of those myself using a spark plug feeler gauge as a metal piece, but I applied it on the exterior, not inside the layers. Reason being, I don't set my female snap until the holster is dry from wet molding as I find the strap often shrinks when drying, so if I set both ends of the snap too soon, I can have problems when the holster is dried out. If I used one of those stiffeners "inside", I'd be committed to a snap position. -
Question about leather stiffener
DeWayne Hayes replied to DeWayne Hayes's topic in How Do I Do That?
I wet mold the entire holster - isn't that the same as casing? I've never 'cased' specifically, as I don't tool. Please educate me if I don't understand casing. -
I understand Weaver sells a liquid leather stiffener. If anyone has used this, I have a couple questions. I want to stiffen the thumb-break portion of a leather pistol holster - just the thumb break tab, I don't want to stiffen the whole holster. Can I apply this stiffener after wet molding but before spraying my pro dye? In other words, will the stiffener affect the color of either the raw veg-tan or once dyed? Will it leave a stain-looking line between that area and the rest of the holster? Thanks for any experience you can share. DeWayne
-
My technique for hand stitching thick welts
DeWayne Hayes replied to DeWayne Hayes's topic in Leatherwork Conversation
I'm still a novice, but love problem solving ... or attempting to solve problems. As for the excess welt, I cut about 90% off with a razor box cutter, and then grind it down flush with a table-top belt sander. -
My technique for hand stitching thick welts
DeWayne Hayes replied to DeWayne Hayes's topic in Leatherwork Conversation
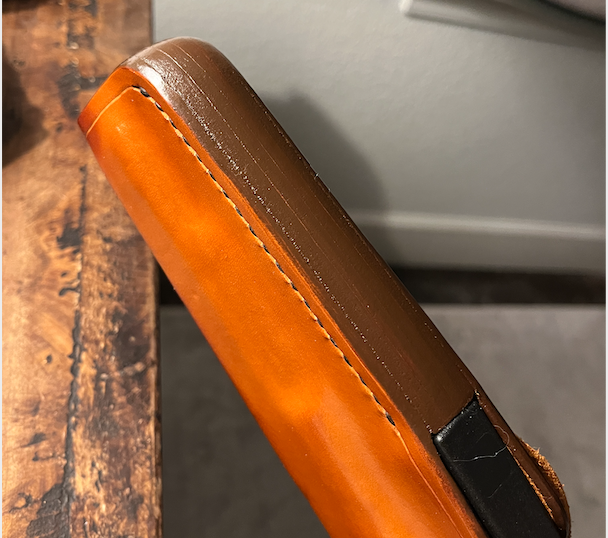
The final product looks like this, once stitched. I hope these pictures help explain the process a little better. It's surely not as fast or easy as using a machine to punch and sew through a thick welt, but it is the best I've come up with for aligning holes and then sewing through them pretty easily with no glue interference. The primary benefit is the backside stitching looks as good as the front side, since you're connecting two sets of nicely pre-laid out holes - not punching through hoping the punch doesn't wander and come through the back side of the holster misaligned. Looks much neater this way, I think. Regards, DeWayne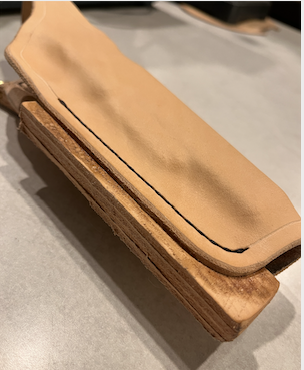
-
My technique for hand stitching thick welts
DeWayne Hayes replied to DeWayne Hayes's topic in Leatherwork Conversation
And finally, I use the needle/pin method to glue up and attach the other side of the holster to the welt.
-
My technique for hand stitching thick welts
DeWayne Hayes replied to DeWayne Hayes's topic in Leatherwork Conversation
Once the welt is attached, I use a needle to make sure every single hole is lined up and I can see through it.
-
My technique for hand stitching thick welts
DeWayne Hayes replied to DeWayne Hayes's topic in Leatherwork Conversation
Now, I use sewing needles as guide pins to make sure the welt attaches to the shell with all holes lines up. I do it like this.

-
My technique for hand stitching thick welts
DeWayne Hayes posted a topic in Leatherwork Conversation
I described this in other threads, but as I was doing one today, I thought I'd snap a few pics to better explain my process for hand-stitching very thick welts. The first time I did a thick welt, I swore I'd never try it again. Deep holes, alignment issues, glue in the holes, trying to get needles through - it was a nightmare. But ultimately, this is what prompted me to devise a better process. That, and Dwight's suggestion to use my drill press to drive a sewing needle through the welt. I have developed a modified version of this technique to instead use a chisel style hole punch in my drill press. This gives me rectangular holes which allow more leeway when aligning everything - and that leeway is really helpful when trying to align the holes in the outer holster shell with the holes in the welt itself. First, I mark where I need my stitch line and then punch the holes in both sides of the outer shell of the holster. I pinch the holster shell together to make sure these two sets of holes likes up. Then I take my welt blank and hold it firmly against one side of the sheath and mark where the holes need to be in the welt. I then use my drill press to punch through the welt, which is surprisingly easy, and makes much straighter holes than I could ever achieve by driving the chisel with a hand held hammer. Now, I stretch all the holes in the welt with an awl, just to increase their shape for guiding my needles through. I then glue up one side of the holster and one side of the welt, making sure not to get glue in the actual holes, like shown below.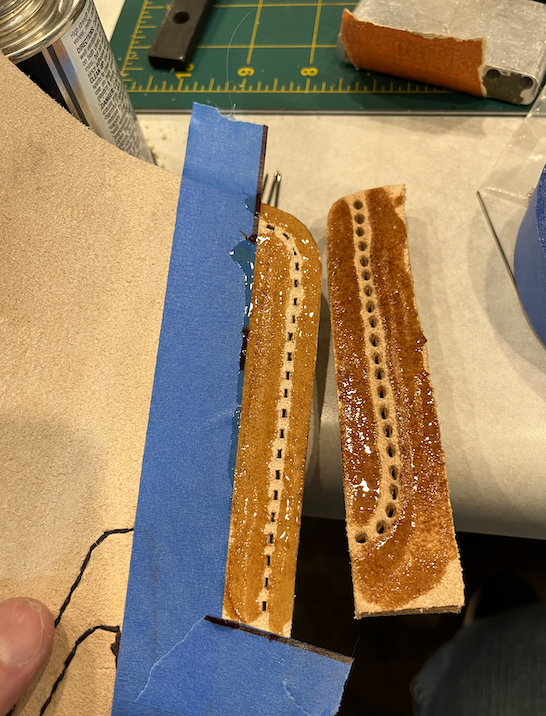
-
Wonderful work! Beautiful. Some tips on those mega hoss welts I've developed over the last couple jobs. 1) I now use my drill press with a chisel hole poker thing chucked up and pre-cut all my holes in the welt before I glue it to one side of the holster. I pre punch my holes in the holster shell, and then use those holes to mark where the holes in the welt need to be. Then the drill press punches them nicely and perfectly straight. At this point, the welt is still a separate piece that needs to be glued in. 2) I use sewing needles as locator pins pushed through the holster holes (3-5 of them) to make sure I glue the welt to the holster side with the welt holes and holster holes aligned. I lay my glue on both holster and welt in such a way that the holes don't get gunked up with glue - in other words, in two "strips" beside the holes but not over them. 2) Once the welt is glued to one side of the holster, I then I glue the other side of the holster (holes pre cut) to the welt the same way - with locator pins in place so all the holes line up. I came about this method because the first one I did with a welt that thick, I hammered the chisel punch through the welt and, like you, had a few that went stray somewhere in those layers and came out the other side out of line with the rest. This made lining up all the holes a real battle! Dwight suggested using the drill press with a sewing needle to punch through, and I just modified that to using a chisel punch, which gives me a wider hole that's easier to maneuver through on those thick welts and gives a little margin for alignment error. I filed on the chisel punch to remove the shoulders so I could punch deeper holes. I can get through 4 layers of 8-10 oz. now. It's really sped up my work and most importantly, no more wandering stitch holes on the back side! I hope this helps. Enjoy that beautiful holster!
-
And then here it is all sanded and painted.
-
I should mention, I found a much better way of doing that massive welt on these holsters. I used my drill press to mount my chisel hole punch and did all the holes in the welt before ever gluing it to the holster. I used needles as locator pins when I did glue it in to ensure alignment, and I didn't slick glue over the holes and all - I just did two panels of glue on either side of the stitch line. This kept glue out of my holes, and my word, did it make my sewing easier! The old drill press hole punch method was a game changer - I'm not scared of those big hoss welts anymore. Here's a couple pics in process ...


-
Hi folks, I actually have two long-slide Glocks (one in 10mm and one in 9mm) so I made a duplicate of the holster I posted the other day for the 10mm. I did this one in Fiebings Pro Dry English Bridle, sprayed through a preval. One thing I notice though that I want to ask you all about. I treated the inside of the holster with pure neetsfoot oil, and must have gone too heavy down near the muzzle, as a few hours later I noticed some oil soaked through to the outer face. I did the same with the black holster, but I reckon you wouldn't see any bleed through with black. I can live with it either way, but do you think that oil stain will diffuse and fade, or is it always going to look like that? Thanks, DeWayne


-
Another "had to roll my own" pistol holster
DeWayne Hayes replied to DeWayne Hayes's topic in Show Off!!
That makes a lot of sense, thanks for the tip. -
Another "had to roll my own" pistol holster
DeWayne Hayes replied to DeWayne Hayes's topic in Show Off!!
I tried skiving a strap and ruined it. My little Tandy skiver tool takes nose dives in the material and randomly cuts too thin. I ruined the piece. So, if I ever try to skive again, it will be with a different tool, more like a chisel I can control better. But even though this strap is fairly thick (8/10oz) it is supple enough to work well, so I'm happy leaving it full thickness. I had a major technological breakthrough today, based on Dwight's talk of using the drill press. I realized if I chuck up my single point chisel, I can easily drive it right through four layers no problem. Next time, I'm going to pre-cut the holes in my welt with the chisel, not a drill bit. Should provide more room for needles when it's all glued together. Heck, from now on, I'm doing all my holes with the drill press - perfectly straight, and no more picking up/putting down a hammer 10,000 times a project. That's progress! -
Another "had to roll my own" pistol holster
DeWayne Hayes replied to DeWayne Hayes's topic in Show Off!!
That was 22 rounds with 3 at 7yds and the rest at 10 and 15 yds. Slow fire - if I was shooting fast, it would be all over the place! -
Another "had to roll my own" pistol holster
DeWayne Hayes replied to DeWayne Hayes's topic in Show Off!!
Thanks, guys. I have the gun wrapped in Saran wrap and in the holster, with the strap wet on the inside surface and re-molding itself in the proper position. I'll leave it in there for several hours. Already felt like it was loosening up. I was spurred to action as i took the pistol to an indoor range today, and it was so cold in the range, I couldn't get it re-snapped! That's just too tight for good service - needed to be stretched. I learned my lesson though - next time, I won't mount the female snap until after the holster is dyed and dried and shrunk all it's going to. Good to know. Good news is the pistol is a shooter!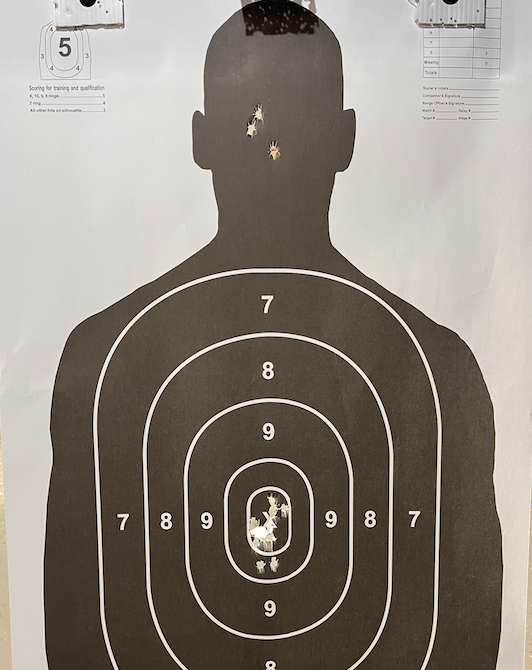
-
Another "had to roll my own" pistol holster
DeWayne Hayes replied to DeWayne Hayes's topic in Show Off!!
Thank you - good idea. I wonder if water would work better than neetsfoot to re-wet mold the strap? I hate to reintroduce water, but it may be the only way to get some stretch. I know what I'll do - I have a dud holster that has the same issue. I'll try it on that one and see what effect I can achieve with water. That way, if I have a problem, it won't matter. -
Another "had to roll my own" pistol holster
DeWayne Hayes replied to DeWayne Hayes's topic in Show Off!!
I'll tell you what I did run into with this holster ... The snap arrangement fit perfectly when I made it - I established the position for the female side of the snap while in wet moulding and then punched it when dry. Everything lined up nicely. BUT ... After I dyed the holster and let it air dry all night, the holster shrunk a bit, most noticeably the retention strap. I had to pull on the strap for a while to stretch it a bit to re-establish the snapping geometry. It's easy enough to unsnap, but getting it re-snapped can be finicky. I reckon I should have left the gun in the holster when drying, but I didn't want dye on the gun and also wanted the interior to have air circulation to dry. I think I'm going to try coating the inside of the strap with neetsfoot oil and wrap a thin piece of leather over the back of the pistol to stretch on the strap overnight and see if that helps. If not, I may get in there and do some surgery to move the female end of the snap up a mm or so. Concealing that work will be the trick, but I think the head of the snap will cover any changes on the exterior. And whatever it looks like on the inside will be hidden and dyed black, so hopefully not noticeable. I reckon it was the alcohol in that pro dye that caused the holster to shrink. I went at it pretty heavy. I do love how stiff it made the holster though, overall. This was a pretty spongy piece of 8/10 oz veg tan, and it's nice and hard now. -
Another "had to roll my own" pistol holster
DeWayne Hayes replied to DeWayne Hayes's topic in Show Off!!
Just for fun! Not too many 6" barrel 9mm pistols out there - you get higher velocities than you can with most other 9mm handguns. Just something to have. -
Another "had to roll my own" pistol holster
DeWayne Hayes replied to DeWayne Hayes's topic in Show Off!!
That's a brilliant idea - kind of a 'semi-automatic sewing machine!'