DeWayne Hayes
-
Posts
73 -
Joined
-
Last visited
Content Type
Profiles
Forums
Events
Blogs
Gallery
Store
Everything posted by DeWayne Hayes
-

Another "had to roll my own" pistol holster
DeWayne Hayes replied to DeWayne Hayes's topic in Show Off!!
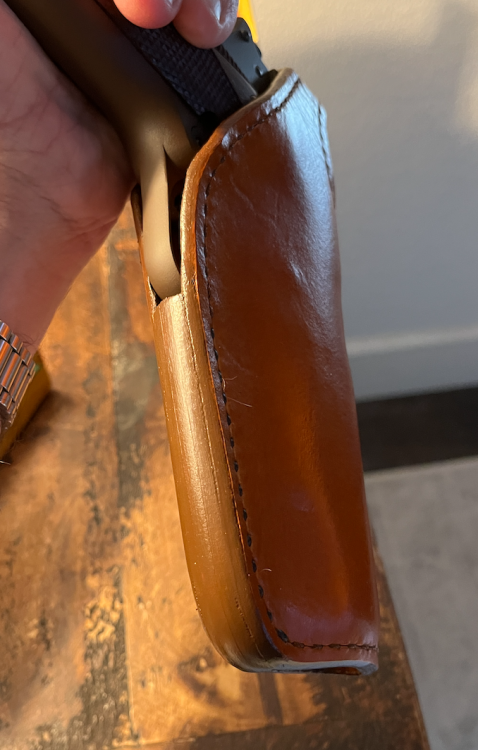
Right, that's why I did it - I was matching the thickness of the trigger guard. I think most (including Bianchi) make a thinner welt and just flair the shell out at the trigger guard during wet mould, but I had it in my head to just match the trigger guard. That idea is now out of my head, and will never be acted upon again! -
Another "had to roll my own" pistol holster
DeWayne Hayes replied to DeWayne Hayes's topic in Show Off!!
I will NEVER attempt a welt this thick again! Yikes!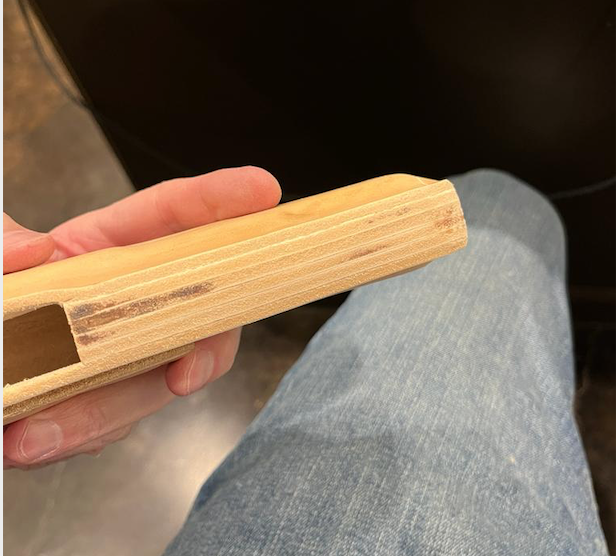
-
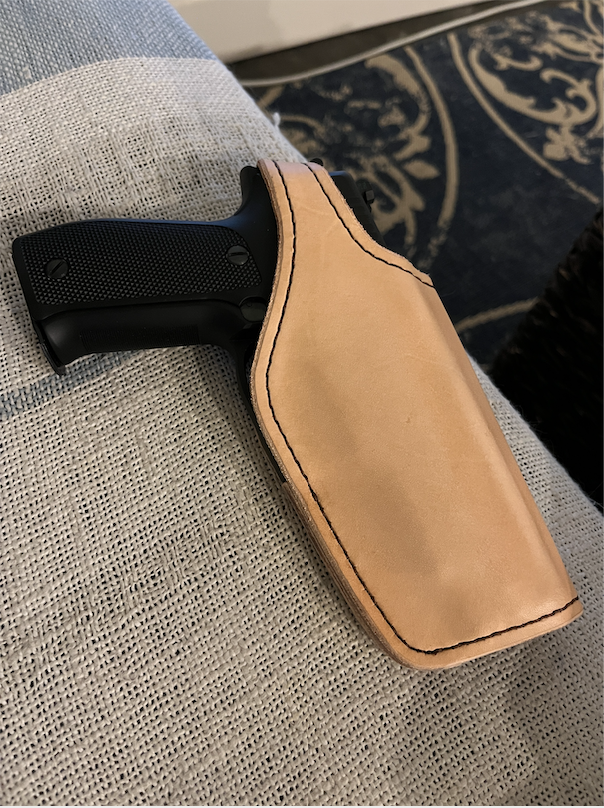
This is my latest project - a leather holster for a Glock G17L "long slide". This is a fairly rare kind of Glock with a much longer barrel, and finding a factory holster in leather is almost impossible, and in cross-draw, just non-existent. It would be a custom order, if you could find anyone willing to do it. So - I had to roll my own. The holster itself was simple as I didn't use a lining - I reverse engineered a pattern from a standard Bianchi Glock offering and added extra length for the barrel, but with a six layer welt of 8/9 oz leather, my gosh - I wanted to cry. Even though I used my drill press to drill the holes in the welt, and they seemed to line up with my chiseled holes on the holster shell, my drill holes were too small, just slightly larger than my needles. This means you add in a little contact cement gunk, and those holes became a nightmare. I had to use my awl and my chisel to work on each hole stitch by stitch, trying to get it where I could see daylight for my needles. Painstaking literally - my fingers and wrists are aching today. By the grace of the leather clad gods, I somehow got it done and the stitching turned out looking really nice, if I do say so myself. Always trying to make a factory-looking stitch by hand ... Finished the edges with Fiebings foam tipped edge dye applicator, and finished the leather with Leather Balm + Atom Wax (I really like this stuff). It's not really waterproof, but this is a target pistol - I can't imagine a rainstorm scenario. I suspect it's the only cross-draw leather holster for a Glock 17L in the world! (Which just means I'm the only person who wants one, I reckon!) DeWayne


-
Can I dye brown nylon thread black?
DeWayne Hayes replied to DeWayne Hayes's topic in Leatherwork Conversation
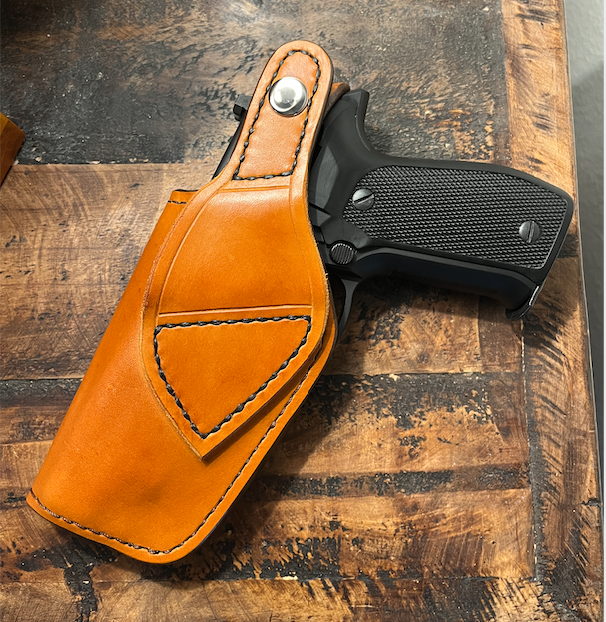
Thanks guys. And Dwight, I can't claim any credit for the holster design, I reverse engineered a Bianchi Model 19L holster to make a pattern, but I made it a cross-draw rather than forward tilted design. Couldn't find a cross-draw with a thumb break that I liked, so had to roll my own! And as to the scar (or whatever that spot is that wouldn't take dye), I'm happy to say, I loaded a toothpick with some dye and slowly pecked at it until it blended perfectly and disappeared. I don't know why it didn't take dye when I sprayed, but for whatever reason, I'm happy that I could fix it - my OCD would have caused me to look at that spot every time!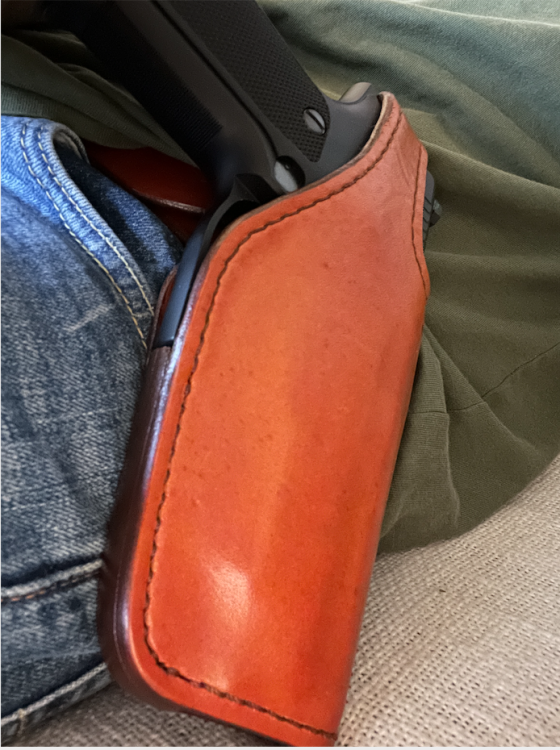
-
Can I dye brown nylon thread black?
DeWayne Hayes replied to DeWayne Hayes's topic in Leatherwork Conversation
-
Can I dye brown nylon thread black?
DeWayne Hayes replied to DeWayne Hayes's topic in Leatherwork Conversation
As I said, I went ahead with my English Bridle Pro Dye. After I finished with leather balm/atom wax, I note there's a tiny scar right in the geographic dead center of this holster that didn't take dye. Couldn't have planned that if I tried. But I reckon I can live with it. If I tried to fix it, I'd no doubt create something more noticeable, and as the holster ages, it'll probably get scuffed and aged anyway. DeWayne
-
Can I dye brown nylon thread black?
DeWayne Hayes replied to DeWayne Hayes's topic in Leatherwork Conversation
Thanks folks. I decided to go ahead with my original brown plans, so will save the black for another day. Thanks, DeWayne -
Hi folks, I just made another pistol holster and was intending to dye it English Bridle brown, so I used brown nylon thread. However, I'm considering maybe dying this one black instead. So, I'm wondering, of course, will the thread take on the black dye, or when all is said and done, will I have brown stitches on black? Thanks, DeWayne

-
Is there a better way to end your hand stitching?
DeWayne Hayes replied to DeWayne Hayes's topic in Sewing Leather
No, when I back stitch the whole thing (i.e. double stitch the whole thing) I just pull through my last stitch hole and cut the the thread off very tight to the hole, and press it into the waxy thread next to it. By this point , that hole is tight with four thicknesses of thread, so I'm not too worried about the thread backing out of it. Also, I stitch before wet forming, and that causes the leather to shrink and tighten around the stitching anyway when it dries - so I imagine those holes are all pretty darned tight to the thread. -
Is there a better way to end your hand stitching?
DeWayne Hayes replied to DeWayne Hayes's topic in Sewing Leather
I hear you, guys. It's the standard for a reason, I'm sure. What I have done before, like on these two sheaths, is literally backstitch the entire thing - just so I could achieve a uniform fat stitch line. It's tedious, but I like the robust look. Just trying to explore if there might be a way to do it with a single line, ending tidily with no backstitching. May be the impossible dream ...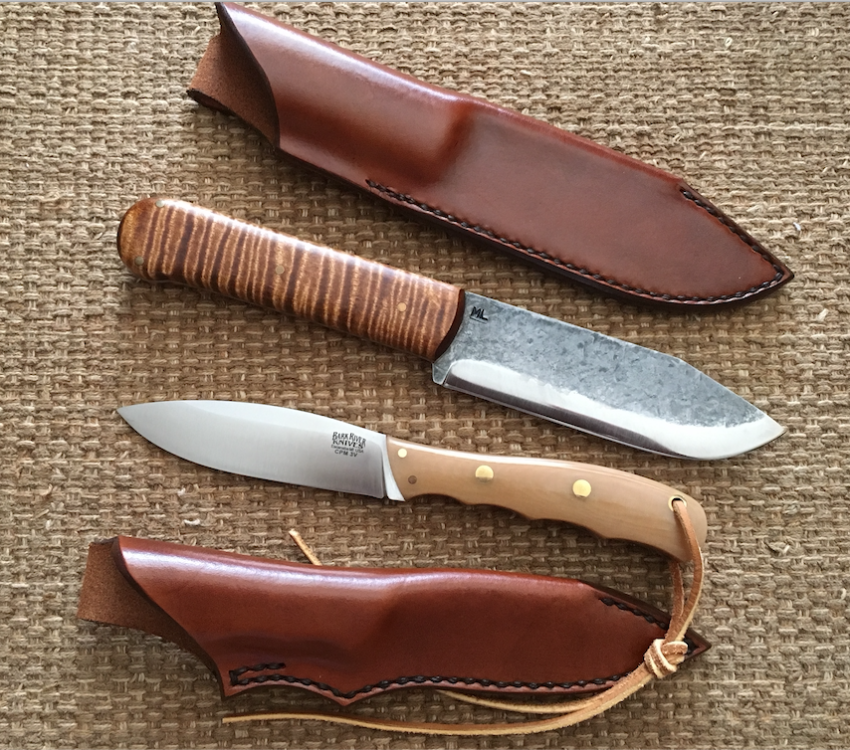
-
I am curious if anyone has a novel approach to finishing a stitch line. I do knife sheaths and gun holsters and have never been happy with my final two or three stitches being backstitched to lock down the thread end. It always looks bulkier in that one spot and attracts my OCD eye every time I look at it. My understanding is that even with nylon thread, where you'd simply melt the thread ends, most people backstitch one or two holes to lock it down. Is there a better way? Some sort of internal knot in the last hole maybe (though my experience is nylon knots tend to come loose.) Any novel approaches I'm not aware of?
-
Sorry all, I want to clarify one thing - the thread I used on the welt area is linen, not cotton. Tandy waxed linen. I don't know why I was thinking cotton, I just knew it was natural, not nylon. I like the nylon since the ends melt nicely. But I can see use for both, for sure.
-
This is a small panel I just bought from Buckleguy of Wicket & Craig carving leather. Some weird black (dye) stains on it. I'm going to attempt sending back. This was my first time buying W&C leather but I get now what people mean when they mention W&C leather feels "spongy" to them, or soft. Very pliable - not sure if it would firm up enough after wet forming for holster use, but regardless, I don't want to spend hours working on a project wondering how bad those black spots will show.

-
Hi Al, I don't honestly know what this thread is - I picked it up at Tandy. There is a number on the label that says 1227-02, but I don't know what that means. To be on the safe side, on the belt loop, I double stitch (fully back stitch) so the belt loop can't tear apart from the holster (one would hope!) And yes, I do glue the welt before I stitch, but I punch my holes first. Reason being, I don't have a punch that will go all the way through all layers at once, but also because even if I did, I don't want the punch coming out on the back side in odd, unaligned places. so I punch holes in the outer shell where I want them, and then glue the welt to one side, punch all the way through it, and then waller out the holes just a bit on the back side of the welt so I have an easier time hitting those holes coming through the other side of the outer shell. I also use several needles as locator pins when I glue that opposing outer shell side down to the welt. Those help me make sure the thing doesn't twist too badly while I'm trying to press it down in the right spot. It's a kind of brain surgery!
-
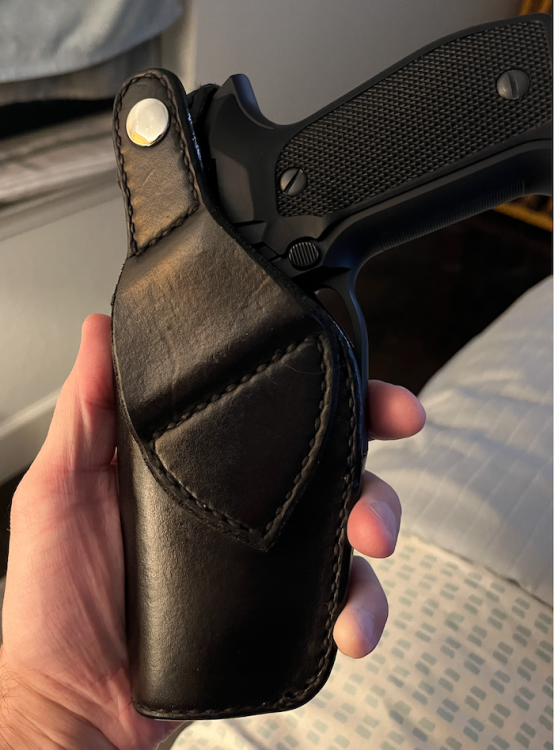
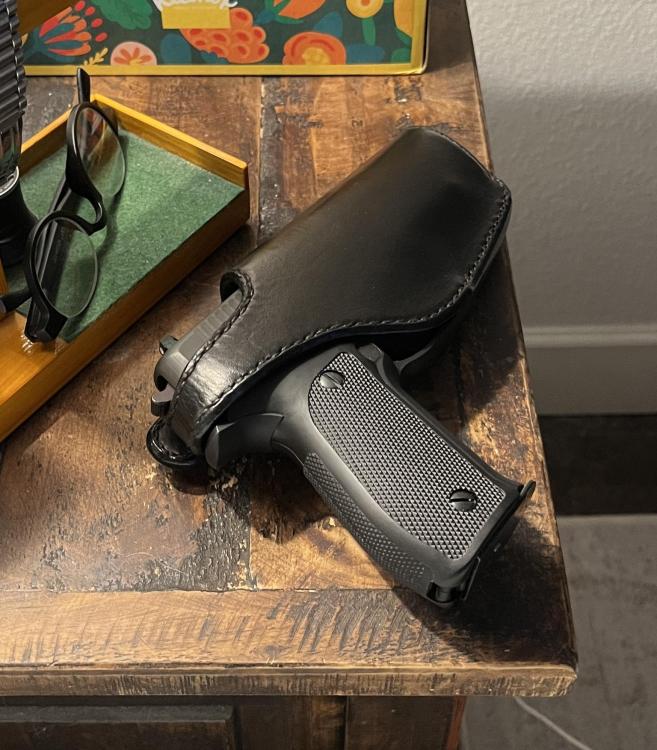
On a 1911 holster, if you're carrying "cocked and locked," that leather thumb strap really gives a feeling of safety, as the strap prevents the hammer from hitting the firing pin should the gun somehow try to fire. That's really the only way I'd be comfortable carrying cocked and locked.

-
Hi folks, I'm still pretty amateur and new to holster making (have more experience with knife sheaths), but here's holster #4 - made for my 1911 Commander model Colt. I wanted a lined holster, and decided to use thinner thread to somewhat approximate a factory machine stitched holster. I did switch to heavier cotton thread at the welt just for strength. This is the first time I've used a stitch groove and when combined with the thinner thread, it really laid them down! I have to say, the welt is the hardest part of these things - getting all my holes to line up is nothing short of engineering and prayer! Always thrilled and slightly amazed when it works. As for details - Tandy leather, 6/7 ounce. Some sort of thin liner leather I bought at Hobby Lobby. Sprayed the Fiebings Pro Dye English Bridle with a Preval sprayer. Edges painted with Fiebings edge coat foam tipped applicator. Then finished with Fiebings Leather Balm w/ Atom Wax. It's certainly not fancy, but I'm partial to really simple, smooth leather. I appreciate the artistry of tooling, but for my own taste, I just like a nice smooth leather finish. Thanks for a great forum! DeWayne The welt! Seven layers of leather - always a nail biter to see if holes will line up. What a joy it would be to use a machine and do it in about three seconds!

-
That is a simple, elegant work of art. Well done!
-
Beautiful work, especially the fish scale style tooling. I'm laughing at the notion of my local engineer wearing his caliper low slung on his hip, gunfighter style, ready to put any comer in his place with super accurate measurement of a critical dimension. Of course, he'd need a hammer thong fast-draw holster, not a traditional flap holster, for that purpose. Does paint a vivid mental image though! Again, beautiful work and craftsmanship!
-
Incidentally, that's the third gun holster I've made (I've made several knife sheaths though several years ago). But importantly, this was the first time I've done an interior lined holster and the first time I've ever mounted a snap in leather! SO much hand stitching to do a liner, I was cross eyed by the end. But I like a cross-draw holster, and simply couldn't' find one for this pistol in this configuration, so I had to try and make it myself, based on a factory holster I like, but which doesn't come in cross-draw. I reverse engineered the pattern from the factory holster and designed my own cross-draw belt loop. But I seriously worried about the dimensions of the pattern I was tracing off a 3-dimensional holster, and how much thicker the leather would be when the liner was attached. I just didn't fully believe that: A) the gun would fit in the holster, and B) that the thumb snap would fit together correctly. I was holding my breath until the bitter end. Anyway, I was kind of amazed everything worked out ... but this one makes me seriously consider getting a leather sewing machine!
-
Thank you. I think I'll be alright. I wore the holster tonight while wearing jeans and didn't see any noticeable rub off on the jeans, and realistically, that's all I'd ever be wearing this holster with anyway. So I'm going to call it good. But patience is a running battle for me!
-
Hi folks. Quick question. I recently made a gun holster and dyed it English Bridle, but I had some weird water stains when wet forming and they never would go away. So, I decided to salvage the project by re-dying the holster black. So, I stripped off the coat of Kiwi Shoe Polish I had on the holster using rubbing alcohol, and then dauber dyed Fiebings Pro Dye Black. Looked really good, and I laid the dye on fairly heavily - a couple coats at least. In parallel, I wanted to try out a new top coat besides my usual brown shoe polish, so I bought some Fiebings Leather Balm with Atom Wax. Now, I was pretty sure I needed to wait 24 hours for my dye to fully dry, but I am a terribly impatient sort! So, after five hours, with the holster feeling dry to the touch, I applied the LB+Atom Wax, burnished, and it looks really nice. However, the next day, I can get some traces of black if I burnish or rub cloth on the holster fairly firmly. I'm second guessing that I probably applied the finish too soon. Maybe not. But I'm wondering if I should strip with alcohol and let it air dry for a full 24 hours. Does anyone see any problems with this tactic? Or do you think my dye was probably dry enough after 5 hours? It's not like it's bleeding everywhere, but that said, I wouldn't want to wear it with a white linen suit either! Thanks all, DeWayne
-
First Post - Saddle Stitch Question.
DeWayne Hayes replied to DeWayne Hayes's topic in Leatherwork Conversation
Thanks for the compliment. I think I learned watching videos too. I use a lightly scribed line to lay out my stitching line and then use a pricking fork to make my holes. That's about it - the front looks good, the back is not near as straight though, as is sometimes the case with hand stitching. DeWayne In regard to my initial problem though, I've just changed over to brown linen thread. That way I can stitch, wet mold, then airbrush my dye and it doesn't change the color of the thread. I just quit trying to have white on brown and embraced brown on brown. One added benefit I've found from stitching BEFORE wet molding to the knife is that when the sheath is wetted, the leather expands and really snugs up around the stitching, which looks good to me (others may not care for it.) DeWayne -
Hi all, this is my first post. In fact, I've only been into the leatherwork hobby for a couple weeks, inspired by my desire to make my own knife sheaths. I'm attaching a picture to help explain my problem. These are the first couple of sheaths I've made, one for a pocket knife (just to protect it in the pocket) and one for my old Marbles Woodcraft knife. Both are made from Veg-tan (3-4 oz and 5-6 oz respectively). Both were dyed with Fiebings saddle tan oil dye (the pocket sheath by dauber, the larger sheath by airbrush). And both are stitched with Tandy waxed linen thread, by hand. On the pocket sheath, the stitching stayed pretty well nice and white/natural. But on the larger sheath it turned a funky sort of olive drab. It's as though the wax is really dirty. I can assure you it was clean when I started. Strangely, if I move a stitch around with my fingernail, it will become a little whiter as the caked up was rearranges, but it's still left looking pretty soiled. Can anyone explain what I'm doing wrong? I did stitch the sheath the same day as I dyed it - I probably waited a couple hours. But the dye seemed dry to me - thinly applied as it was with an airbrush. You think it's the dye staining the wax? I'd like to have nice white stitching in contrast against the leather color. I'm ready to try poly or nylon, I'm not married to linen, it's just the first thing I got to try. But I need help before I just repeat this same mistake again. Thanks for any advice you can give. DeWayne http://s19.photobucket.com/user/sonvolt/media/IMG_1411_zpsyuhokbnl.jpg.html?filters[user]=7464691&filters[recent]=1&sort=1&o=0