Christopher
-
Posts
15 -
Joined
-
Last visited
Christopher's Achievements
Member (2/4)
-
Buck knife sheath
Christopher replied to Christopher's topic in Gun Holsters, Rifle Slings and Knife Sheathes
Thanks guys! That's the first 2 toner I've done that came out right...lol That black was fun to make. I ran out of straight black a few months ago, so I've been mixing my own with the eco-flo dyes. -
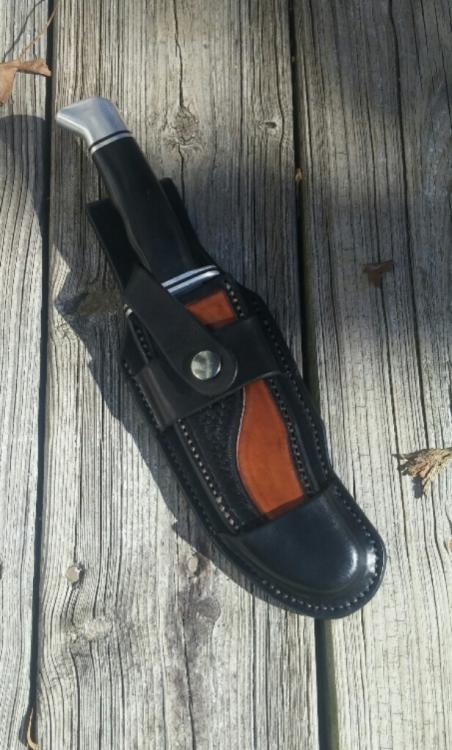
Had a guy at work ask me to make a sheath for his Buck knife. He wanted it to do two things: be a belt hanger, and slip into his pocket. He also asked that the secure snap be removable. I didn't see where that would be safe, so I came up with this modular design compromise! The insert acts as a friction sheath when removed and put in a pocket or in the waistband.


-
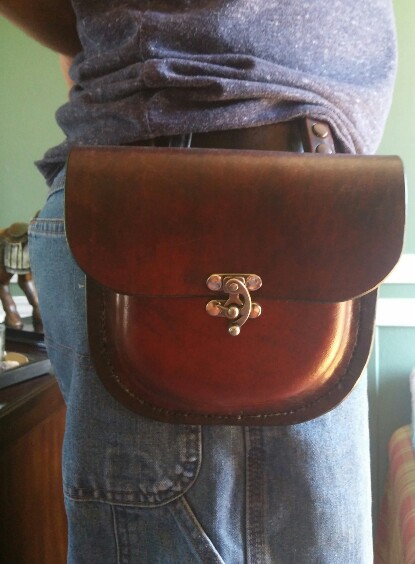
Small Satchel we made.
Christopher replied to venator's topic in Purses, Wallets, Belts and Miscellaneous Pocket Items
Nicely done! -
Thanks venator
-
Following a nifty tutorial found in here, and supplemented by a video on YouTube....I made my first possibles bag!!!

-
New guy trying new things
Christopher replied to Christopher's topic in Gun Holsters, Rifle Slings and Knife Sheathes
Thanks for weighing in Dwight....nice to meet you. At first, I didn't follow what you described, after you added the picture, then I understood what you were saying. I like this idea...it makes sense to me -
New guy to forum
Christopher replied to Christopher's topic in Purses, Wallets, Belts and Miscellaneous Pocket Items
Roxboro area -
New guy trying new things
Christopher replied to Christopher's topic in Gun Holsters, Rifle Slings and Knife Sheathes
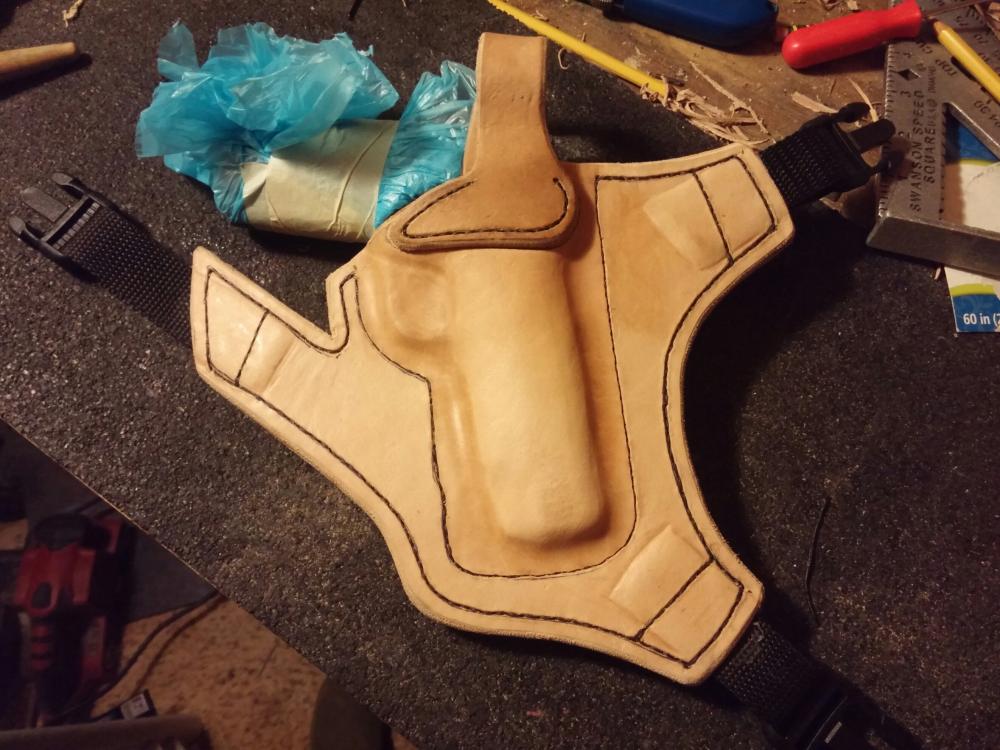
Joon1911, Wonderful advice that I absolutely will take. Thank you for the website...I will be checking that out asap!! To answer the question about that sharp angle cut, the application of this holster is for a chest rig, so that leg is the one that extends around the body to meet the one opposite on the right side of the pic. The reason for this design....I recently saw some chest rigs, one in particular...the guide's choice...I liked, especially where it has the quick release parachute buckle. The one thing that I didn't like was that it was a foldover mated to a panel that then had the harness connected. That's when I thought....maybe a pancake design could work, and with a thumb break, instead of the long front strap they used, to facilitate both retention and quicker draw....plus the pancake could possibly make it easier to be ambidextrous/reversible so one holster works for either hand (saving customers $$$.... :-) ) Also, using quick release parachute clips...customers only have to buy one harness instead of a new rig for each gun. This way...they buy one harness, then just the holster for any additional pistol...1911, k frame, xd, etc. -
New guy trying new things
Christopher replied to Christopher's topic in Gun Holsters, Rifle Slings and Knife Sheathes
True....and since it's a prototype, this is the time to work out the kinks -
New guy trying new things
Christopher replied to Christopher's topic in Gun Holsters, Rifle Slings and Knife Sheathes
Hiya Toney... I am seriously considering adding that extra stitch. -
New guy trying new things
Christopher replied to Christopher's topic in Gun Holsters, Rifle Slings and Knife Sheathes
Agreed, Marty. So my question is: how best to calculate where those stitch lines should be in relation to actual gun placement? -
New guy to forum
Christopher posted a topic in Purses, Wallets, Belts and Miscellaneous Pocket Items
Hi folks!!! I'm Christopher, and I am just starting my home leather business. I mainly make journals, but adding holsters and sheaths to my repetoire.

-
New guy trying new things
Christopher replied to Christopher's topic in Gun Holsters, Rifle Slings and Knife Sheathes
Thanks Tugadude I do like the recessed threads look. As far as wear and tear, for this design and application, I think it's more for retention as this is a chest rig design. But I get what you are saying the flatter the stitch, the more tension in the thread, equals more possibility of thread snap and unraveling. -
New guy trying new things
Christopher replied to Christopher's topic in Gun Holsters, Rifle Slings and Knife Sheathes
I did mark the lines before moulding. Nearly everything I have read, and watched, have plotted the stitch lines before moulding, when drawing the pattern. -
Hi folks! I just joined a few days ago, and have been reading threads here and there, trying to gleen what I can, and learn how to make quality holsters. So, I'm working on a modified pancake design...this is the prototype....I'm using 8/9oz veg tan. I can already see one problem I have and that is...gauging where to place my see lines. In the pic, you can see where the stitch is far off the molding, which would make this holster pretty darn loose. I also tend to over groove, I see. The pattern is my own design, with influences from all over. Any advice you can give me to help better plan a good holster? How better to calculate where to plot stitch lines? For this one, I measured the width of the slide, divided by half, and added 1/8th inch (taking the advice from another leather worker as they also added the 1/8th) though it seems my calculations were a bit off... I added the snap straps for security, of course. But any advice on making this better...taking it from prototype to production...would be greatly appreciated Thank you!! And...I love this place!!!