


JeannieH
-
Content Count
260 -
Joined
-
Last visited
Posts posted by JeannieH
-
-
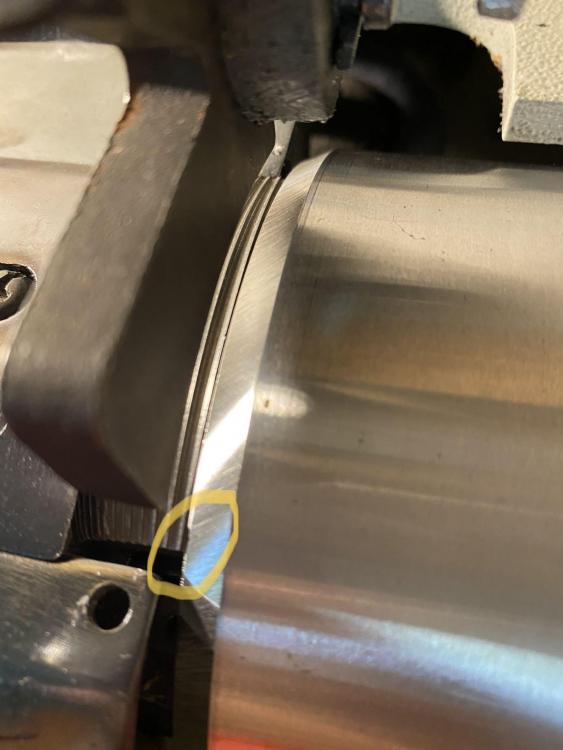
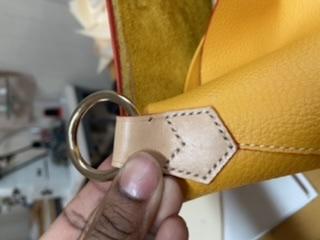
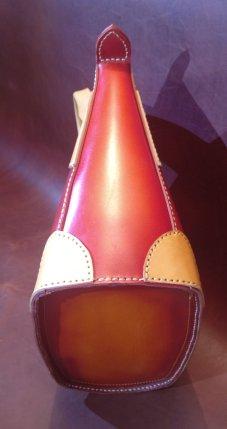
Hi. So I nicked my blade when I was removing the burrs with my stick for the skiving machine. Do I need to buy another blade? I’ve tried sharpening theee times but the gauge is still there.
-
On 8/13/2021 at 4:41 PM, Arturomex said:Here are some links to threads that might help regarding your questions, Jeannie. There's a lot of good stuff in Brian's posts.
https://leatherworker.net/forum/topic/86653-help-a-guy-out-with-his-new-skiving-machine/page/4/
https://leatherworker.net/forum/topic/76603-skiving-machine-independent-feed-mod/
https://leatherworker.net/forum/topic/79422-attaching-shop-vac-to-bell-skiver/
Your post has me thinking that I'd now like to set up some kind of vacuum system on my skiver. But I'd really like to see how the units with the built in vacuum are configured "out of the box" and think about reverse engineering from there before I start getting too creative and spending money.
Regards,
Arturo
Ok thank you!
-
4 hours ago, jimi said:Installed....you should be able to see it from the left side without taking anything apart.
Ok yes it’s in there. How do I know if it’s adjusted correctly?
-
13 hours ago, JeannieH said:Ok thank you I will check that out!
I assume I do. I haven’t taken anything off other than the front shield that plate that covers the blade some.
By on do you mean on like not turned off..or installed on the machine? Im
-
On 8/9/2021 at 11:56 AM, kgg said:Yes, they do make skiving tables with a vacuum system. Essentially the exhaust for the waste material which normal falls down a chute is replaced with a tube that a exhaust vacuum removes the waste material into a container or bag. I think installing a exhaust fan something like a high CFM inline hot air duct fan connected to a 4" tube would probably work just a well but a lot quieter then a vacuum cleaner or shop vac.
Something like " https://www.amazon.ca/VIVOSUN-Inline-Booster-Extreme-Grounded/dp/B01C82SYZ0/ref=sr_1_6?dchild=1&keywords=Inline+Duct+Fan&qid=1628524596&sr=8-6 "
kgg
Ok thank you I will check that out!
On 8/9/2021 at 1:28 PM, jimi said:Do you have the scraper on??
I assume I do. I haven’t taken anything off other than the front shield that plate that covers the blade some.
-
Hello! Do they sell vacuum systems for skiving machines that you can add…or should I try making one with a shop vac or something lol? My leather (soft chrome tanned…Remy)is coming back up on my stone roller. I just bought a steel one yesterday and I did try aussie’s suggestion of putting talcum powder on a piece of leather and running it through. I want a permanent fix though because this is utterly annoying lol!
also, how can I get my roller and bell blade on separate motors diy?
thanks!!
-
On 2/25/2021 at 3:55 PM, SeattleGarth said:You wont like starbond then; stinky as they get. SB950 is a Chloeoprene rubber based adhesive which works really well. The problem is getting it into the US. Its almost impossible these days. However, as Renia Colla De Cologne contact cement is probably just as good, and readily available in the US. Super stinky with a similar pot life. These adhesives flash off quickly once exposed to UV and air.. I've tried MANY brands of adhesive including water based... I always go back to the stinky stuff.. One trick I used to use with WeldWood - I'd leave the cap off of the bottle and stir it up a bit every so often. Once it gets a little thicker it behaves similarly to SB950.
Ok thank you!
On 3/22/2021 at 12:06 PM, Ole South said:Way cheaper than anywhere else I've found it. Widths up 1/4, 1/2, 3/4 & 1" ZERO odor. Just hammer it down before stitching... it will hold (light duty) without stitch.
Thanks for that info! I will check it out!
-
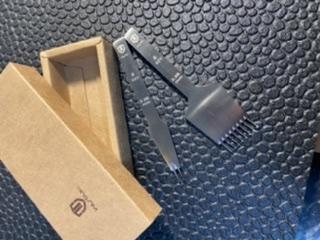
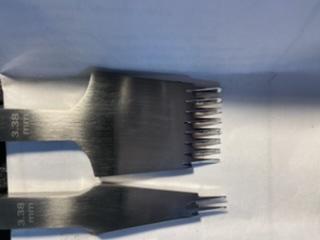
Hi. I purchased these pricking irons when I first started leather working. I have used them no more than 10 times. They are in like new condition. I just don’t use them. I was doing a project where I wanted my hand stitching to look straight like my machine stitch. I believe the reverse are used for pricking the underside of thick leather also. The set is a 2 tooth and 8 tooth. I also have another wuta reverse 8 tooth I will include. Wuta sent me a replacement 8 tooth because the first one wasn’t sharp enough to my liking. I’m sure it could be honed or something or work just fine for someone else.
$80 free shipping for the 2 tooth and two 8 tooth pricking irons. I would send a business PayPal invoice for payment.

-
19 minutes ago, Matt S said:TBH, I think that Aquilim as about as good as it gets with water-based contact cements. As you've found there are many applications where it's not suitable, and if there were some way of making a water-based glue that works as well as the high-VOC glues, Renia would be all over that like a rash. Simply put, the "nastier" the solvents the more effective it is as a glue. If you don't need such a powerful glue you might be able to find one locally with reduced fumes. Try DIY/hardware stores.
If you like it (apart form the fumes) you may be better off finding new ways to deal with the fumes of the Barge stuff. I work with high-VOC glues in enclosed spaces a lot and find that simple measures improve things massively. The biggest single one was fitting a small extractor fan (like you'd get in a kitchen or bathroom) in the window behind my workbench. I wear a 3M respirator rated for organic solvents when using larger quantities, close the glue/solvent pot ASAP, and force myself to take regular breaks in the fresh air. If the weather were more reliable where I live I would have an outdoor glue bench for maximum ventilation. Even with the ventilation the fumes are still noticeable and I'm working from a dedicated workshop rather than my kitchen so how useful this advice is may vary depending on your situation but these measures let me use the super effective glues that I need for my business without much discomfort.Ok those are good things for me to try. I have a sewing room outside (shares a door with a bigger workshop/tool shed) and it’s an insulated room with two windows...about 500 sqft. Maybe I can rearrange things to have my glue station in front of the window and open it when glueing..maybe a table can to blow out may help. I will look for a mask for the fumes as well. The water based glue is not good at all for glueing reinforcement to the base. Thanks for your suggestions and I will give them a try.
47 minutes ago, Hockeymender said:Just a guess, but I’m thinking it may well be cost prohibitive to bring any of that over, even if they could/would sell it to you. I bring material over from Korea and that is very pricy. A flammable liquid would be more so I’m sure.
Yes you are more than likely right. I will just have to work with what’s available here then.
-
13 minutes ago, DJole said:Hopefully they can find somebody in the company who is comfortable enough in English to correspond with you.
I suspect that they do very little business in the English speaking world.Ok yes I didn’t think about that. Well what would you guys suggest as next best? Right now I use Renia aquilim for holding parts together on the body of my bags..and weld wood contact cement for flying the base..it’s so stinky and I’m trying to replace it because I want to breathe freely while gluing and not getting high!
-
2 hours ago, Arturomex said:There's been lots of talk about glues here on the forums but I don't recall anyone ever discussing the Chilsung products.
I've seen these glues used in the YouTube videos and was also impressed with how easily it seems to spread. And I've wondered if it was an inherent characteristic of the glue or if it was simply thinned out to that consistency.
You've probably already seen this but here's a link to the manufacturer's website: http://www.starbond.co.kr/eng/product/product_list.php?part=1
If you go to this link, you could send them an inquiry to see where it's available: http://www.starbond.co.kr/eng/customer/inquiry.php
Please, keep us posted with what you learn.
Regards,
Arturo
Thank you. I did come across their website and emailed but never got a response. I will try again and update of I hear back from someone.
-
Hi! I’ve been hunting for this Korean glue that I see used overseas. It isn’t sold online. Are there any Korean leather workers on here that can help me out? Or anyone else that knows the product!
its called star bond 950(yellow one) and star bond b5(beige one).
it looks so easy to spread from what I’ve sent and the consistency is very nice looking.
-
14 hours ago, Bigfoote said:Start in the middle, between the two layers, leave a tag end about two inches, go through one layer to come out one side, two or three rounds through both layers, end up coming out in the middle between the layers, then continue over to the opposite side, come out one side or the other, go around two or three times through both layers, and end up coming out in the middle between both layers. Take the end of your thread and make a reef knot with the tag you left when you started. The knot will be hidden between the two layers and as long as you tie a good knot will never come undone or be seen. Done with one needle, hope this helps.
Ok thank you I will give that a try!
-
2 hours ago, jcuk said:Is it lined
Yes but I haven’t sewed the lining in yet. See..I have to have enough clearance from the outer foot when I sew the top of the bag for the lining..so if I stitch the holder onto the outside of the bag..I won’t be able to move the holder out the way of the outer foot when I come around to that part.
-
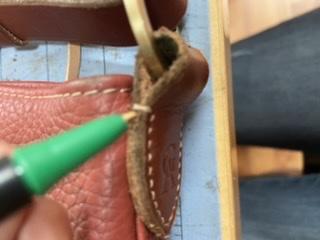
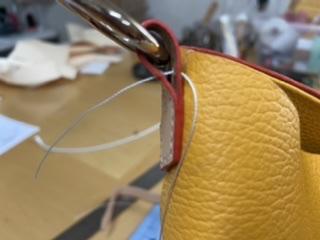
The piece is already saddle stitched onto the bag. I’m just trying to close up the opening some so that you can’t see the reinforcement I have in the middle. So there is only one hole..I wouldn’t be able to back stitch it. I will attach better pics of what I’m trying to do.
so I didn’t go all the way up with the saddle stitch to the area I’m Ryun to close up. The first pic shows what I’m trying to do..but with just the stitch on the ring holder and not going through the holder and the bag...
I use vinymo #5 MBT thread for stitching
-
I’m not sure what terms to use to explain but how do I stitch a single hole to reinforce sides of my ring holder? Do I use one needle or two? I’ve tried both but I’m still able to unravel thread so I’m not stitching it so that thread is knotting or locking right.
-
5 hours ago, Rahere said:Let's try it this way, looking from the front.
= 5 =
= 4 =
= 3 =
= 2 =
= 1 =Push one end of the lace through each of the slots marked 2.
Bring both back to the front through the slots marked 1, without crossing, straight down, left through left, right through right.
Push the end on the RIGHT through the LEFT slot marked 3.
Push the other end (the lower of the two on the LEFT) through the RIGHT slot marked 3. The laces have crossed sides.
Bring both back to the front through the slots marked 2, without crossing, straight down.Continue, going up 2 rows each time and crossing the same every time on the front, down one row on the back, never crossing.
So 2-1, 1X3, 3-2, 2X4, 4-3, 3X5, 5-4, 4X6...alternately back-front-back-front, where "X" has the laces cross sides, always going forwards 2 rows on the front, and "-" has the laces keep to their same side, always 1 row backwards, on the back.
Ok just saw your response! I will try that in the morning! Thank you for taking the time to explain it differently to me!
-
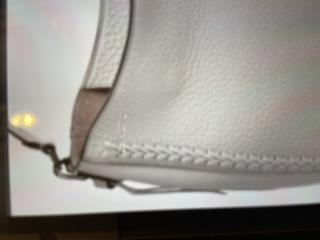
17 hours ago, JeannieH said:Here is a better picture. The bag has the name whip stitch in it. I don’t have the bag it’s an image off the Internet.

Thanks. That does look similar! I will take a better look so I can try it.
Looks like this will do it for me. Thanks for you guys helping me. Looks like I need to add lacing on my learning list because there are so many beautiful decorative techniques out there.
-
4 hours ago, Rahere said:The first pattern used a single end, burying the other. That produced the lopsided lace, because it has ro move up the work.
A balanced lace, by comparison, uses both ends. What you're looking at is the reverse of two parallel lines of backstitch, with the overlap turned into a decorative crossover. The underside is the normal front. If you were to use complementary colours, gluing the tails rather than crossing them at the start, you'd get a sine wave effect, I think.
Ok. I understand what you are saying but I still don’t understand how to do it lol! I understand that in the picture of the bag I attached..they used one lace instead of halving the lace and using two ends...and that the part shown is actually the backside of the type of lacing technique...right?
now..I need to figure out your instructions for doing it because I’m not completely understanding your wording for some reason.
-
8 hours ago, Rahere said:It's been worked from the bottom to the top, two lines of slits, Up Two Crossing RL before LR on the front, Down One Straight on the back.
1. Take a long length of lace, halve it, and insert it equally through the second holes from the end, from the front.
2. Run both tails back through the bottom slots just beneath.
3. Run the right tail through the next slot up on the left side, then the left likewise on the right side.
4. Repeat from step 2 until the tails are too short. Complete a step 3, then run them down as if to thread a step 2, but glue them down and trim short rather than running them through the holes.. Restart with a fresh lace from step 1, in the holes you just used to bury the tails, so the new lace hold the old tails down, then continue normally. An alternative would be to skive-join, gluing new lace on, but it's a recipe for a mess at your level, the crossing lace isn't visible as it's buried by the overlacing..
Ok! I will have to read what you typed a few times because right now it’s not clicking lol. If you find a video of someone doing what you are saying shoot me the link!
9 hours ago, LatigoAmigo said:In the drawing the lace looks a little on the narrow side. Wider lace might just give you the look you want.
Ok I will test it out.
-
Here is a better picture. The bag has the name whip stitch in it. I don’t have the bag it’s an image off the Internet.
1 hour ago, LatigoAmigo said:I'm not sure if this is exactly what you are looking for, but it might help you see what could be going on here. It is Bruce Grant's book "Encyclopedia of Rawhide and Leather Braiding." I've done this braid with punched holes, but straight cuts could work too, depending on the thickness of the lace. His drawings show oblong holes, so he has split the difference.

Thanks. That does look similar! I will take a better look so I can try it.
-
I want to do this type of lacing on my bag. But I cannot find a video with this specific look. Anyone out there can help me? I can’t tell if they used straight cuts or punched holes for this.
-
2 hours ago, toxo said:2.4mm veg tan. Here's a couple more pics.
Ok nice! I love the untreated leather!
-
3 hours ago, toxo said:I wasn't worried about an exact fit on this one. It's attached along the top with the zip. The rest can be pulled out for cleaning.
What leather did you use for the handle? Is it Vachetta?


Nicked my bowl blade in skiving machine
in How Do I Do That?
Posted · Report reply
Lol ok thanks!