


HardenGoods
-
Content Count
57 -
Joined
-
Last visited
Posts posted by HardenGoods
-
-
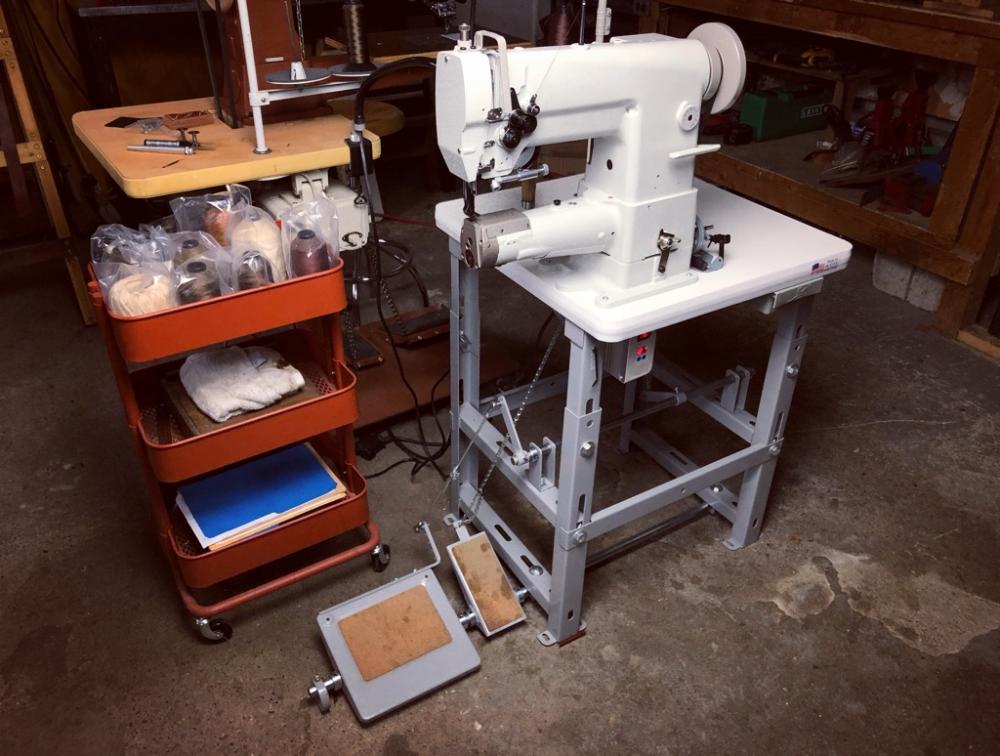
This is nice!
-
4 hours ago, alpha2 said:Well, it was a great picture, so you nailed it! Thanks!
Thanks man!!
-
21 hours ago, DonInReno said:The downside to trying to find an all around machine is that it’s not great at either extreme and no one machine can do it all.
So true and I learned this the hard way. I purchased a Cobra class 4 and it works beautifully (to say the least!! its amazing) on medium to thick material but when I took the time to dumb down my machine for lighter weight stuff, it never worked like I wanted it to. Someone on here had said something along the lines of "you are trying to use a sledgehammer to crack a nut".
It was those words that got me looking for another machine to cover the thin(ish) to medium range of leather. Thats when I purchased a Juki 341 clone which is extremely similar to the Cobra Class 26. Although I had a few minor run-ins with my machine, I couldn't be happier with the two machine setup I have now. My two cents is to buy the machine that will cover the majority of the work you do first, and then a second to follow.
On 2018-10-08 at 8:50 PM, Wizcrafts said:While a Cobra 26 can sew 1/4 inch of veg-tan leather, it only does so with #138 thread (or possibly 207 on top and 138 in the bobbin). Either way, that thread is inadequate for securing a weapon in a working holster. The reason is that #138 thread has a breaking strength of 22 pounds per stitch. It is easy to put more stress on the stitches holding a holster together than 22 pounds, especially during a struggle, or panic situation. Ideally, each stitch should have twice the strength, calling for #277 thread.
This is very, very useful information if knife sheaths are going to be made most often!
-
59 minutes ago, alpha2 said:I'm guessing the shop is a bit brighter in real life! My shop assistant has that same Kong toy, I put a Milk-bone in it, keeps her busy for a while.
You got it - It totally is bright enough in person (photographer used a wide angle lens and some post effects). haha, my shop assistant seems to clean that kong out faster than I can fill it!
-
-
Just an update on my Koby 1-341. It is in fact a nice machine. I saved hundreds of dollars buying it from Chris and setting it up myself (although it sewed pretty well out of the box). The table is very low quality. As I was loading it into my truck, I mentioned to Chris that the k-legs were heavily warped. He quickly grabbed me another one. Upon setup, lots of the holes in the table were missing and or too big or too small for the hardware provided. Because the table was of such low quality, I just purchased a new one made by a company named Phillocraft and I'm extremely happy.
After setting up the machine, I noticed the felt pad was missing from the front of the machine head (and wasn't in the box), there was no machine stand peg for tilting the machine back and the Synchronizer adapter was warped and unusable. I called Chris up and he said I could come back to Toronto and grab the parts. I suggested he mail them because it was his mistake that they were left out... and he said no. He suggested that I have a friend pick them up and mail them to me if I didn't want to drive... strange but whatever.
Lastly, although the machine has the push button and some other corresponding parts, this machine doesn't come with a safety clutch. Although it may not be necessary, the included instruction and parts manual both show the safety clutch assembly in existence (not to mention all of the other 341 clones that include it). I assumed it was an assembly line mishap during manufacturing and phoned Chris to see why my machine didn't have one and he said "you don't need. Customers don't like". I told him that I was under the impression that it was included because he had told me before I bought it that it was literally a Juki 341 machine with a different name (I knew it was a clone). Chris went on to tell me that he doesn't have those parts and cant get them in because they won't fit my machine and there was nothing he could do. The information just seemed a little shifty at this point.
Just as a heads up to anyone purchasing from Japan Sewing:
- The machine is sold at a very good price point (at least it was to me) and if your brain can process mechanics, you are set.. but only if all parts are there
- Skip the table with zero hesitation
- Be prepared to drive back for parts
- There is no safety clutch on the machine and it, apparently, can not be obtained. If it could be, I'm sure I would be paying for it too... and I would have to pick it up.
- Be aware that not all of the information you receive from this company will be accurate.
-
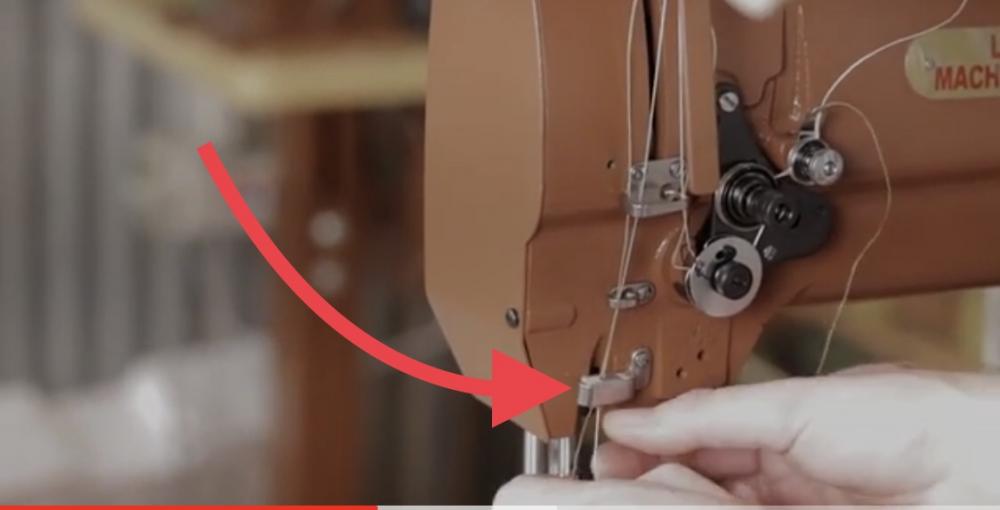
On 2018-10-08 at 8:12 AM, Uwe said:Can you elaborate on that? Your check spring does not move at all when the thread wraps around the hook now? What adjustments did you make to the tension unit?
Yea for sure. I experimented with various tension combinations between the upper tension disks/spring along with the bobbin case spring making sure that with each combination my knots were still in he middle of the material. I'm not exactly sure why this alleviated the jerk of the check spring to be honest but it did go away at the time of experimentation. I'm starting to wonder if the thickness of material in relation to the needle size could have something to do with it too - perhaps less needle hole space for the knot to be pulled in and inside of the material (requiring more upper tension) would cause a jerk before the knot finally gets pulled through the small needle hole and seats properly?
(side note: bought this aftermarket table made by Phillocraft which Is super solid. Guess I like it a lot because I learned on a pedestal machine.)
-
On 2018-10-05 at 11:33 PM, shoepatcher said:That spring is not working quite correctly in the video. The spring works twice when it is only supposed to work once. Watch the take up spring.
glenn
Thats what I thought!! Something didn't seem right with mine. Some adjustments to the tension unit and all is well.
-
On 2018-09-23 at 10:35 PM, 480volt said:Bruce Johnson has a Rose, a Gomph, a couple Osborne Newarks and an unmarked on his site, currently. Always been happy dealing with him
Me too!
-
2 minutes ago, Zesan said:Thanks for the tips, I do have a new hook assembly on it's way. The old one is pretty scratched up and worn. I was doing most everything else. I will have to check the feed dogs and foot pressure.The tension disc looked good and smooth. I may have to play with the threading tension on the bobbin as the tension knob for it is frozen. I got a new bobbin case.
Sounds like you are on the right path. After checking the above mentioned things, I always find it helpful to go through every single adjustment in the service manual separately and sew (without power, just by hand) right after each adjustment. A parts list layout may help you understand your machine better too because some of the parts are hard to see and reach (maybe someone provided this already, I haven’t read all of the previous posts).
-
12 hours ago, R8R said:I think I want to be buried with it.
Haha.. good sign.
-
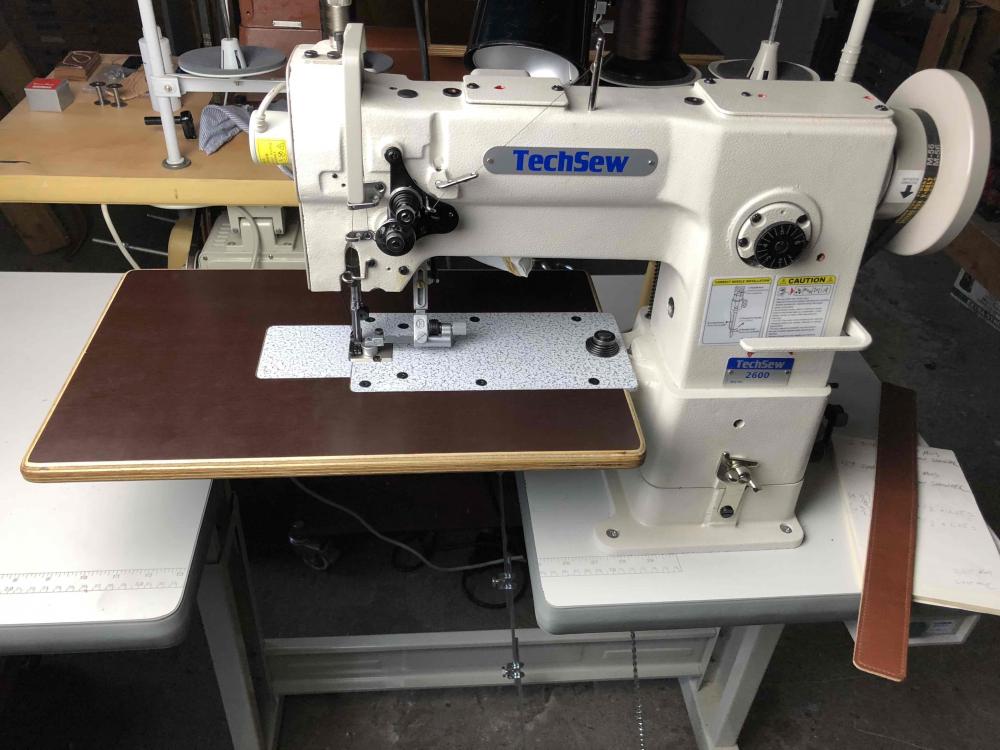
1 minute ago, R8R said:This will primarily be for binding operations with light leather and woven nylons. I could not justify dropping $5k on a new Juki 246, as it's a pretty dated design. I definitely don't need the 2342 yet.
I considered going for a used 1341 and trying to track down their binding converter kit but it's back ordered, possibly forever as the 1341 is officially discontinued in the US. (per my local dealer)
So the 2600 seemed like the best choice, as it has a bit of a heavier edge over a 355 or similar machine. I really want the synched binding for tighter corners.
I think I saw that flat bed on eBay. I have the flatbed end of things covered with a 2810, but I will think about it.
It's a fantastic binding machine for sure - much versatility via attachments. It surprises me that the 1341 is out! The 341 definitely looks its age at this point lol.
A dedicated flatbed machine is of course, even better. How do you like the 2810? That machine looks so damn beautiful.
-
17 minutes ago, R8R said:Had? How did you like the machine? Can I ask why you don't have it anymore?
I'm going to start by saying there is a very good chance you won't have the issues I did. I really don't want to lessen your excitement and expectations of the 2600 by any means. Ron and Mike were both very professional and helpful in regards to my situation.
I had some small qualms with the roughness of the castings and paint job from the get go but it didn't bother me much because the machine was adjusted and timed to sew very well right off of the crate. My trouble came when I noticed my machine making strange grinding noises and would vibrate excessively. As soon as I noticed metal shavings/dust under the machine head (where the oil tray goes), I suspected deeper issues. Normally at this point I would dive in and make a thousand adjustments to get everything just right but the machine was brand new and I didn't feel satisfied for the price I paid... However, I did try changing out the belt, tried changing the motor (to two different servos I had) and double checked all settings via the engineers manual but couldn't narrow down why the machine made grinding noises. Basically, it sounded and felt very off.
I'm hoping your experience is a great one. Also, if you love the machine, I have a flatbed attachment for sale that I picked up from Uwe, and customized it to fit the 2600 perfectly.
-
I will post an ultra slow hand turned stitch on my machine tomorrow. I'm starting to think this is how it should be too. The check spring jerks in Al Bane's Cobra 26 video (341 clone) as well.
-
3 minutes ago, R8R said:I have a Techsew 2600 on order that should be here any time now. I hope their manual is better and not a Juki copy...
I had the 2600. The manual (at least the one I received) was indeed a copy of the Juki 246 manual.
-
Here is a quick video of the machine with the hook advanced to 7:30 (and the needle height adjusted to suit). The check spring still jerks slightly which just doesn't seem normal. I could be wrong though, I just thought the check spring was supposed to come into play after the thread made its way around the bobbin case and then rested again just as the needle was entering the material. I can adjust the range of motion of the check spring to barely move but it still takes a load before it is supposed to.
I could advance the hook even more but then the needle won't rise enough to create the thread loop it is supposed to.
-
16 hours ago, Uwe said:16 hours ago, Uwe said:The timing belt position and synchronization of top/bottom shaft mainly affects the timing of the feed movement, which is important, but really has nothing to do with how the thread wraps around the hook.
This does make good sense. My thought was from a little bit of a different angle. I was thinking that if the hook, needle bar and shaft were timed as per the book, my only option was to move the top shaft gear back a tooth to set the take-up lever behind a pace or two. This however, will likely have an effect on feed (maybe negligible, but even small adjustments seem to matter a great deal on machines).
16 hours ago, Uwe said:My Juki LS-341 also has two thread holes in the take-up lever (intended for double needle versions.) If your take-up lever has two holes, use the lower of the two holes. It may provide an extra millimeter of thread slack when it counts.
Thats the first thing I looked for as I know some double needle machines use the same take-up lever as single needle. I just have one hole. I also completely agree on the BDC rise figures not being 100% accurate. Its starting to make more sense that the book is more of a starting point really. Buttery smoothness as you say is exactly where I want to be. Also, the progression to an independent thread-around-hook mechanism seems very logical. Thanks for providing the diagrams, much appreciated.
16 hours ago, Uwe said:16 hours ago, Uwe said:Ideally, the check spring alone would provide a small amount of tension as the thread wraps around the hook.
Is the little bit of tension while the thread passes around the hook supposed to cause a slight jerk in the check spring before it rises? No snags on bobbin case opener or under throat plate at all. Maybe the slight bit of tension across the bobbin case I'm worried about is perfectly normal (just that the check spring jerking didn't seem right).
-
I've got a new Juki 341 clone and after printing out both the instruction manual and engineers guide, I fine tuned the entire machine. This machine was purchased from a dealer for a great price because it (the head) was sealed in the box straight from China. Yes, I could have purchased from Ali or another giant overseas but I wanted easy access to parts and accessories without the wait. I also went into this purchase knowing very well how much fun I would have learning every possible aspect of the machine and it has been incredible so far.
The only snag I've run into without being able to fully understand is the top to bottom shaft timing. When the top shaft brings the take-up lever to its highest position, the markings on the bottom shaft (line marking pointed at centre of shaft collar fastener) are where they should be and the belt is securely in place. The machine works well but I'm getting some snapping (not breaking) of thread across the face of the bobbin case. I'm fully aware that this is due to the fact that my take-up lever is ascending just a smidge too early. I'm also aware that I can change the check spring slide rest position to compensate (but this leaves the check spring travel very low which minimizes its use and tells me that the check spring isn't the root of the problem). I can also advance the timing of the hook so the thread wraps around the bobbin case before the take-up lever begins its ascent (and adjust the needle bar to suit) but this is also not getting to the root of the problem. Lastly, I can move the top shaft gear back one tooth on the belt to slightly set the point at which the take-up levers begins its upward travel, but it still doesn't seem like I should have to do this on a new machine.
I guess I'm wondering how this could be on a machine that is new with everything fine tuned and adjusted as per the manual. Oh, I've also confirmed that all adjustments and measurements that I've made are exactly the same in the manual that came with the machine as they are in the official Juki paperwork.
The machine sews fine when I make any of the three adjustments above but just trying to gain some more insight into the machine as I'm really having a great time learning what I can about it.
Thanks in advance for the help!
-
No longer for sale.
-
Good to know. Thanks guys
-
Hi all,
was just wondering if my 341 clone was supposed to come with a small felt pad that sits inside one of the thread guides. Video I saw on YouTube has one on the Cobra 26 so wasn’t sure. Could just try cutting a piece and inserting it but wanted to find out a little more info first.
thanks!
-
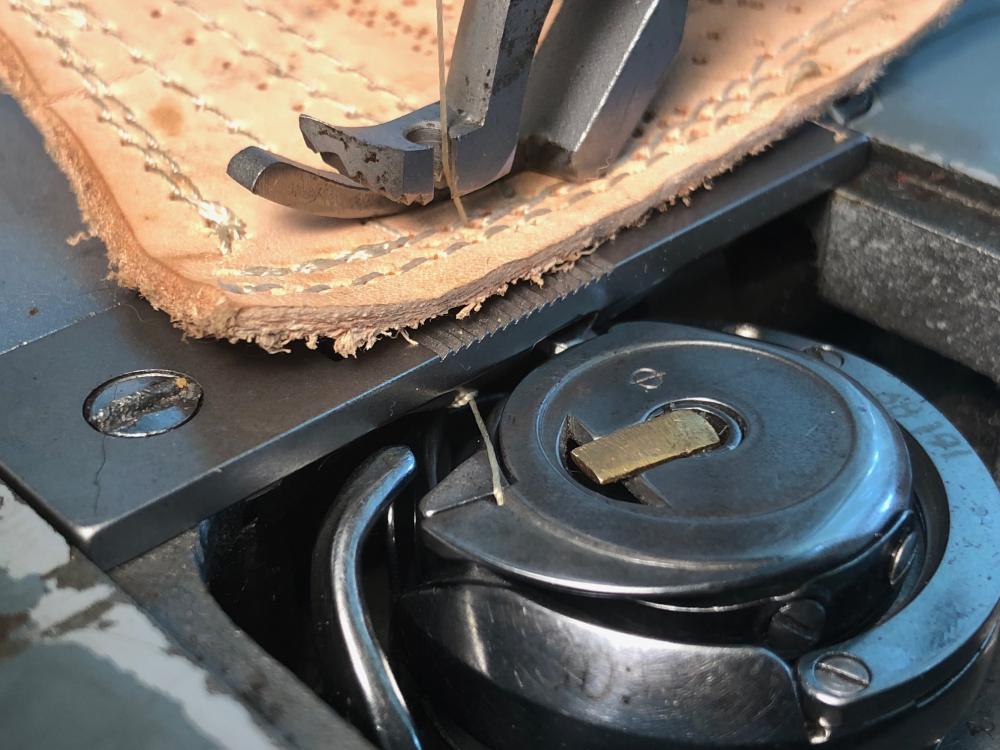
2 hours ago, Uwe said:Chances are it's not actually the throat plate's fault.
I've worked on machines that had multiple parts very worn and multiple adjustments made to compensate for that wear. When I install a new part that is to spec, things are suddenly too tight and all manner of problems manifest, setting off a cascade of adjustments and new parts.
Totally. And the fact that I have an extra throat plate to experiment with is a plus too. I’ve watched you Adler 67 video at least 50 times haha. That’s what started me down this path.
I remember installing a brand new hook and, as you said, everything was slightly off. Had to move the hook assembly over slightly to make room (which means someone had compensated for the wear before) with the two fasteners that were stuck in your video.
Going to pull out the mechanics manual and double check the proper distance between hook tip and needle.
-
1 hour ago, Uwe said:It looks like there's not enough of a gap between the hook and the throat plate. It's possible tolerances of aftermarket parts added up the wrong way. The hook is not original but I can't quite tell if the throat plate is.
Thanks for the photo! The throat plate in the photo Is aftermarket (KH) but I do have the original Adler and the problem persists. Going to put new hook in tomorrow to see if the distance between plate and hook is any different. I think you are right - will try the grind and super polish on the aftermarket plate to see if any change in result.
-
On 2018-08-13 at 6:33 PM, Uwe said:So that statement turned out to be not entirely true, only partially. I'll have to have a word with my fact checker . . .
It sounds like your hook timing is retarded, (hook arrives at the needle too late). I'd try advancing the hook timing a little and adjusting needle bar height to suit. Can you post a picture of the top of the hook when the needle is precisely at bottom dead center?
To my knowledge, there's no way to adjust the relative movement between needle bar and take-up lever on this machine. But I have a history of being wrong on occasion.
The movement of the hook has helped but the thread continues to get caught up on the edge of the throat plate as the knot is forming which then causes jerking in the check spring. Photo below.
I can also take another snap of the hook with needle at bottom dead centre if that helps!


Show your Shop
in All About Us and Off Topic
Posted · Report reply
Just saw this. Names Alden (after the boot company")