


gr8legs
-
Posts
10 -
Joined
-
Last visited
gr8legs's Achievements
Member (2/4)
-
The tip of the spout is pretty small so most oils don't evaporate away at all. The only thing so far that's leaked away is the carrier in "Dri-Slide" molybdenum disulfide lubricant. They're reusable several times but eventually the oil or solvent causes the plunger to swell and soften and become stubborn. At $.25 or so apiece it's no biggie. Stu
-
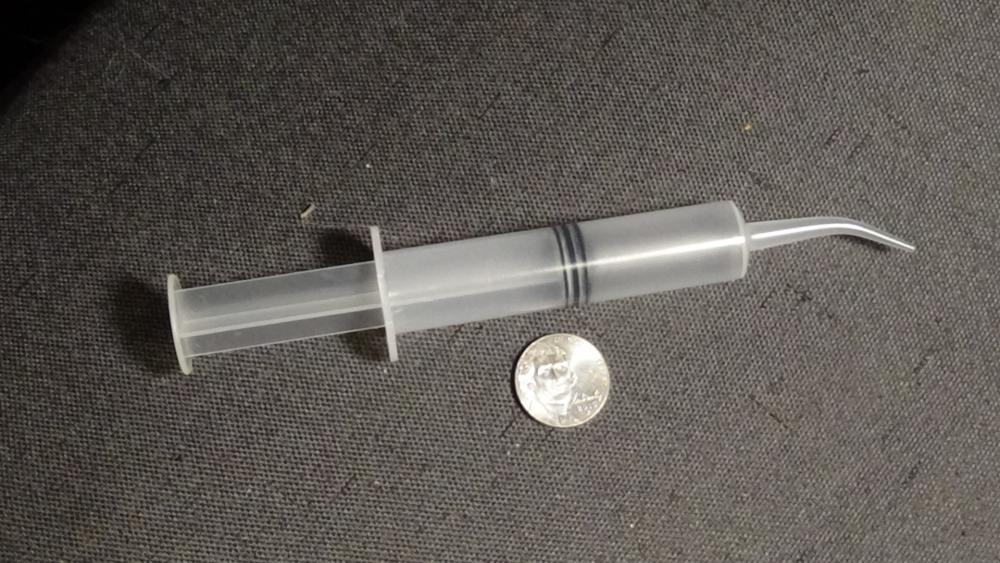
I've found a 'curved tip syringe" works very well for oiling and applying other chemistry in small amounts. Available on eBay for about 50 cents each if you get a box of 25 or 50 (lifetime supply?) They come in sizes from 5cc and up - 5cc is fine for most everything I do. Also puts down a very fine line of glue or cement. Disposable item and no metal needle to scratch paint or poke you. Stu
-
40W Chinese Laser - Engrave and Cut Leather - Discuss
gr8legs replied to Billy Hell's topic in 3D Printers and Lasers
Here's a copy of a post I did a couple of months ago on hobby-machinist.com about my K-40 Laser adventure. It may add a little bit to the discussion, or not. This isn't really a Project of the Day, it's more a Project of the last 5 Months that I'm finally getting around to writing a journal entry. Back in December my 'significant other' bought a new business to supplant her copy/print shop - and I subsequently found myself knee deep in making rubber stamps. As a bit of background, we made rubber stamps about a million years ago, setting hot type slugs on a Linotype machine (Rube Goldberg would be proud), pressing the type into uncured Bakelite and then heat curing it, then pressing unvulcanized rubber into the Bakelite and then heat curing the rubber and finally mounting the cured rubber with raised type onto wood mounts. A long and labor intensive process. The company she bought had slightly newer technology, exposing photo-sensitive polymer to UV light through a film negative and then washing away the un-cured polymer to make the 'stamp die'. Somewhat more efficient but still very labor intensive and process control was a nightmare. The latest wrinkle in stamp production is CNC laser burning sheet rubber (or polymer) to make the stamp dies in one step with minimal operator interaction. We knew this going into the business in the first place but suitable laser engravers are $10K and up and making a bad choice would not create domestic harmony. So, knowing nothing about lasers we bought a 'learner' cheapie system off one of the Asian eBay sellers of what is known as a 'generic K-40 laser engraver'. 40 watt claimed power, 5" x 8" workspace or so. Big enough to learn on. These things are listed eBay for $300 to $2,000 depending on the sophistication of the purchaser and the greed of the seller. As near as I could tell they are all identical, the only perceptible difference being a 'red case' or a 'blue case'. Picking a cheap one and ordering it was the easy part - find the price from a seller with not terrible feedback, place the order and then wait for the shipment to arrive. In due course (about 45 days) a giant box arrived with what looked like the pictured laser enclosed. Offloading it to the workshop to play with it was the next step. So, hook up the laser box, connect the water cooling unit (an aquarium pump) plug it in and turn it on. You could hear a couple of stepper motors whirring inside as the lens carriage searched for the 'home position' limit switches. Well, uh, why is the motor still whirring? A quick look into the guts revealed the X-Axis belt was lying in the bottom of the unit having pulled loose from its connection to the lens carriage somewhere between Hunan Province and Oregon. Grrr. Contacting the seller about the problem was the usual Chinese Fire Drill: "Send us a picture." Done. "Send us a video." Done "Send us a video of you singing the finale of The Mikado in Mandarin" (???) All steps designed to delay feedback and get past the warranty. (Warranty??? Ha Ha Ha!) So, since this was planned as a learning experience, I dove into the machine. It was obviously made of partially recycled tin cans and floor sweepings. My initial reluctance to take it apart was quickly replaced with an exercise in critiquing curious construction techniques. If there was a way to make something cheaply and poorly, these people had found it. Many parts looked hand-made, and not in a good way - but more on that later. As a production economy move the cog belt driving the mirror/lens carriage was about 2 cogs short of the actual required length to work - apparently held in place by a tiny drop of superglue that gave up the ghost in transit. And taking the carriage apart was made even more challenging by not having any way to access the screws holding it together. I 3D-printed a longer clamp for the cog belt so it had a chance of actually remaining connected to the carriage - and re-jiggered the end pulley so it was slightly more adjustable for tension - And of course getting to the belt clamp by working around the pillars that the carriage was mounted with was another challenge; you can almost but not quite get a screwdriver or nutdriver into the approximate vicinity. Three hands would almost be enough. Put it back together, powered it up and lo and behold - the motors whirred and the carriage found it's home! The unit came with a bootlegged copy of Corel Draw and some of the crappiest CNC driver software available. Although the label was in Chinese I am sure the brand was "Dumpster Software" and even that organization would not claim authorship except under extreme duress. They require and supply a 'dongle' to get the software to talk to the laser unit - what a joke - as if anyone would want to pirate this bit of excrement! These laser engravers work by having a laser tube mounted at the back of the machine, then one mirror at a 45 to get the beam into the work area, another 45 mirror on the Y-Axis carriage to send the beam to the lens carriage that moves along the X-Axis - and this carriage holds another 45 mirror and the lens so the beam is directed downward to the work piece. Theoretically these machines come pre-aligned to put laser energy into a small space and burn up whatever is there. Since I had removed / replaced / removed / replaced all the parts the factory alignment couldn't be verified - but hundreds of YouTube videos testify to the lack of factory alignment - so the next step was aligning the mirrors to get laser energy somewhere near where it would do some cutting. The videos were a great help. Since these are CO2 lasers and emit infrared energy it doesn't look like they're doing anything when you push the 'test' button. And I didn't really expect it to actually work so I was quite surprised when I put a piece of notebook paper into where the beam should be, pressed the button and a hole magically burned itself into the paper. Note to self: Do not look into laser with remaining eye. (Just kidding, but good advice nonetheless) After an hour or so of diligent futzing I got the mirrors aligned pretty well - at least well enough to burn holes in cardboard - which I considered a success. However, it was short lived for my purposes. These lasers have a fixed focus lens and no way to move the workpiece into the focal plane. We would definitely need a Z-Axis unit for fine detail in rubber stamp production. The supplied lens mount was a semi-triangular piece of tin-can sheet metal with a couple of holes in it. To get a tiny bit of Z-Axis movement in this unit I made a new lens holder that would adjustably clamp the mirror/lens unit and allow a tiny bit of vertical movement. Worked like a charm and allowed a lot of experimentation and education on laser engraving. So, after working on and off on this POS for several months and getting it functioning well enough to figure out what actual engraver specs we needed - I listed the K-40 on our local craigslist and found a buyer who wanted a project and was happy to have a semi-working K-40. Apparently these rarely work and my modifications were a 'plus' to the buyer. We purchased a very nice TroTec Laser (made in Austria) and we're happily turning out stamps with it. The K-40 is a dim memory. Hallelujah! I'm sorry I didn't take more pictures of the process. But it was definitely educational.

-
Newbie Progress Report - Servo & Speed Reducer
gr8legs replied to gr8legs's topic in Leather Sewing Machines
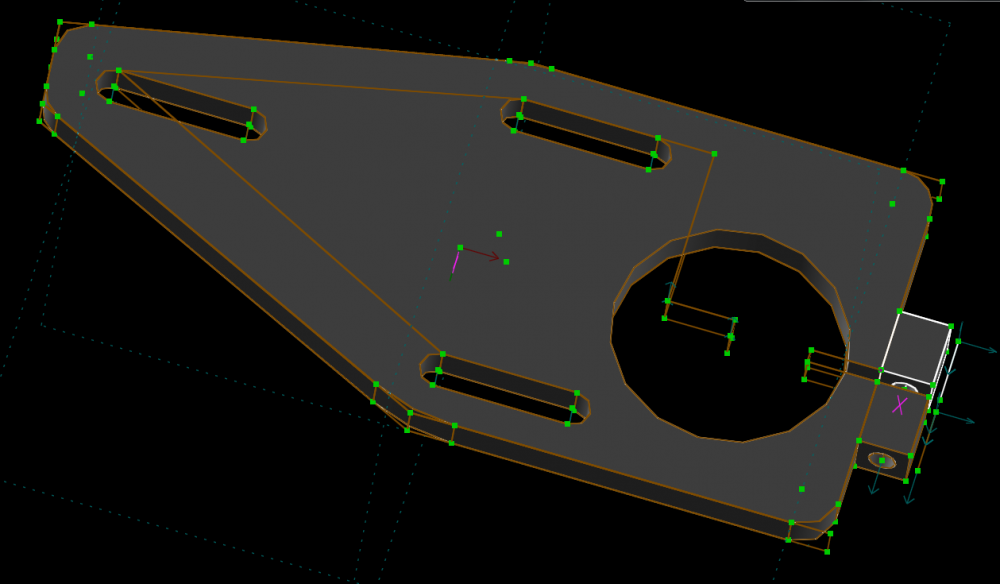
The STL files for both pulleys are attached - happy to share. Also, if you're looking for a freeware 3D cad program I use SolveSpace (www.solvespace.com) and am happy with it. It won't open STL files, if you'd like the SolveSpace source files let me know and I'll post them also. This was PLA material - not really the strongest and occasionally somewhat brittle and probably the easiest stuff to 3D print with - but hey, if I break one OK can just print a replacement, right? The large pulley web is 1/4" or so thick so there's lots of 'meat' on the bones. SewingBigPulley_4.stl SewingMotorPulley_4.stl -
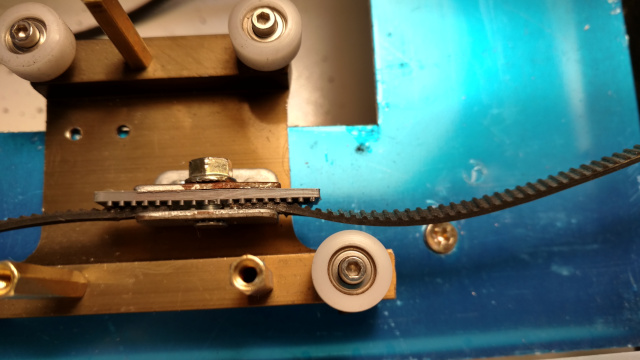
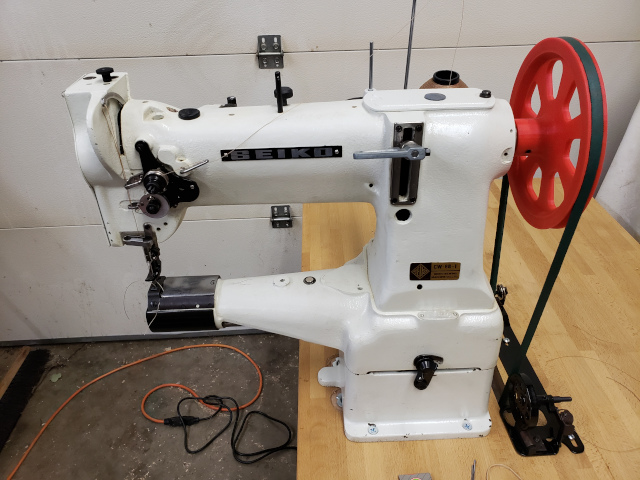
A while ago the 'Heavy Duty Sewing Bug" bit me (apparently there is no vaccine or anti-venom) and I started researching commercial duty sewing machines and haunting eBay and craigslist. Perusing these forums was / is very helpful and I now offer an interim progress report. 1: Found a Seiko CW-8B at a reasonable price. Bought a Family servo motor. Reading the posts here gave me the impression that these motors used a photocell and variable-density film segment for speed control. OK, I'm cool with that. More details later. 2: Purchased an Ikea rolling table at a yard sale for $20. Steel frame, big casters, I could sit on it and not splay the legs. Should support a sewing machine. I thought a speed reducer would be nice but not in the budget at the moment so postponed. Big box arrived with sewing machine head. UPS driver said I owed her a truss payment.Negotiations are ongoing. Smaller box with servo motor also arrived. Got all the pieces into the shop and played multi-dimensional Tetris figuring out how to make these pieces work together. Formulated a plan. Implemented the plan. Mostly worked but it became obvious that the servo motor wouldn't have enough 'oomph' at low speeds to be controllable. I was still too cheap to spring for a speed reducer - plus the physical setup was not amenable to adding one without a major re-design and re-work. I'm too lazy for that sort of shenanigans. Designed and 3D printed two new pulleys - a big one for the sewing head (7" is as big as I can 3D print) and a 1.5" for the servo motor shaft. Cool - works fine. Gives about a 4:1 speed reduction. Removed the brake pad from the motor so the big pulley (now it's officially a 'Handwheel") can be used for fine machine jogging. The original plan was to replace the photo detector speed control with a foot potentiometer. Great idea except the motors apparently now use a Hall Effect linear magnetic sensor device for speed control. Probably I can replace that with a pot but will need to research it a bit. Hindsight: should have gotten a 3-phase motor and VFD package from Dealer's Electric for about $170 and been done with it. But at least now, after Mickey Mousing a foot pedal to the speed control arm, I can sew a bit. Now on to machine tuning and timing.
-
That 12.76 mm sounds a lot like 1/2" plus a smidgen of schmutz on the calipers. . . . but if it's correct you might have an easier time getting an adjustable reamer to enlarge the hole in a 1/2" bore pulley instead of sleeving down a larger pulley . . . Of course it is entirely possible that I don't understand the problem. Stu
-
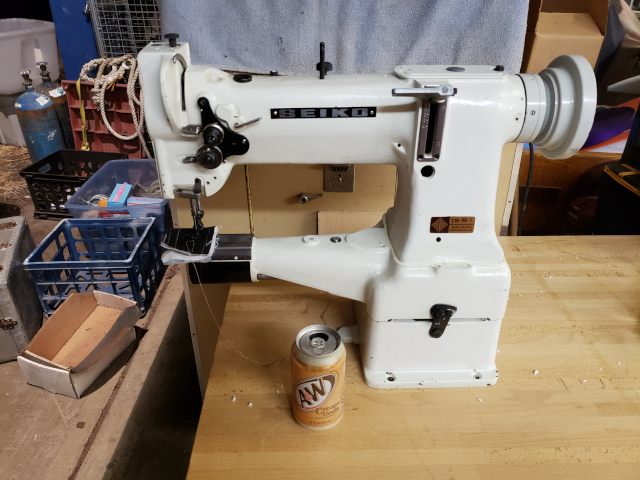
Seiko CW-8B (Consew 227R) "Oil Reservoir" and oiling?
gr8legs replied to gr8legs's topic in Leather Sewing Machines
Excellent, thank you - that answered my question Stu -
Hello all - I tried searching for this and came up empty - so We just got a 'new to us' Seiko CW-8B and reading the instruction manual there is a reference in one of the assembly drawings to an 'oil reservoir' and elsewhere the 'Lubrication Instructions' show you the myriad places to manually oil, but no reference to filling the 'oil reservoir'. Is this 'reservoir' actually just a 'drip pan' or do we need to put oil into it for some sort of splash lubrication that's undocumented? Thanks for any information! Stu
-
" I wonder if your 7th grade shop teacher was as muddled as mine was? At least he (Mr Burns) instilled a love of leatherwork in me. " It was a much different effect on me. I was in Junior High (grades 6-8) in 1960-62 and ours was a small school, maybe 80 kids per grade. MISS Hallock was THE shop teacher - from leathercraft to lapidary to wood shop, SHE taught it all and did it all. She also designed and built her own house and it was a marvel to behold. Truly a Renaissance woman. She may also have taught home economics but my memory is dim and also I did not take that course. It just wasn't done way back then. But 'muddled' was not in her character - and I still feel her influence when I think of stereotypical gender roles and how they just whooshed out the window with her influence. Thanks for the memories Stu
-
Hello all and thanks for a great site. I can't claim to be even a leather hobbyist - more like a 'hackerist' with an interest in many things mechanical. I stumbled (or Googled) into this site when I was interested in getting a sewing machine that would reliably stitch fabric webbing and a bit of leather from time to time. Our Singer 401 is a lovely machine but definitely not up to the tasks I had in mind. After studying the recommendations and conversation links on this site I found what looks like a pretty good cylinder arm machine at a decent price - so 'thanks all for your advice'! Long, long ago I did my first leather craft in Miss Hallock's seventh-grade shop class and my skill has only slightly improved since then. It was fun but I definitely could not make a living off of leather crafty work. It was a good thing I had more aptitude for electronics and software engineering. Now that I'm semi-retired (down to operating only three businesses) and still have a fascination with a variety of things it seemed like a good time to re-kindle a long dormant interest. Among my hobbies is collecting 'implements of human restraint' - my early interest in mechanical devices led to collecting handcuffs, leg irons, nippers, etc . . . which evolved into also collecting a few 'soft' restraints - many of which are either made entirely of leather & webbing or have significant leather content. Some of the items I find at local flea markets and garage sales (and, eBay of course) are a bit worn or otherwise in need of a bit of maintenance so I'm now studying this site for inspiration and instruction on doing some repairs. I hope it proves relaxing - I have enough stress already Thanks for reading - have fun! Stu

