-
Posts
13 -
Joined
-
Last visited
Profile Information
-
Location
Washington
-
Interests
Creating things in a variety of mediums. Computer science. Music.
LW Info
-
Leatherwork Specialty
None as yet
-
Interested in learning about
Everything
-
How did you find leatherworker.net?
the interwebz
Recent Profile Visitors
The recent visitors block is disabled and is not being shown to other users.
grep's Achievements

Member (2/4)
-

What is Mycelium Leather? Does it exist?
grep replied to RobertoDR69's topic in Leatherwork Conversation
Totally agree there--already way too many products being marketed as leather that really shouldn't be. I personally don't see it as a replacement for leather, but another option to have available. On the other hand, if the fast-fashion industry must continue, it might be preferable if they used materials like that. -

What is Mycelium Leather? Does it exist?
grep replied to RobertoDR69's topic in Leatherwork Conversation
Well, my understanding of mycelia is that it's really more of the structure that various fungi grow as. Mushroom leather has been made from different species. In addition to use as a leather alternative, mycelium is also being investigated as an architectural material, with promising results. Reportedly it's about as strong as deerskin and has coloring, texturing and patterning possibilities beyond that of animal skin. It is light, insulating and good against skin (particularly those with eczema), breathable and can be waterproofed. It's grown in bags on a sterilized substrate like any fungus (straw, wood chips, corn, etc). After a few weeks it's extracted, compressed and dried. During compression, before drying, dyes are added and textures are created (cow, gator, snake, etc). It can also be pressed into a desired form during this process if not left flat. Here's a place that sell some: https://lifematerials.eu/shop/muskin-cruelty-free-and-oil-free-vegan-leatherette/ I know folks like to poo-poo the vegans and environmentalists for cause, but I wouldn't be so quick to write off potential new materials. -
It's good practice to separate your registrar and hosting services. Maintaining these independently is one safeguard against being locked out of your domain or having it stolen. It also helps to avoid certain hassles that can occur if you ever have problems with your hosting service or wish to change providers. Personally, my experience with GoDaddy as a registrar has been okay -- not great -- though I'm still with them. I had an issue where I couldn't change DNS because their their 2FA was misbehaving. After they spent a week bungling the entries and giving me the run-around, they required that I disable 2FA in order to make changes specifically intended to be guarded by 2FA. Their support tech claimed this was normal, while I argued that was all nonsense--to no avail.
-

Reviving the STH-8BLD-3, or: Yet Another Speed Reducer
grep replied to grep's topic in Leather Sewing Machines
Indeed--sleepy me. As it turns out, they're not quite so inaccurate; the shaft is noticeably shy of 1/2" on every rule I own. Pretty sure they were too tight. Managed to find more of a sweet spot when I aligned for the larger pulley. New pulley arrived, very happy. Ended up making a new shaft, as I didn't like how well nothing stayed put on the first one. Since the new pulley has a single grub screw and keyway, I decided I'd go ahead and try making keyways for both pulleys, by hand, with a cutoff disk on a dremel. They didn't turn out super pretty--I'm sure the machinists are cringing--but they're the right size and nothing shifts. Also drilled divots for all the non-keyed grub screws, and remembered the loctite this time. That all seems to have done the trick. Now my machine happily creeps along right down to about half a stitch a second.- 9 replies
-
- speed reduction
- sth-8bld-3
-
(and 1 more)
Tagged with:
-

Reviving the STH-8BLD-3, or: Yet Another Speed Reducer
grep replied to grep's topic in Leather Sewing Machines
Curiosity got the best of me and I pulled the hand wheel to measure the shaft. Looks like ~12.48mm according to a micrometer and a dial caliper; however, both being from harbor-freight and converted from imperial, let's say 12.5mm. You're both correct, not a standard pulley bore size and the table slot would need extending. Ran a couple layers of rather stiff 8oz through comfortably at ~80spm--which is already much more controllable that it was. Then I saw how it starts to bog down if attempting to go much slower. Though the motor may be capable of running under 300rpm, I'll consider 300 the minimum speed to actually sew. I was able to source a 9" pulley for my reducer shaft; that'll arrive next week. According to my calculations, it should put my lowest useful speed at around 44spm--plenty for my needs. Will update later.- 9 replies
-
- speed reduction
- sth-8bld-3
-
(and 1 more)
Tagged with:
-

Reviving the STH-8BLD-3, or: Yet Another Speed Reducer
grep replied to grep's topic in Leather Sewing Machines
Thanks! I suspected that might be the case when I couldn't find the shaft diameter published anywhere. Wasn't too keen to remove mine just yet to get a micrometer on it. Will keep an eye out for an 8-10" pulley instead.- 9 replies
-
- speed reduction
- sth-8bld-3
-
(and 1 more)
Tagged with:
-
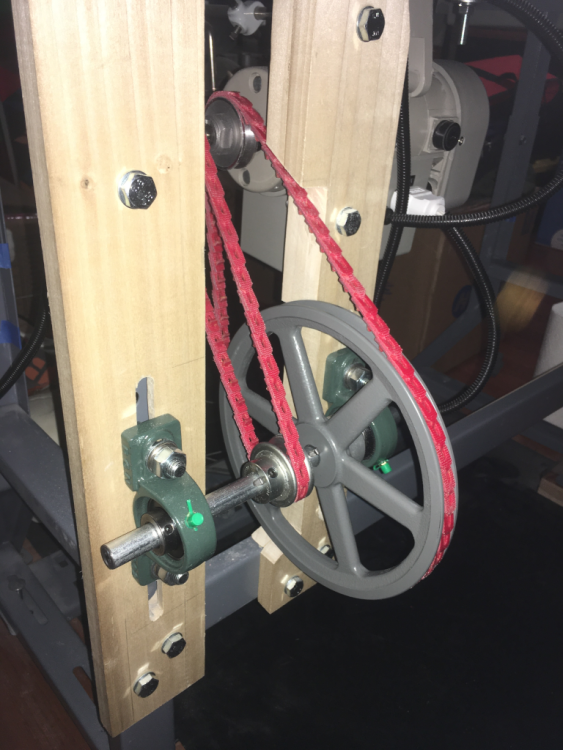
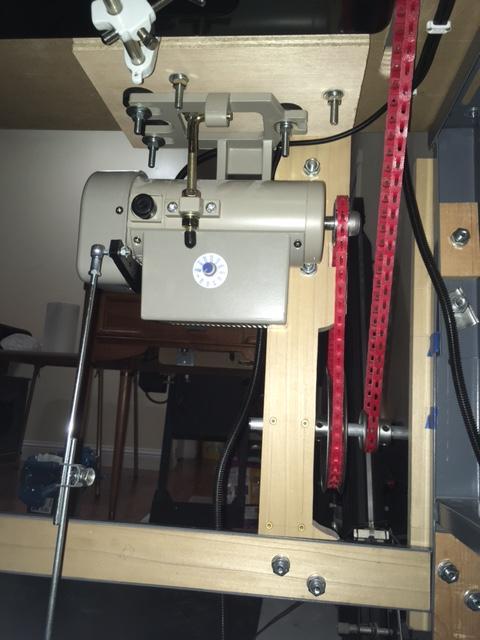
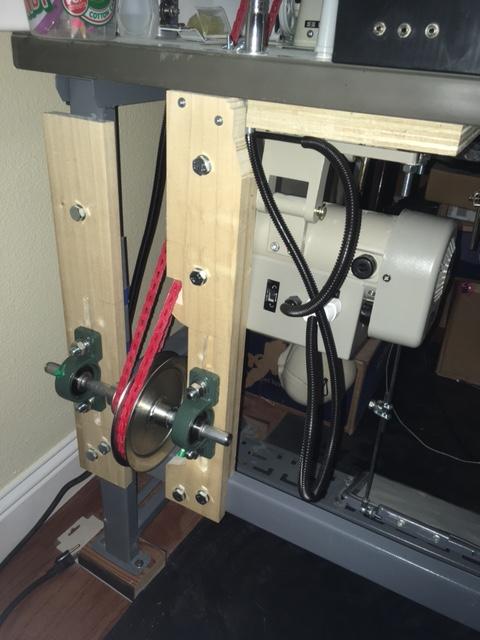
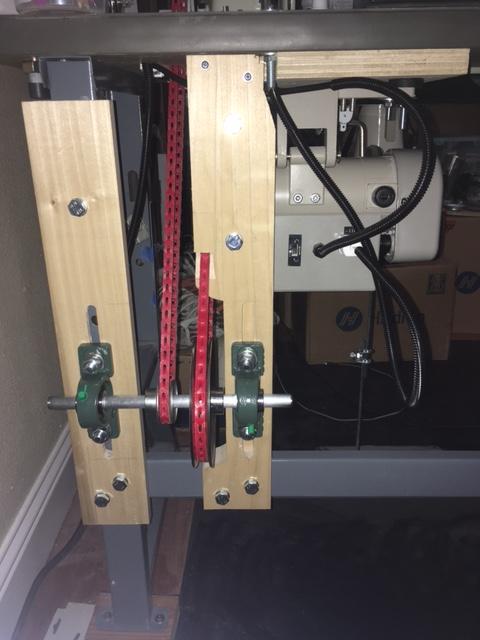
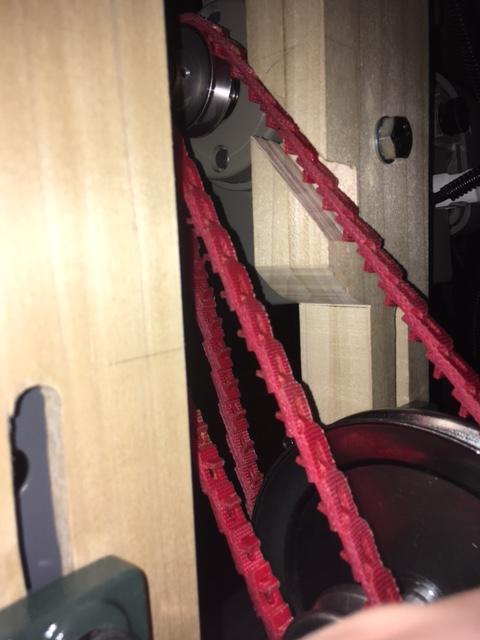
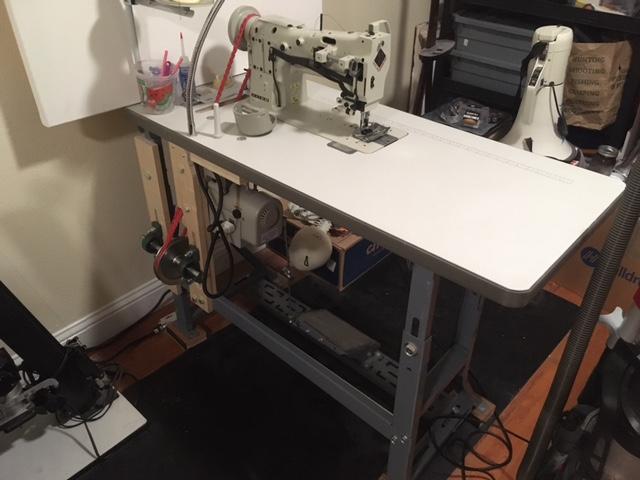
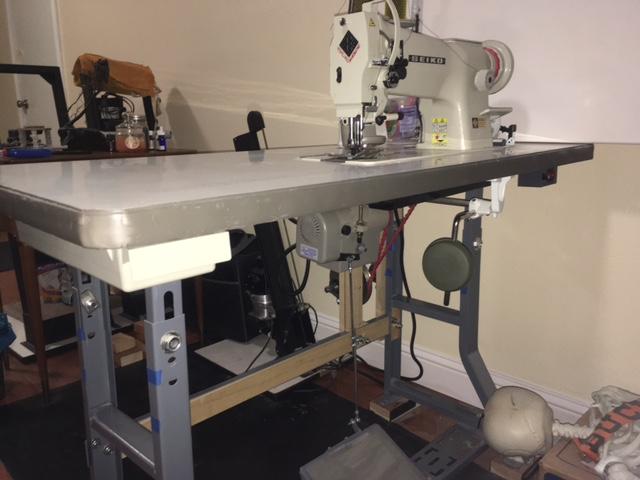
Back in 2018, I got hold of a STH-8BLD-3. I used it for a couple of small leather projects, but without a speed reducer, it primarily it saw use for heavy canvas on a theatre gig I was doing at the time. In 2019 I moved across the country and my art/craft/hobby area had to be colocated with the cats' litter boxes for the past few years. I've had plenty of other stuff to do in the meantime, so I've kept my machines bagged until the last of the kitties eventually passed on. Now that I'm able to eradicate the clouds of fine dust from the room, I've started setting things up again. Regarding speed reduction, I researched the topic on the forums back in 2018, and again recently. After considering others' builds as well as the purpose-made products available, I still chose to go the DIY route. The factors leading to my DIY decision: I felt that I could build a reducer for less than the cost of a commercial product. As it turns out, I can--so long as I'm paying myself in beer. I really really really didn't want to cut or drill extra holes in my table. This was really the biggest factor. Every other solution I'd seen required modifying the existing belt hole or was a new top build. I hate myself apparently and don't have enough problems There are likely simpler ways of accomplishing this, but here's what I cobbled together with a band-saw, drill-press, dremel and hand tools. Maintaining the original angle coming down from the hand-wheel prevented the need to modify the slot, but made for a long stretch. I haven't measured each belt, but the two add up to ~9ft. This worked to apply load to the pillow-blocks in their strongest direction, directly into a leg; though, beefy as they are, I doubt it much matters here. Note, the belt going to the machine head is on in the wrong direction in these photos. The vertical boards, and the horizontal bit inside the cross-brace (pictured further below) are all 1x4" poplar. The slots for the bearing mounts were done on the drill press by setting a fence to slide the board along while drilling a LOT of holes with spade & Forstner bits, then cleaned up with a chisel. The bolt heads and spring washers sit in a pocket and can slide up or down. For the motor mount, I plotted out the base on graph paper and made a template to shift it left and back enough to be out of the initial belt line and to not interfere with the original bolt locations. This ended up being a really tight fit for belt adjustment at the end; if I did it again, I'd position the motor a quarter to half an inch forward. This worked out because link belt is forgiving, and I designed this to allow for adjustment at the pulleys in addition to the motor. It's two pieces of 1/2" birch ply, with the motor bolt heads countersunk and hidden between the boards & table. These bearings are adjustable, however, the ones I received were very stiff initially. Even after greasing, I worried I'd break something while trying to get them aligned. I ended up bolting each pillow-block to a 2x4 clamped to my bench and worked them around for a while with a 3ft rod until they loosened up. For the axle, I cut steel bar down to size & chamfered the ends. Using a dremel and file, between bouts of sciatica, I ground about the ugliest usable flats that I'll never show you for the pulley & bearing set-screws. Because my flats are dodgy, and because both pulleys have key-ways & I'm not using keys, I balled up lengths of electrical solder to fit comfortably in each set-screw hole, which mushed down and engaged nicely. This also prevented the set screws from extending into the empty key-ways where they'd be unsupported & weakest. Once I got everything tensioned, it all moved nicely by hand and easily penetrated several layers of heavy canvas. I'll get some leather under it later this week and see how it does. I suspect I may want to move up to an 8" pulley and designed with this in mind, however I may look to a larger handwheel first if I still find it too fast.
- 9 replies
-
- speed reduction
- sth-8bld-3
-
(and 1 more)
Tagged with:
-
There's a national chain with several locations in my area called Total Wine & More. They put their cigar boxes out for sale by the registers for about $2 each. Oddly enough, I also catch some of the local thrift stores trying to sell the same boxes for $5-10. I'd imagine some might also turn up at yard or estate sales on occasion.
-
Those sortimo boxes are awesome, they definitely cost a pretty penny though. I have a slight obsession with diy and repurposing things; kind of a hobby in its own right actually. The cigar boxes are a good outlet for that.
-
I realize folks are traditionally posting leather projects here, but I thought there may also be some interest in projects on the workshop side of things. I've been working on storage boxes for my tools and hardware. Cigar boxes and a little balsa or basswood make for a cheap but solid solution. I'd estimate that each of these boxes totals about $3 in materials, plus ~20min of my time. For tools, I tend to favor clamshell style boxes. For hardware I like the ones with sliding lids as they're more secure, but they are a bit more work to fit properly. For anyone who wants to make some of these for themselves, I've attached a couple photos of a sample joint. The trick I've found for a tight joint is to cut the notch to a bevel, then shave off a little as needed until desired fit is achieved. Tools required: x-acto knife, straght edge, square.
-
Doh! Just tested it out, and that was exactly it! It seems like fairly heavy tension...which I suppose it would be for stitching, but for winding it's great. The physics of it make perfect sense. Learn something new every day. Thank you both so much!
-
Thanks for the response Bob! So, that was the initial adjustment I performed to get it winding evenly (per the manual). What I found was that I got to a point where there's a small (few millimeters) window of adjustment left or right where it will wind evenly (up to the spoon), but positions inside of that window only appear to affect which side the thread gets stuck and builds up on once it reaches the spoon.. If you can clarify, am I shooting for an extremely minute (less than a millimeter) adjustment at this point?
-
I got a Seiko STH-8BLD-3 a few weeks ago. This is my first industrial machine, though not my first sewing machine. Thus far, I've used it to make a large portfolio style case out of nylon packcloth and webbing. The machine performs wonderfully, however, I have run into an issue when winding bobbins that I wondered if any of you might be able to steer me in the right direction with...maybe I'm missing some adjustment (followed the manual as much as possible, but it's definitely not all there grammatically). So I've got the bobbin winding evenly (after adjusting left and right to find the sweet spot) until the point where the thread begins to contact the release lever/spoon. At this point, the thread seems to get stuck on that side of the spoon, causing the bobbin to continue filling unevenly on that side until enough pressure builds to kick the winding mechanism off of the belt. My workaround at this time has been to stop sewing and do a dedicated run to fill a bobbin, and when I reach that trouble point, apply side pressure to the thread to help it move across and keep the winding even until the release is tripped. It seems to me like this wouldn't be an issue if that lever/spoon were as wide as the inside of the bobbin, however, I can't see why it would've been designed this way if that were a problem. So, my second guess is that I'm missing something in the adjustment process. I'm attaching two photos. This first is an empty bobbin mounted on the winder, to show the difference between the bobbin width and the release spoon. The second is a mostly filled bobbin, after it begins to fill unevenly to one side of the spoon. I'm using class M bobbins, with 138 bonded nylon thread.Thread tail goes through a hole on the right, then is fed through the center to bind the bobbin to the winding shaft (bobbin spins on the shaft otherwise)...a little trick I figured out on my Singer 403a that is missing the spring, but I'm not sure if it could somehow be a contributing factor.


