

goingconcernMA
-
Posts
19 -
Joined
-
Last visited


goingconcernMA's Achievements
Member (2/4)
-
Thanks much - that's very kind of you to say!
-
Appreciate the kind words. For something similar to the most recent "fully loaded" models I posted (i.e., inclusive of the tension knob, the adjustable-height foot, and alternate free-standing base), my asking price is $650. I'd encourage you to build your own if you are already going down that route - I know I found it to be a rewarding and certainly a learning experience
-
Thanks all, appreciate the compliments. The stand was a custom request to make the piece optionally function similar to the bi-lim floor model. I quite like it myself so will probably continue to add that as a feature. I am offering up for sale as I go (these two are spoken for), but as I'm pretty slow with progress I don't really have a site / inventory to speak of BTW I had to look up what a "roach clip" is, but I chuckled at the reference when I did
-
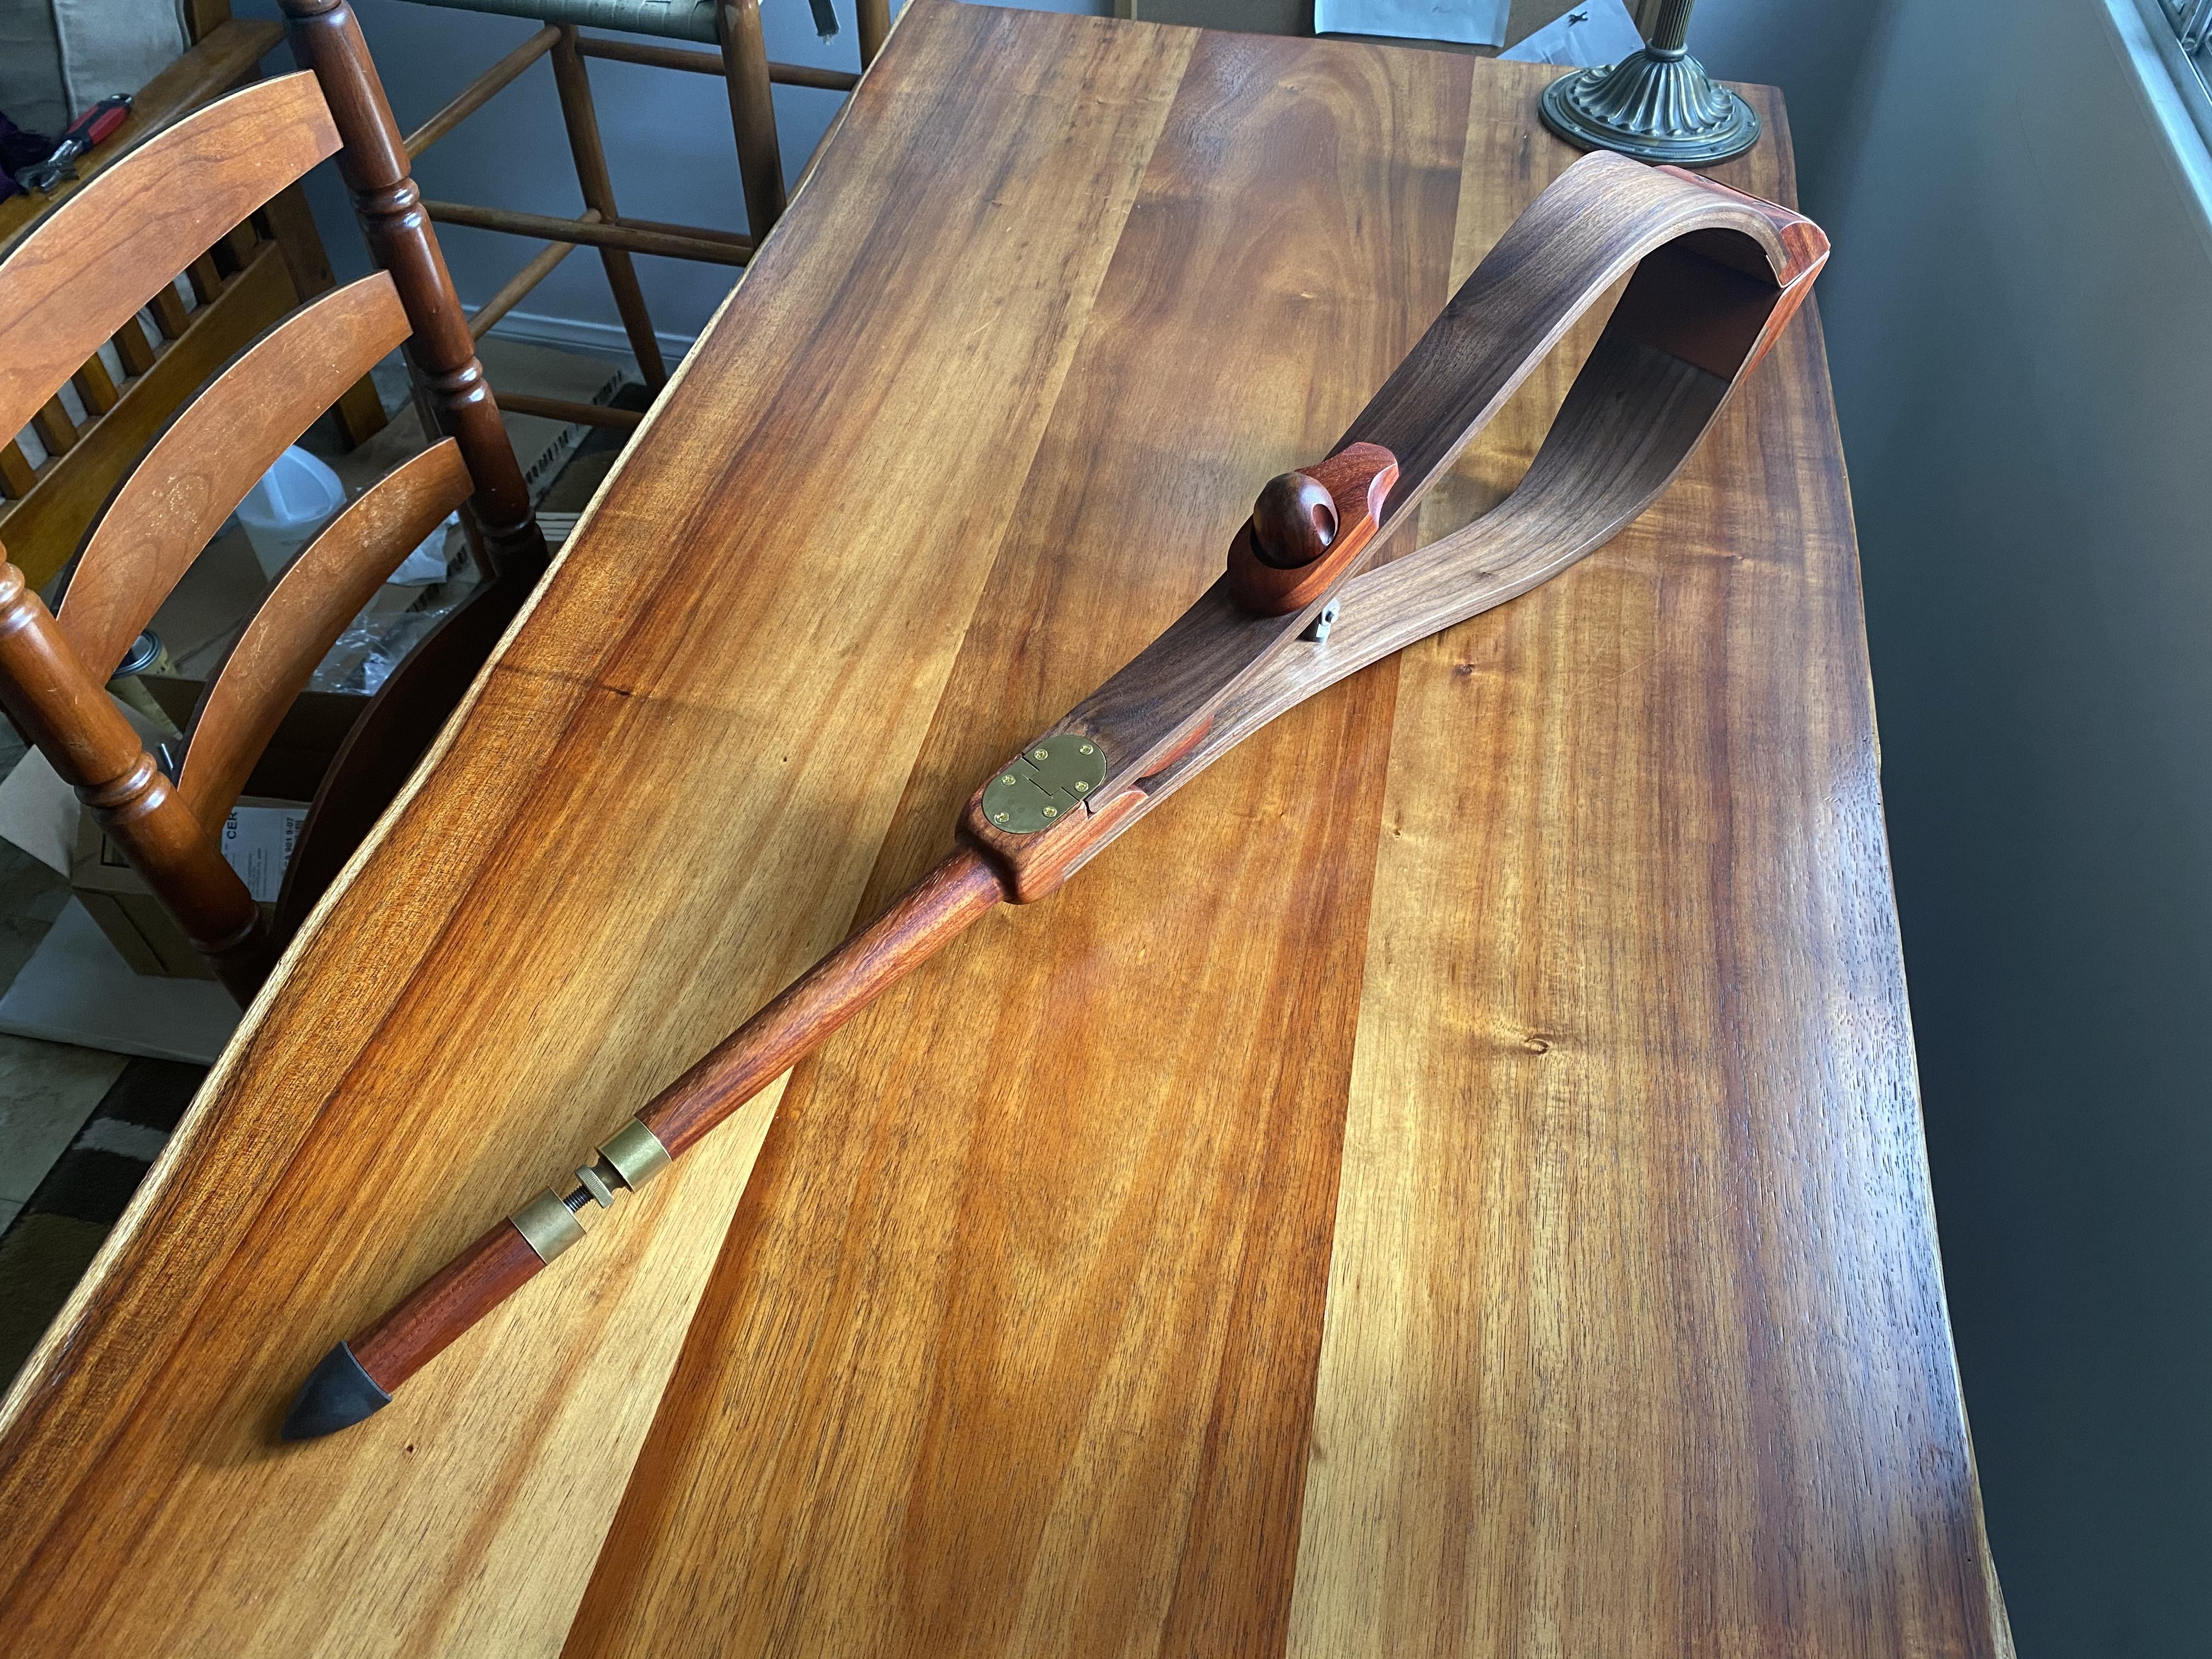
Dredging up my old thread to share some recent clams (#'s 6 and 7), both of which have some new "extras" - notably an adjustable-height leg with non-slip rubber foot, a tension knob, and an alternate "free standing" base. Hard to believe it's been almost two years since my first build #6 (Sapele & Walnut) (Imgur Album: https://imgur.com/a/dPllZtc) #7 (Walnut & Padauk) (Imgur Album: https://imgur.com/a/bcn7fW1)
-
Hi All - Up for sale are several stitching clams I recently constructed. These clams were handmade from a variety of hardwoods. Each has been signed, numbered, and dated. Due to the steam bending / lamination process and the use of different hardwood species, each clam is slightly different in its construction. Unless otherwise noted, each clam features the following: Profiled jaws, padded with whiskey Buttero leather Retaining strap for storage Contrasting wedged dowel reinforcements at joints Hidden needle magnets Mortised brass hinges Clam #2 (Ash / Sapele construction) - $500 (Sale Pending) Clam #4 (Walnut / Sapele construction) - $525 Clam #5 (Sapele / Walnut construction) - $525 Prices include domestic shipping. If you are looking to ship internationally, please message me for details on the additional shipping cost. Additional details (along with additional pictures) for each individual piece can be found in my etsy listing here: https://www.etsy.com/listing/784930167/leather-stitching-clam-saddlers-clam
-
Happy to share - thanks for the kind words
-
Version 2 of the clam complete! A few more pics in the album here: https://imgur.com/a/8W1pqUq
-
Stitching two thinner pieces of leather together to arrive at your desired thickness is a perfectly acceptable solution The topic you linked to discusses modifying a spokeshave for purposes of splitting panels of leather. I've not tried this but I can imagine it is a quite advanced technique and would require significant fine tuning to produce (likely) uneven results. As a beginner, I'd suggest ordering your leather split to the intended thicknesses of your projects instead. Several suppliers offer splitting services free or at a small cost when you purchase leather (Rocky Mountain Leather offers it free, District Leather offers for a small fee, Wickett & Craig offers free)
-
I couldn't agree more that the hinge was a poor choice. Rather than reset the pin, I'll probably just replace it at some point with a mortised brass hinge with tighter tolerances. I'm actually building a new model at the moment where I'm doing just that. I should have it finished up soon and will post pics here when done, but here's a quick shot of the new hinge construction:
-
I took the opportunity this weekend to pad the jaws and take the clam for a test drive: All in all, it worked great! Still need to get used to the new stitching angle and find the optimal height to sit at, but happy that I'm able to get a fairly consistent stitch in the first go with a different setup. A definite area for improvement is getting the jaws to come together with a larger surface area, but it didn't take too much pressure from my legs to hold the leather securely while I stitched. I think an "extension" piece that sits inside the jaws may also be good to mock up for more delicate work. I can see myself running into difficulty trying to stitch something like a thin strap in here
-
 This is beautiful work! I can imagine this took a fair bit of time. If I may ask a few questions: How thin is this leather split to? Looks fairly thin - is it 0.5mm? It looks like you have partially lined card slots - is it difficult to get the fold to the same depth for each slot? Your skiving seems is crazy exact - any tips on getting to that level of consistency? Thanks for sharing
 -
Thanks! You know, I told my wife I wanted to hang it up, but I don't think she liked that idea all too much... I've thought about adding a few of the other odds-and-ends that Fred's models have. I'm either going to add the little triangular "guides" on the inside of the jaws to help mitigate some of the lateral play that the hinges have, or I'm going to add an internal locking mechanism (not featured on the one you posted, but on several others he has done), though it's been incredibly hard for me to figure out which hardware to use for that. I would really like to do the leg guides, but I also see that as one of most difficult features since you've got to join it to a very curved section of the wood
-
Thank you - not at all a stupid question. This style clam is designed to rest at a slight angle on your left leg (assuming you stitch right-handed), while your right leg applies pressure to keep the jaws closed. Now with that said, the "proof is in the pudding," so to speak, and I've not yet had the time to work up a project using this. It's a consideration that will be top of mind when I do so In case it's causing any confusion, the strap on the inside is purely there for storage purposes
-
Oh boy, I remember trying the boil-in-a-bag approach one time. Sadly I did not have the foresight to think how heavy 5+ pounds of grain becomes once soaked - that brew ended up a hot mess. All grain is nice, but I found it to be an all day affair - lots of cleanup on both ends. I tend to prefer the flexibility that leather offers - I can sit down for 15 minutes and work one step of a long project if I don't have a ton of time (which all too often I don't)
-
Thanks all! I got some really great feedback about improving the hinges, so if for no other reason I may do a "version 2" just to clean up that part of the project at some point Yes, it's a pretty sweet homebrew setup. I've done some brewing myself, but basically just working with a large aluminum stockpot and a 10-gallon cooler converted to mash-tun.