


regius
-
Posts
25 -
Joined
-
Last visited
regius's Achievements
Member (2/4)
-
A lot of good discussion about thread here. I have a needle-specific question. I noticed the Juki DNU1541 and it s cousins and clones take the "135" system needles, so, regardless of the diameter of the blade (the NM number) and the size (after the /, like 135/17, size 17 needle), there is always a 135 somewhere on my needle packages, from Groz to Schemtz. Then the LU1508NH uses a longer needle, and has the number 190 on top of other numbers. What number designates the length of the needle? also, on the Juki Lu1508 user manual, under "1508NH" column, they put "CROS-BECKER 190, NM125 TO NM 180". This only means their recommended needle right? I don't have to buy GROZ and don't really have to stitck to NM125, can be thinner than NM125?
-
New Juki LU1508 NH bobbin case does not move
regius replied to regius's topic in Leather Sewing Machines
so, long story short, it worked. Pushed the clutch button down and hand cranked in opposite direction until I hear the click. There was a twist to the plot though, after re-engaging the clutch, i started cranking in the normal direction towards me, again. but the entire mechanism just felt so tight and sooooo much friction. as if the whole clutch trick never mattered. i was so scared, it's like i'm about to bend some metal. then it passed the "threshold" and everything started to spin normally, and I started to hear the healthy squeal noise typical of industrial machines. I noticed a detail on the 1508 manual (never noticed this on the DNU manual), it says something about do not run the machine idle when a loaded bobbin is inside the case. When I wind the bobbin, without simultaneously sewing a job, I typically lift up the foot with the rear lever, then I run the machine dry, so the needle goes up and down very fast (and so does the bobbin case), while the bobbin is being loaded. Is this good? -
New Juki LU1508 NH bobbin case does not move
regius replied to regius's topic in Leather Sewing Machines
wow, UWE channel, life saver!! https://youtu.be/N-MClgDKnq4 JJN, thank you!! I'll try not, I did notice that silver button. -
New Juki LU1508 NH bobbin case does not move
regius replied to regius's topic in Leather Sewing Machines
another quirk I noticed about the LU 1508 is the extra wiggle room on the reverse lever? here's a video, why??? -
just had delivered a brand new Juki LU-1508NH. The machine was assembled in the factory, mounted to a table, shipped on a pallet to my dealer's store in Hartsdale NY. He threaded it and sewed, no problem. His guy then unmounted the body from the table and delivered it, I helped re-mount the machine. Threaded the top, dropped the bobbin into the case, now, all of a sudden, the bobbin case area does not move anymore. Hand cranked the wheel, the walking foot and needle all move normally, the bobbin components just does not spin, so the needle can't pick up the bobbin thread. Any idea why? nothing sounds funny, in fact, it's so silent and sounded like something is not engaging.
-
the LU-1508NH was delivered today. Before it got to my house, I went to the dealers shop to see if it works. The dealer threaded it and did some sewing, all seemed fine. After it's delivery and mounted on the table, long story short, the bobbin case does not spin anymore. 1. I threaded the top 2. wound the bobbin (already preloaded from the dealer) 3. dropped the bobbin into the case 4. hand-crank the wheel to loop the bobbin thread around so that the needle can pick it up. Nope, nothing spins in the bobbin area. I can't begin to know what went wrong??? it's like some critical gears or shafts are completely disconnected.
-
home machine, keyhole buttonhole, leather
regius replied to regius's topic in Leather Sewing Machines
Thanks!! Just making any buttonhole, my plastic Necchi home machine does the job. It doesn't have any keyhole button hole shape, only regular rectangular/straight buttonholes, but this machine is quite strong and the hardware can take heavy threads, such as the Gutermann top stitching thread (very thick). It can puncture two layers of garment leather, that are about 2.5oz each layer. The performance is not consistent, so some level of struggling, but does the job. However, for commercial purpose, I do need the industrial keyhole button hole machine. -
Kobe 1541S alternating lift height adjustment
regius replied to plinkercases's topic in Leather Sewing Machines
I was just asking this very question on another thread, before I found this discussion from 2019. @plinkercases seemed to have resolved it all and said "stepping high with even gate". May I ask how high? I have tinkered around this adjustment of my DNU1541 for a while now, the only time I could get it "step high", is when only ONE foot steps high, when I make the lift-height of both foot equal (like how it came from factory), the max height has to be compromised. Say when the presser foot was able to achieve almost 0.5 inch max height, the center walking foot barely lifts at all, and vice versa (although I couldn't get the walking foot to achieve the near 0.5" height). After playing around with the "foot drop" adjustment with the top hex screw, I was able to make the walking foot lift higher than the presser foot (this is how I need it, best suited for my leather jacket need with bulging/ bumpy sections, I need the center walking foot (where the needle is at) to walk over the bump, and with some push and perhaps knee lift, I can manually walk over those seams), but the compromise is that the max heigh of the walking foot lift, now, is not as high as it could be. -
another question, not related to the symmetrical toe foot, is how to adjust the lift height of the foot. The Juki manual has this section but definitely not written by an English speaker. I figured there are two aspects to this adjustment. 1. The individual lift heights of the presser foot and the walking foot (outer and center subunits). 2. which foot lifts up higher. Loosen the screw on the back you can slide the arm into three levels, the low position makes BOTH foot lift up the lowest, middle is middle, high position corresponds to highest lift height. OR, this is completely wrong? The manual does say "normally the lift height of both foot are the same". So what does the three sliding position do exactly?? Then, there''s a hex screw on top of the sliding assembly. This is to adjust which foot/subnit lifts higher than the other. BUT, how to do it completely evades me as the written text doesn't make any sense.
-
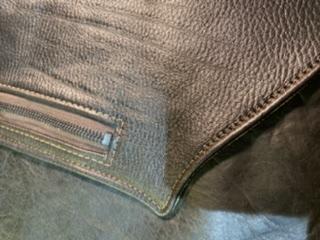
I placed an order for the LU1508NH, supposedly top of the line for "heavy dutiness", although it may not feel much different than my DNU1541. I thought the LU 1508 needle feed path is the rectangular shape, while the DNU is oval, but today I learned the DNU path is also rectangular...well. I am desperately trying to figure out the best way to do "hidden zipper top stitching". Let me try to explain. For leather jacket enthusiasts, say most modern day motorcycle jackets, the visual impression/cue is a size 10 front zipper, typically chrome/silver and it catches the eye. This is because these zippers are "exposed" type, the leather that's on top of the zipper teeth do not cover the teeth. The leather shell is pulled back (toward the zipper tape side) and a narrow row of top stitching is added. However, the jackets I make feature the concealed type of front zipper. the zipper is receded into the leather "sandwich" layers, and the edge of the teeth lines up with the edge of the leather fold/lip. Now, the default foot of the DNU1541 has asymmetrical toes, the right toe is skinniner than the left toe. The distance between the rightmost edge of the right toe and the needle is about ¼". The top stitching width over this concealed zipper is often ⅜", more or less (less than half an inch), This means if I use the default foot, the skinny right toe will land somewhere where the teeth meets the zipper tape. Or, if the leather is thick or slippery, it could land on the teeth, or, slide off the teeth, all over the place. Most annoyingly, is that (due to the fact that the right toe cannot flush with the teeth edge due to the useless mere ¼ distance aforementioned), when the foot lowers onto the jacket, it SQUEEZES the teeth out! towards to the right side, like when you bite into a burger, the meat will get pushed out of the two buns (on the other side). Because of this, it is very unnerving to control the stitching line, and whether the teeth will still stay tucked in between the leather layers or somewhere protruding out. I have seen photos of another successful jacket maker's machine, a Juki LU1508 older model, his default foot has SYMMETRICAL toe?! Also, for some reason, when he does the zipper top stitching, the teeth are not squeezed out. I attribute this to the fact his foot has a right toe as wide as the left toe and therefore it lands on the teeth (over the leather of course), so the walking action is literally walking on the zipper teeth. Resulting in a more controllable, straight line. I have since been searching for such a "symmetrical toe" walking foot set that fits the DNU. If anyone knows the existence of such a foot, please let me know. If the foot is serrated/has teeth to grab, that'd be better.
-
-
Specialty equipment: leather buttonhole machines
regius replied to regius's topic in Leather Sewing Machines
May I ask what the "201" and your other machine, refer to? sorry for the ignorance. -
Before I invest in the $9000-$12000, one-function button hole machine for leather, I wonder if anyone know of a home machine that has 1. the keyhole button hole function and 2, can handle denim and light leather? If it can go through 4mm of garment leather, it'd work for me.
-
thank you!! got it, i use the dnu1541, so i can see the compound/triple feed mechanism
-
I'd hope this is the appropriate place to post this. I am in the Westchester, NY area, Hudson Valley/Greater New York city. I wonder if anyone/establishment near me has a heavy duty buttonhole machine that I can come and pay to put buttonholes on my products. Thanks.