


dirk87
-
Posts
46 -
Joined
-
Last visited
Recent Profile Visitors


dirk87's Achievements
Member (2/4)
-
Thanks for the clarification, makes total sense. I didn’t notice but now it’s clear and a really nice idea, never thought about doing this. Actually if you mount the straps they will be slanting the same way but i guess the most pleasing is if they both run the same away from the watch to the ends.
-
Maybe a little late to reply but might still be useful. i did a few tests straps in this way. A bit to much overside but it seems to work for me. https://imgur.com/a/fgvQ6u1 0.9mm veg outer 0.2mm reinforcement(nylon) 1mm padding veg tan 0.7mm inter layer veg tan 0.6mm lining alran sully
-
Nice work! Thank you for sharing~ I wanted to order some Baranil, is this gold color? Looks great. can i ask why you use the inverse pricking irons? X punching from both sides? Also where did you get the buckle? Looks nice and small.
-
Adventures in watch strap making
dirk87 replied to dirk87's topic in Purses, Wallets, Belts and Miscellaneous Pocket Items
Have been away from the hobby for a while but let me share the finished pictures of the Togo strap i posted the construction of earlier. Thank you! Happy to hear -
I’m trying to design and make a logo stamp i can use for hot foil stamping. I’m totally new to hot foil stamping and would like to have some opinions on what minimum line withs are doable. Looking at fonts in the 2-4mm height range. Does anyone has experience or tips? Time to fire up my Deckel G1L again! BR, Dirk
-
Adventures in watch strap making
dirk87 replied to dirk87's topic in Purses, Wallets, Belts and Miscellaneous Pocket Items
Some more pictures build up: 0,9mm Haas Zermatt 0,15mm velodon reinforcement 0.9mm buttero -
I tend to use painters tape to mark a line allot. If i have sensitive leather like pueblo etc, i paste it a few times on scrap leather to reduce the stickiness (or my sweater )
-
Really nice wallet and execution. About the diamond pater you say swivel knife, this is a kind of carving knife to cut through the top layer right? Not so familiar with this. Really like the look. Also wondering about the cutout in the centre between your card pockets. Is the shrink leather you use for lining not able to fold there? Im wondering about constructions like this if you would leave the leather there but not glue it. Thank you for sharing!
-
Adventures in watch strap making
dirk87 replied to dirk87's topic in Purses, Wallets, Belts and Miscellaneous Pocket Items
Thank you for the feedback. Yes! I learned allot from leathertoolz videos, i really appreciate his effort. It’s the first time i stitch rounded corners in stead of square. Square aur i know how to plan. For rounded I was thinking of planning the corners with a 2 prong at 45deg first ( yes it difficult to explain by text ) then fill the space between. -
Adventures in watch strap making
dirk87 replied to dirk87's topic in Purses, Wallets, Belts and Miscellaneous Pocket Items
Good to know, i can also see this as a benefit , I will wear it for a while, kind of really like it -
Adventures in watch strap making
dirk87 replied to dirk87's topic in Purses, Wallets, Belts and Miscellaneous Pocket Items
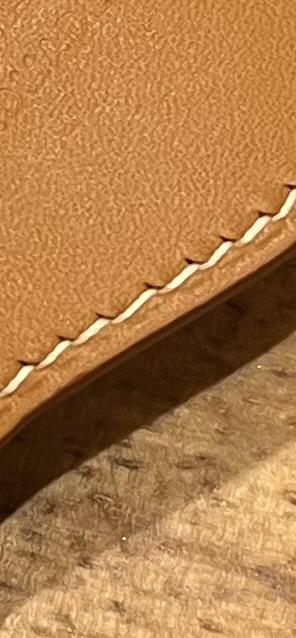
Thank you! I mean these kind of stitching things witch i didn’t really plan for, some long or short stitches. Changing the dimensions a little will get rid of this.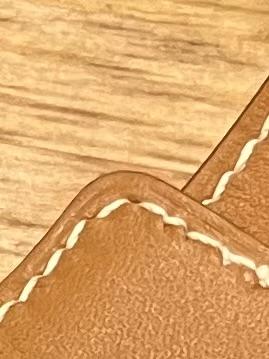
-
Adventures in watch strap making
dirk87 replied to dirk87's topic in Purses, Wallets, Belts and Miscellaneous Pocket Items
Made a bund strap ‘attachment’ thingy. Slides under a normal strap. Never really gave these any thought but i quite like it now. It’s more a proof of concept, messed up the stitching and didn’t finish the edges. *please ignore the maker stamp, was trying out some 3d printed stamps before ordering proper ones. -
I am using it allot, its easy to use the basic functions. It’s not perfect but by far the best tool to plan your patterns for stitching. I like to estimate my dimensions then draw it up in leathercraft CAD to see how my stitch placement looks and adjust the dimensions. Then i draw it in fusion 360 and 3d print my patterns. So far used it for wallets and watch straps.
-
Adventures in watch strap making
dirk87 replied to dirk87's topic in Purses, Wallets, Belts and Miscellaneous Pocket Items
I have a question for people who have experience with bonded leather, in particular salamander salpa. As i posted before, i use an inner layer to build up thickness(and make a nicer spring bar hole after folding over), lets say im using from 0.4mm-0.8mm depending on the strap thickness i want. i am now using salpa for this and quite like the feeling and stiffness of the finished strap. My question is, does anyone has experience with the longevity of salpa? I read allot about bonded leather not being ideal for high stretching and bending. But in this application its backed up with velodon so there is basically no stretch but there is allot of bending at the buckle. Would a layer of shoulder, belly or just split be better here? -
Adventures in watch strap making
dirk87 replied to dirk87's topic in Purses, Wallets, Belts and Miscellaneous Pocket Items
Thank you~, very kind. Please do, its fun