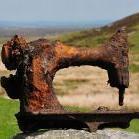
trash treasure Report post Posted May 27, 2022 (edited) I know there are some here that are pretty knowledgeable on both Singer and Adler patchers, and I'm hoping for some input and advice. So, I picked up an Adler 30-1, for pretty cheap, and it was cheap for a reason :~) One of the parts it needs is what Singer calls the "slide bar" - I have no idea what Adler calls it. Anyway, mine is broken right where the bar joins the ring. I actually found the Singer part for sale (not cheap), but I'd like to find out if it will fit the Adler - I know some parts will, but this one ? I have a TIG welder, and I could try and weld it, if there's no hope of matching the part - I have nothing to lose, at this point Anyway, this is the part : Edited May 27, 2022 by trash treasure Quote Share this post Link to post Share on other sites
shoepatcher Report post Posted May 27, 2022 Adler part is a little different as to specs and roller size. Color of your machine. Black ones were the earliest ones and had a lot of Singer parts in common since Adler copied Singer. May fit, may not. I would weld your parts first and then grind the welds for better fitting. Should be able to weld it. glenn Quote Share this post Link to post Share on other sites
trash treasure Report post Posted May 27, 2022 Sorry, I should have said - It's a green machine, complete with a treadle table. Maybe I'll post a photo, if everyone promises not to beat me up too much for taking on a lost cause. The machine is free moving, but that's about it - Covered in old lithium grease, to the point where I can't tell yet, how bad it is . Tom, headed off to practice his welding........ Quote Share this post Link to post Share on other sites
shoepatcher Report post Posted May 27, 2022 (edited) Ok green one form the 1950's and early 1960's . Weld piece first and then lets see. send pics please. glenn Edited May 27, 2022 by shoepatcher Quote Share this post Link to post Share on other sites
trash treasure Report post Posted May 27, 2022 OK, here it is, in all it's glory - A real project, but maybe doable, if I don't find too many other broken parts. It is complete, so there is that, to give me confidence, but I may feel differently, once I clean it enough to really see what's wrong. Quote Share this post Link to post Share on other sites
Constabulary Report post Posted May 28, 2022 (edited) I think I once replaced this part on an Adler with a Singer part. The roller could be a problem if I recall correctly on the modern Chinese parts they are held by a c clip and could stick out a bit too far. But I´m not 100% sure. I still have 2 Adler 30 on my shelf and I have an OEM Singer feed motion Ring so I can check but that may take some time... But I have no Chinese parts that I could compare. EDIT: not entirely the same but I once compared 29K1 parts with 29K71 parts: Edited May 28, 2022 by Constabulary Quote Share this post Link to post Share on other sites
Constabulary Report post Posted May 28, 2022 (edited) @trash treasure this may be some useful information Edited May 28, 2022 by Constabulary Quote Share this post Link to post Share on other sites
trash treasure Report post Posted May 28, 2022 (edited) Many Thanks for posting those links, Constabulary - They make a couple things much clearer to me, now. Having never had one of these apart, seeing your work on that 29 K1 gives me hope that I can get this machine at least functioning. I really appreciate the collective knowledge available on this forum :~) Edited May 28, 2022 by trash treasure Quote Share this post Link to post Share on other sites
Constabulary Report post Posted May 28, 2022 Patchers are no secret machines. Pretty sure you will succeed one or another way. Keep us updated with what you do. Quote Share this post Link to post Share on other sites
shoepatcher Report post Posted May 28, 2022 Trash treasure, I have rebuilt ones in worse shape than that. The head needs to be disassembled, derusted, primed and repainted. All parts taken out and derusted, cleaned and polished. I have a lot of parts to the older 30 class machines. As Constabulary will tell you, Electrolysis or Evaporust will do the job. They are worth saving. Only shoepatcher better than Adler is Claes. The stand will clean up nicely and I have bolts and nuts for the stands as well. Will take time but a fun project. Take lost of pics when disassembling. You even have the tension assembly below the bobbin winder and the wooden pitman arm. Pics of the aback of the stand and head please. glenn Quote Share this post Link to post Share on other sites
trash treasure Report post Posted May 29, 2022 (edited) OK - As requested, here's some possibly better photos - At least they're against a plainer background. As you can see, everything is there, but some stuff broken . It's missing only one nut from the stand - One of the one's on the end of the treadle axle :~) It's also missing the wooden drawer, but I think I can make one. The wood pitman arm is interesting - I wonder why they chose that material. It seems to work fine, and doesn't seem to have any wear, so I guess they knew what they were doing. It'll be a little while before I can start in on it, but I will refresh the thread with updates, as they happen. Or at least some "After" photos. I've restored a few machines before, so I'm pretty familiar with the drill, but this one is different, and a bit rough - We shall see what I can make of it. And thanks again, for the encouragement ! Edited May 29, 2022 by trash treasure Quote Share this post Link to post Share on other sites
Constabulary Report post Posted May 29, 2022 what I would NOT do it pulling out the top shaft and removing the inner cam and the cam on the front end if not really accessory. Better use a brush and some solvent like paint thinner or kerosene for cleaning these parts. Quote Share this post Link to post Share on other sites
trash treasure Report post Posted May 29, 2022 (edited) 1 hour ago, Constabulary said: what I would NOT do it pulling out the top shaft and removing the inner cam and the cam on the front end if not really accessory. Better use a brush and some solvent like paint thinner or kerosene for cleaning these parts. I totally agree - I don't like to disassemble more than is really necessary - No problem for me to mask and paint, with the main shaft, etc, still in place. I have lots of brushes, solvent, and time to spend on it :~) I can do decent work on sewing machines, if I take my time and go carefully - Here's a little one I cleaned up a couple years ago. It was a bit crusty, and didn't look, or work, as nice as it does now ( Nothing like as bad as this patcher, though) - It turned out pretty good : Edited May 29, 2022 by trash treasure Quote Share this post Link to post Share on other sites
Constabulary Report post Posted May 29, 2022 Nice Adler 20 !!! Can you take some pictures of the underside meaning how you "sunk" the machine in the table or with other words the bracing the machine is sitting on. I still have a Singer 7 kicking arround for a long time and its time to set it up and I would like to have it flat as yours. Quote Share this post Link to post Share on other sites
trash treasure Report post Posted May 29, 2022 2 hours ago, Constabulary said: Nice Adler 20 !!! Coming from you, a high compliment, indeed - Thank you :~) There was no rocket science involved in sinking the Adler - The photo shows the 3/16" (5mm) steel straps used. You would need to bend these with a powerful bending brake, or cut and weld them - These are welded. Just compensate for the table thickness, and how high you want the bed to stick up above, and design accordingly . They are just hung from the table with carriage bolts & lag screws - Make sure to leave a cutout for the bobbin winder, belt, and front bed access. The machine just sits on them - You could just lift it out, if you were strong enough ;~) The photo also shows my home-brewed speed reducer, which uses a modified fan belt idler pulley from a '78 Ford Mustang, to tension the belt from the backside. With a 750W servo motor, the machine has plenty of power ! Quote Share this post Link to post Share on other sites
Constabulary Report post Posted May 29, 2022 Alright - thanks for that. I always feared the machine would be to heavy for "just hanging" on the table plate. I was thinking of approx the same construction but going from left to right and hanging on the machine stand and not on the plate. If you don´t mind please post some more pictures Nice solution for the speed reducer too! I will keep that in mind IF I ever find the time and patience and parts to set up the Singer 7. Quote Share this post Link to post Share on other sites
shoepatcher Report post Posted May 29, 2022 (edited) 7 hours ago, Constabulary said: what I would NOT do it pulling out the top shaft and removing the inner cam and the cam on the front end if not really accessory. Better use a brush and some solvent like paint thinner or kerosene for cleaning these parts. correct C. Never pull main shaft unless it is bent! is that an Adler 20 or 120? glenn Edited May 29, 2022 by shoepatcher Quote Share this post Link to post Share on other sites
trash treasure Report post Posted May 30, 2022 It's an Adler 20-19 - I'll post a couple more photos, after breakfast :~) Quote Share this post Link to post Share on other sites
trash treasure Report post Posted May 30, 2022 OK - Here's a close up photo of the speed reducer set up, which I guess is what you wanted to see. The Mustang idler is at the top - The long carriage bolt passes through the sliding part that has the idler pulley. The head of the bolt bears against the back of the fixed part, and pushes the slider against the back side of the belt - Once it's adjusted, I lock it down with the 2 nuts. The whole thing, including the reducer pulleys, is fastened to the rear cradle that hold the machine in the table. The Idler set up had to be modified a bit to work like this, but it performs flawlessly, and solves the belt tension problems with homemade speed reducers. Here's a photo of the Adler as found - It was nowhere near in as bad a shape as the 30-1 patcher I just acquired, but it was non-working, and I had to do a couple repairs and replacements to get it there. The seller had never gotten it to sew, and told me that he bought it from "some old guy" that used it to sew buffalo skin rugs together - It WAS clogged up with woolly brown fur, so I guess maybe that was true Here's the last shot, of the whole machine - I sort of re-engineered the table for it, shortening it, and making a new top. I'd seen photos of Adlers used by the German military, and loosely followed that idea, with a cabinet under it. I picked up a nice iron treadle, and fabricated a new lower crossbar, to replace the bent up originals. The table is on casters, as it lives in one end of our kitchen, when we're not using it - It rolls into the shop, through the doorway behind it. My wife said it had to look nice, if it was going to live in the kitchen. And so maybe I "over-restored" it a bit, even to the extent of polishing the handwheel rim - After I polished it, I rubbed it with this anti-corrosive sculptor's wax, and surprisingly, it's stayed rust-free for a couple years now. Quote Share this post Link to post Share on other sites
shoepatcher Report post Posted May 31, 2022 Nice 20!! your 30-1 Adler looks like everything is there including the tension device for the bobbin winder. Good luck rebuilding it. Let me know if I can help. We want to see pics as you progress. glenn Quote Share this post Link to post Share on other sites