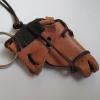
Members DoubleC Posted December 26, 2011 Members Report Posted December 26, 2011 First, I hate to keep saying this, but a woman and I are starting a business. She went a little nuts with all the holiday sales and bought a ton of tack for me to decorate because I was coming to visit her. I would so love to say where but don't want sued or thrown of the forum my second day I can post, LOL. She bought three 'natural' sets that are actually yellow, and two dark oil. They all came from the same country and have the same problems, well except the dark oil is; except the breast collar is a slightly different color than the headstalls. Her 5 sets were headstalls and breast collars. I think out of frustration, or maybe just too much browsing one night, I BOUGHT a black set on eBay right before I left her house. It was new and was the headstall, reins, and breast collar. I bought it for $20.50 but the seller left most of it in the plastic (which was too bad for him because had he shown all the matching basket weave tooling etc. I think the price would have gone much higher) and I waited in anticipation of getting a similar set to hers and kicking myself. I was pleasantly surprised by the tooling and the sewing done on it, BUT in places the black dye didn't cover the leather. On her set I'm working on right now, one of the yellows, it was pieced, and though not in danger of coming apart, looks cheap. Questions...Can I just use Fiebings black dye on it all over to cover the areas that weren't covered? And if so, do I need to put something over that because i keep reading about all these problems with black dye rubbing off? Also I added a picture of blackberry conchos I made, carving the vine and leaves, stamping the thorns and adding vintage black glass scarabs as the blackberries. Do you like the look because I'm going to add one to the breast collar too and have to order the scarabs. Now the yellow tack....I started painting it royal blue because I have some blue and mother of pearl zebra settings I can use on it. I let it sit overnight to see if the paint was going to peel or crack when the leather was twisted. It doesn't because I've twisted it every which way. Does IT need a coat of something put on it after I'm finished. I intend to paint it blue all over, then go back and paint white with zebra stripes on it in places. the pictures of the yellow tack I put on shows where there is NO sewing in most places. The first one shows that best, the second shows the true color better. I may make you shudder (I hope not) but on my tack I actually wash it with soap and water and then put Vaseline or bag balm on it to protect it, but of course it's already had the other processes applied by someone else. so I don't know about finishing it off. On my conchos I use mod podge under and over the decorations so they won't come off and haven't had a problem yet, but it makes them rock hard and I don't think i want to sell rock hard tack, LOL. Any and all suggestions appreciated. Thanks, Cheryl Quote http://www.etsy.com/shop/DoubleCCowgirl
Members Dwight Posted December 27, 2011 Members Report Posted December 27, 2011 I'm not sure I understood all of your questions, . . . but this one I can help with: "Questions...Can I just use Fiebings black dye on it all over to cover the areas that weren't covered? And if so, do I need to put something over that because i keep reading about all these problems with black dye rubbing off? " No, . . . you do not HAVE TO PUT SOMETHING OVER IT but it is adviseable at least, . . . depending on the look you want, . . . will determine the product you use. The first thing to do, though, . . . is determine how much work you want to put in this, . . . and what you want out of it. If you are willing to really bend the elbow and get a really good dye job, . . . then use the USMC black Feibings dye. It penetrates somewhat better then the black oil dye. BUT, . . . you need to get out the old wash cloths you don't want any more, . . . and hand rub, rub, rub, . . . all the extra pigment that is left behind by the USMC dye. THAT is what rubs off, . . . not the dye, . . . and if you rub it off. After you dye the item, . . . let it sit for 24 hours in a comfortably warm environment, . . . so you can start rubbing when it is dry. Have some WHITE rough paper towels handy, . . . when you think you have rubbed it enough with the wash cloth, . . . hit it with a paper towel, . . . if it stays white, . . . you're good, . . . if not, . . . just keep rubbing. The oil dye does not need but about 1/2 the rubbing and polishing, but does not penetrate as deep. Depending on the item, . . . your finishes range from just plain old neatsfoot oil applied sparingly and buffed, . . . all the way up to multiple coats of Resolene. There are many other options in between. Neatsfoot oil will offer some protection, . . . and add a very minor gloss, . . . Resolene will practically encapsulate the item, . . . provide excellent protection (including UV rays) and when buffed, . . . shines like a brand new penny. Best wishes, may God bless, Dwight Quote If you can breathe, . . . thank God. If you can read, . . . thank a teacher. If you are reading this in English, . . . thank a veteran. www.dwightsgunleather.com
Members DoubleC Posted December 27, 2011 Author Members Report Posted December 27, 2011 I'm not sure I understood all of your questions, . . . but this one I can help with: "Questions...Can I just use Fiebings black dye on it all over to cover the areas that weren't covered? And if so, do I need to put something over that because i keep reading about all these problems with black dye rubbing off? " No, . . . you do not HAVE TO PUT SOMETHING OVER IT but it is adviseable at least, . . . depending on the look you want, . . . will determine the product you use. The first thing to do, though, . . . is determine how much work you want to put in this, . . . and what you want out of it. If you are willing to really bend the elbow and get a really good dye job, . . . then use the USMC black Feibings dye. It penetrates somewhat better then the black oil dye. BUT, . . . you need to get out the old wash cloths you don't want any more, . . . and hand rub, rub, rub, . . . all the extra pigment that is left behind by the USMC dye. THAT is what rubs off, . . . not the dye, . . . and if you rub it off. After you dye the item, . . . let it sit for 24 hours in a comfortably warm environment, . . . so you can start rubbing when it is dry. Have some WHITE rough paper towels handy, . . . when you think you have rubbed it enough with the wash cloth, . . . hit it with a paper towel, . . . if it stays white, . . . you're good, . . . if not, . . . just keep rubbing. The oil dye does not need but about 1/2 the rubbing and polishing, but does not penetrate as deep. Depending on the item, . . . your finishes range from just plain old neatsfoot oil applied sparingly and buffed, . . . all the way up to multiple coats of Resolene. There are many other options in between. Neatsfoot oil will offer some protection, . . . and add a very minor gloss, . . . Resolene will practically encapsulate the item, . . . provide excellent protection (including UV rays) and when buffed, . . . shines like a brand new penny. Best wishes, may God bless, Dwight Thank you Dwight. I saw the USMC listed and for some reason figured that would be flat black (I'm mixing up my leather work with my house painting I think). I'm quite willing to put the work in it because I want this to be the first example of what we have to sell. After I get the black set, I'm going to take tiny Austrian crystals and place them randomly on the set so they're aren't really noticeable just seeing the set but in the sun first you might have a tiny burst of light on the right rein, then the left breast collar hobble, next the brow band. I will use the Resolene. I didn't make this set which I want to do with all our tack in the future, but I still want who ever gets it to have it 20 years from now to pass down. This explains it all perfectly and I'll show it when it's done. Thanks again, Cheryl Quote http://www.etsy.com/shop/DoubleCCowgirl
Members Dwight Posted December 27, 2011 Members Report Posted December 27, 2011 Thank you Dwight. I saw the USMC listed and for some reason figured that would be flat black (I'm mixing up my leather work with my house painting I think). I'm quite willing to put the work in it because I want this to be the first example of what we have to sell. After I get the black set, I'm going to take tiny Austrian crystals and place them randomly on the set so they're aren't really noticeable just seeing the set but in the sun first you might have a tiny burst of light on the right rein, then the left breast collar hobble, next the brow band. I will use the Resolene. I didn't make this set which I want to do with all our tack in the future, but I still want who ever gets it to have it 20 years from now to pass down. This explains it all perfectly and I'll show it when it's done. Thanks again, Cheryl Just a quick note with the Resolene, . . . it is an (I think the right term) Acrylic Finish, . . . it is water based, . . . mix it 50/50 with good clean water, . . . if you are using multiple coats, . . . do the several thin coats, . . . don't go heavy with it on each coat. You also may want to take a large scrap piece of leather, . . . use it on it first, . . . see if you really do want that finish. I use it for holsters and belts, . . . and it does good for that purpose, . . . I am not a tack expert, . . . might want to move down into the saddle forum and pick someone's brain there for the better/best finishes. May God bless, Dwight Quote If you can breathe, . . . thank God. If you can read, . . . thank a teacher. If you are reading this in English, . . . thank a veteran. www.dwightsgunleather.com
Members DoubleC Posted December 27, 2011 Author Members Report Posted December 27, 2011 Just a quick note with the Resolene, . . . it is an (I think the right term) Acrylic Finish, . . . it is water based, . . . mix it 50/50 with good clean water, . . . if you are using multiple coats, . . . do the several thin coats, . . . don't go heavy with it on each coat. You also may want to take a large scrap piece of leather, . . . use it on it first, . . . see if you really do want that finish. I use it for holsters and belts, . . . and it does good for that purpose, . . . I am not a tack expert, . . . might want to move down into the saddle forum and pick someone's brain there for the better/best finishes. May God bless, Dwight Thanks Dwight, I'll try that. Except I don't know how. I saw some masks made by someone and she said she spent most of her time in the mask forum, but I can't seem to find any of those things. I guess I need to look a little harder. Cheryl Quote http://www.etsy.com/shop/DoubleCCowgirl
Members Dwight Posted December 28, 2011 Members Report Posted December 28, 2011 Thanks Dwight, I'll try that. Except I don't know how. I saw some masks made by someone and she said she spent most of her time in the mask forum, but I can't seem to find any of those things. I guess I need to look a little harder. Cheryl Hey, Cheryl, . . . Resolene Application 101: 1. Dilute the resolene in clean, clear water, . . . 1 for 1. I like to use a cleaned out plastic peanut butter jar (Skippy, Crunchy) 2. Get a cheap bristle paint brush (NOT NYLON), . . . real, . . . ugly, . . . pig bristle, . . . I get em at Harbor Freight for about fifty cents each, . . . 1 inch wide. 3. Dip the brush in the Resolene solution, . . . start slapping it on, . . . you need enough to work up a slight lather look, . . . when you get there, . . . quit adding, . . . and start brushing. 4. Brush from the left, . . . then from the top, . . . then from the right, . . . then from the bottom, . . . then a diagonal one way, . . . then an opposite diagonal, . . . and just keep brushing until all the bubbles dissapear. 5. Hang the object in a warm atmosphere, . . . let it dry, . . . takes 24 hours, . . . don't touch it until the time is done, . . . polish in a couple of days with clear shoe polish, . . . you should love the product. It will have a very high gloss if you do it right. A second coat done the same way makes it look like plastic almost. May God bless, Dwight Quote If you can breathe, . . . thank God. If you can read, . . . thank a teacher. If you are reading this in English, . . . thank a veteran. www.dwightsgunleather.com
Members DoubleC Posted December 28, 2011 Author Members Report Posted December 28, 2011 Hey, Cheryl, . . . Resolene Application 101: 1. Dilute the resolene in clean, clear water, . . . 1 for 1. I like to use a cleaned out plastic peanut butter jar (Skippy, Crunchy) 2. Get a cheap bristle paint brush (NOT NYLON), . . . real, . . . ugly, . . . pig bristle, . . . I get em at Harbor Freight for about fifty cents each, . . . 1 inch wide. 3. Dip the brush in the Resolene solution, . . . start slapping it on, . . . you need enough to work up a slight lather look, . . . when you get there, . . . quit adding, . . . and start brushing. 4. Brush from the left, . . . then from the top, . . . then from the right, . . . then from the bottom, . . . then a diagonal one way, . . . then an opposite diagonal, . . . and just keep brushing until all the bubbles dissapear. 5. Hang the object in a warm atmosphere, . . . let it dry, . . . takes 24 hours, . . . don't touch it until the time is done, . . . polish in a couple of days with clear shoe polish, . . . you should love the product. It will have a very high gloss if you do it right. A second coat done the same way makes it look like plastic almost. May God bless, Dwight Thanks so much Dwight. I did find the saddle makers forum, I had never gone beyond the first brown lineI did post it there but no one has responded yet.. I'm going to copy and paste this to my business folder so I do it right, but the 'slap it on' method I think I'll be able to do pretty well. Now do you think I should put Resolene over the painted set to or will it be too shiny? Oh and another thing, since the black bridle has already been finished before, and I have no idea with what, do you think the USMC will even rub in? Well never mind, if the raw leather is showing in places, it will surely rub in there. Thank you for all your help Dwight. Cheryl Quote http://www.etsy.com/shop/DoubleCCowgirl


Recommended Posts
Join the conversation
You can post now and register later. If you have an account, sign in now to post with your account.
Note: Your post will require moderator approval before it will be visible.