Contributing Member TwinOaks Posted January 13, 2012 Contributing Member Report Posted January 13, 2012 The only critique I will offer is that you need to continue the edging all the way around the toe of the holster. It looks a bit 'off' to have everything else with a nice edge and then have that sharp corner at the toe. Quote Mike DeLoach Esse Quam Videri (Be rather than Seem) "Don't learn the tricks of the trade.....Learn the trade." "Teach what you know......Learn what you don't." LEATHER ARTISAN'S DIGITAL GUILD on Facebook.
Members katsass Posted January 13, 2012 Members Report Posted January 13, 2012 Critiques and comments welcome as always, this is my second glued and stitched gun belt and was for a very good friend. Think it took me a little over two hours to stamp that belt! From the grump; You done good! I'm very traditional in my ideas of how leather stuff should look and be done, and this really the type of stuff I enjoy seeing. Mike Quote NOTE TO SELF: Never try to hold a cat and an operating Dust buster at the same time!! At my age I find that I can live without sex..........but not without my glasses. Being old has an advantage.......nobody expects me to do anything in a hurry.
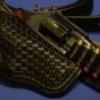
Members Eaglestroker Posted January 13, 2012 Author Members Report Posted January 13, 2012 (edited) Here is a an example of both straight and crooked basket weave. Credit where due, it is Chan Geers work. The colored in line shows the angle the pattern lays in corectly at. The one row shows crooked. The is a very common mistake in basketweave layout. Aaron Thanks Aaron. I can see where laying the stamp further apart caused me to curve. The belt didn't have enough room for error! The only critique I will offer is that you need to continue the edging all the way around the toe of the holster. It looks a bit 'off' to have everything else with a nice edge and then have that sharp corner at the toe. Usually this style turns out nice and rounded at the toe. I wasn't happy with it after final sanding but that's what it took to even the edge. From the grump; You done good! I'm very traditional in my ideas of how leather stuff should look and be done, and this really the type of stuff I enjoy seeing. Mike Thanks Mike, take that as a real compliment. Edited January 13, 2012 by Eaglestroker Quote
Members Shooter McGavin Posted January 14, 2012 Members Report Posted January 14, 2012 (edited) I usually like the stuff that you build. This one though.... is no different. Nice work! Edited January 14, 2012 by Shooter McGavin Quote Zlogonje Gunleathers
Members Eaglestroker Posted January 14, 2012 Author Members Report Posted January 14, 2012 Thanks Shooter, nice dramatic entrance as well Quote
Contributing Member TwinOaks Posted January 14, 2012 Contributing Member Report Posted January 14, 2012 I wasn't referring to the shape of the holster's toe, but to the corner of the leather. After sanding the shape, you can go back with an edger and lightly break the sharp corner left by sanding....or just round it over as you slick/burnish the edge. Either way gives a more finished look. I prefer to go ahead and use the edger to remove the corner, then slick and burnish it. That way there's no question about the fibers of the corner ever standing up and getting fuzzy. Quote Mike DeLoach Esse Quam Videri (Be rather than Seem) "Don't learn the tricks of the trade.....Learn the trade." "Teach what you know......Learn what you don't." LEATHER ARTISAN'S DIGITAL GUILD on Facebook.
Members Eaglestroker Posted January 14, 2012 Author Members Report Posted January 14, 2012 Hey Mike, I use a #2 or #4 bisonette depending on the width of the project before burnishing. Maybe I put to much pressure on the edge? Quote
Members steelhawk Posted January 16, 2012 Members Report Posted January 16, 2012 (edited) Great work, Eagle. What method did you use to finish it? I'm working on a stamped belt now and will be ready for the finish tomorrow. So far I have only put a coat of Neatsfoot oil on it. I'm planning on a trip to Tandy tomorrow to buy a few items. It's 50 miles away, but I will already be over halfway there for something else, so I figured I would go the distance. Edited January 16, 2012 by steelhawk Quote www.bearriverholsters.com
Members Eaglestroker Posted January 16, 2012 Author Members Report Posted January 16, 2012 After the oil I just used 1:1 Resolene to water. A few light coats rubbed in with a sponge brush same as all my leather projects. I like the sheen. Quote
Members steelhawk Posted January 16, 2012 Members Report Posted January 16, 2012 Thanks. I was planning on using Resolene. I used to hate Resolene because I ruined everything I used it on. Then I read about diluting it 1:1 with water and applying with a wet sponge. Now I love the stuff and use it on all my holsters. Quote www.bearriverholsters.com


Recommended Posts
Join the conversation
You can post now and register later. If you have an account, sign in now to post with your account.
Note: Your post will require moderator approval before it will be visible.