Members Schpacko Posted July 13, 2013 Members Report Posted July 13, 2013 I know there are literally thousands of years of experience in leather crafting on this forum. I am sure every one of us has developed some small tricks that make the life of a leathercrafter easier and would like to create a thread to collect as many of them as possible. Please post them here, no matter how small or trivial they seem to you. Here are some of mine, there's a picture attached for every one: "Improved Washers" to cut small radiuses As i know, many of you use washers to cut small radiuses. So do i. But i noticed that the ones for countersink screws work better for me, they are easier to hold. Plus, i punched some round pieces out of a rubber sheet and glued them to the bottom side of the washers for better grip on the leather Rubber bands for Spools This one is so obvious, it took me years to find out about it. Its simply keeps them from unravelling and makes it a lot easier to find the ending of the thread. Felt Pens for Stitching Grooves It annoied the hell out of me that i had to re-dye the stitching grooves of dyed pieces. It was messy and time consuming. So i tried some Felt Tip Pens and it just worked out great. As you can see, its not a huge difference, but enough to weaken the contrast between the groove and the rest of the leather. On the finished piece you would notice an undied groove underneath the Thread, but you would not after re-dying it with a felt tip. I guess you could use any waterproof Felt Tips. I use the ones on the picture because the have a huge range of colours (more than 100 iirc). Now i'm excited to hear some tricks from you guys! Thank in advance Schpacko Quote
Members WScott Posted July 13, 2013 Members Report Posted July 13, 2013 Hello, I like your ideas a lot...simple stuff you just don't think about. To add something here that I learned from another member is about leather storage. A simple tip is to be sure to store like leather and colors together and even more specifically your oiled leathers away from veg tan. Otherwise, you may get some color bleeding or oil stains where you don't want that wont come out. Too easy to chuck everything on the same shelf without thought. There are lots of ways to store.....rolled, folded etc that is personal preference and space dependent. Hope others post some tips. Quote
Members silverwingit Posted July 13, 2013 Members Report Posted July 13, 2013 (edited) Good thread, Schpacko. Here's a little tip, an Easy Bench Anvil. I'm always pounding on something. I dislike setting snaps, punching holes, pounding pricking irons, etc., on my granite surface place, which I try to reserve for stamping. I have small work surface and need every inch of flat space I can muster for its many uses. I stow my surface plate to the back of my bench until I am ready to do some stamping. Instead of having to move the granite in and out in front of me (it's heavy!) and potentially damaging it with a punch, I've made an "anvil" out of an 18" length of 1"x3" steel bar stock. The bar is much easier to move in front of me if need be for extended pounding, but often I find it convenient to just leave it stowed at the edge of my workspace where it's easy to lean over and set a snap or the like. I've cut a 3" wide length off my 12"x12" Poundo board to protect my punches. For setting snaps and such I usually use the bar laid on its 3" side. But it's also handy set on it's one inch side and even and hung out over the edge of my bench to get into small nooks and crannies. There's enough mass in its 18" length to keep it steady for lighter pounding, but if I really want to whack away I just clamp it to my workbench. Saved me and my back a lot of time and work. Thanks, Michelle Edited July 13, 2013 by silverwingit Quote
raysouth Posted July 13, 2013 Report Posted July 13, 2013 (edited) Great topic and sure that everyone has developed some interesting tools/methods at their bench. I have 5 small anvils on my bench and all different shapes and sizes. One designed for jewelers, one very small hobby anvil, a couple of intermediate anvils and the largest I use is the anvil for leatherworkers as sold by Weaver. I love that anvil and has more uses that I could describe. On my dye bench and on my tooling/pyrography bench, I have a 4' section covered by woven backed rubber printers mat as used on large presses. Very comfortable work surface for me and spilling a drop of dye does not cause any problem. Also enjoy having a good selection of different size stainless rulers, sae and metric, along with thin beam squares. Wish I could find larger thin beam squares as mine are 6" max but very nice to work with. Using the threaded side of various bolts, I have rigged up a few for imprinting the thread design and makes some interesting patterns. Also use hex nuts, washers and anything strong enough, and with an unusual shape, to stamp/press designs into leather. Found that, for certain items, model railroad tracks, ho and n gage, make some nice outlines when pressed with my arbor press. Even use the curved sections, now and then. I imagine anything could be used if handled properly. I never throw things in the junk pile anymore, without giving them a try at the bench. Amazing results, at times. Had some counterfiet chinese coins that had nice designs and couldn't read them anyway so I put them in the press and got some very nice impressions. I have a few extra if anyone would like to try one. Picked them up from a guy that purchased at an estate sale and thought they were silver. Lost out on that one. Take a magnet with you when looking at coins of other lands. So much more to do and fun to have. God Bless. Ray Edited July 13, 2013 by raysouth Quote
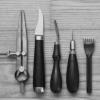
Contributing Member Bob Blea Posted July 31, 2013 Contributing Member Report Posted July 31, 2013 I've got a trick to add. It's actually a specialize tool I modified to solve a problem. When lacing notebook edges I have a bad habit of lacing until I have a very short length of lace left before trying to dry splice in a new piece. Sometimes I get stuck around a corner and either need to backup my lace to before the corner (wasting a lot of lace) or push on past the corner and end up with a very short length for splicing in the new section. It happened enough that I finally took a standard Tandy two prong lacing needle and cut it in half. I then filed down the newly cut tip, just to remove the sharp edge, and made the point a bit narrower like the original tip would have been. The result, a half sized lacing needle that I can swap in and finish the splice. Bob Quote There are always possibilities.... Bob Blea C and B Leathercrafts Fort Collins, CO Visit my shop at http://www.etsy.com/shop/CandBLeather?ref=si_shop Instagram @bobbleacandbleather
Members Sporq Posted August 1, 2013 Members Report Posted August 1, 2013 I use packing tape a lot on the back of the leather when tooling to help prevent stretch... mostly because it's convenient. The real trick with it is to have it go beyond the edges of the piece, especially with smaller pieces. You can either rest your palm on it to hold it in place better, or tape it to your slab if you want. Quote
Members jayjay Posted August 1, 2013 Members Report Posted August 1, 2013 (edited) Here's one I use a brick chisel 2.25" to cut my card pockets. It saves a ton of time and puts a nice looking finish on the card pocket slits. then use an edger on the flesh side Edited August 1, 2013 by jayjay Quote
Members WyomingSlick Posted August 1, 2013 Members Report Posted August 1, 2013 The problem with rubber bands on lacing that is dyed and finished, is that the latex will react with the finish on the leather and stick to it in time. A better way is to punch two or three appropriately sized holes in the cardboard on the end of the spool and thread the end of the lacing through them. Quote (John 8:32) And ye shall know the truth, and the truth shall make you free. (KJV) And the truth is that religion is nothing more than the lame attempt by largely ignorant people to bring sense and order to a world that was beyond their comprehension. Once you see religion for the delusional and superstitious artifact it is............... you will be free !
Members lightningad Posted August 1, 2013 Members Report Posted August 1, 2013 i made myself a wooden bone folder from a scrap of Black Walnut. Just roughly cut it to size, then used the bench sander to add the smooth curves and flat areas i wanted. Then finished it with plenty of very smooth sandpaper. Its my cheapest tool and probably the one i use most! Quote "You is what you am, a cow don't make ham!" Frank Zappa - Musical Visionary Barking Rooster Leather Goods Pinterest Page
raysouth Posted August 1, 2013 Report Posted August 1, 2013 Reading about spills of dye and having experienced myself, I made a small bottle holder which I will try to describe. Two pieces of 2x4 glued together, about 10" long. Traced around 4 oz. bottle, drilled hole in center, routed to the outline. Cleaned out to a depth of @ 2". Did this for two slots and then glued the holder inside a shallow tray, slightly larger and gives me @ 1/2" all around the block. Saved me many problems. I will attempt to take pic and get on later but having bit of difficulty getting pics on computer lately. Lack of know how, I suppose. God Bless. Ray Quote


Recommended Posts
Join the conversation
You can post now and register later. If you have an account, sign in now to post with your account.
Note: Your post will require moderator approval before it will be visible.