rdl123 Report post Posted June 12, 2014 Bob: Your comments are much appreciated - I've been battling the urge just to crank out the last few parts and actually ride this thing - However, your advice has encouraged me to take it slow. I have bored all the holes for my saddle strings. Plan is to install skirt fillers and fleece this weekend. I have notice in the JW DVD's that he does not fill his skirts all the way around - Instead he leaves about a 6" - 8" area right under the stirrup leathers with no filler - Idea being to promote close contact. Can anyone comment on this? It makes sense to me...Just wondered if there is any reason to not go that route... Many Thanks, Ron L Quote Share this post Link to post Share on other sites
oltoot Report post Posted June 13, 2014 Fillers or 'plugs' have a long history. In the early days, they were a sign of extra attention and installing them so that close examination was required to verify their presence became almost like a competition among early makers (1880's-1930's). They gained a bad rap when the cheaper, mass produced stuff began to flood the markets and poorly executed plugs resulted in curling skirts, splitting edges, etc. BTW, properly done is, cut to shape and do all skiving on initial thorough wetting leaving the skirt edge part a little oversize then hang the wet plugs up to dry (and shrink, if they must) then rewet, install, trimming outside edge to fit and go on. If there is to be any stamping on the skirt, even just a border, installing plugs, then stamping helps set them. Now, all that said, while this was going on in the craft, cattle management and tanning practices were changing, too. Fewer mature, grass fat cattle being slaughtered led to thicker hides with more extensive softer areas than before. When layout and cutting continue to emphasize minimizing 'waste' and close fitting, skirts with thin edges that need plugs can be one of the resuts. But if layout and cutting emphasize cutting each piece from its 'best' place in the hides the need for plugs can be eliminated and IMHO if you don't need them why use them. A story: My teacher, C.H. Werner, was in Miles City before and during WWI. With large, grass fed hides, they routinely cut a saddle from 2 sides and had some belly and neck left over for other uses. Today, while I still use some tools that he brought with him from Miles City (to Alpine, TX) and later gave me, it takes me 3 hides to cut a saddle 'right' and I haven't plugged more than a dozen skirts since I gave up trying to get a saddle out of 2 sides in the 70's. But yes, eliminating plugs under the leg portion would give closer contact and help in putting a 'seat groove' in the finished product Quote Share this post Link to post Share on other sites
rdl123 Report post Posted June 13, 2014 Oltoot: That is very interesting - How thick do you like your skirts to be if you are not plugging them? I did cut mine out of prime hide and they are probably 1/4" thick... Sure appreciate your experience, and advice! Thanks, Ron L Quote Share this post Link to post Share on other sites
rktaylor Report post Posted June 13, 2014 Oltoot, Thanks for the detailed comments. I thought the primary purpose of plugs was to make a smooth transition where the skirts were blocked. JW talks about keeping tension on the plugs to prevent the skirts from curling. I was going to order three sides to start my second saddle and talked myself into two. I haven't ordered them yet, but now I am second guessing myself again. That's becoming a habit. Ron, That's good advice from Bob, but I am anxious to see your saddle. Randy Quote Share this post Link to post Share on other sites
oltoot Report post Posted June 14, 2014 Yes, plugs can serve that function, however, with a first quality tree with well shaped bars with fine rather than thick, blunt bar edges, blocking does not need to be so extreme, only a definite change of direction and firm point of contact for lug strings, bar pockets, etc. Different strokes for different folks, I guess. As to thickness, IMHO, 1/4-3/8 is plenty if it is firm. If flanky, 1/2 is not enough. Backing up a little, though. Since I make mostly skirt rigs, some plates and only rarely ring and others, I aim for a different finished skirt for each, laying out and cutting differently in each case. AND, the shape of the skirt is considered, as well. AND, my advice would be to order three sides and relax, especially for a plate with plugs. If you should get exceptionally large, spready, firm sides; smile and save one for next time or for the rifle scabbard or some other something that somebody wants. Quote Share this post Link to post Share on other sites
Ruark Report post Posted June 16, 2014 Are you planning to use real woolskin, or the synthetic stuff? Do you know about putting woolskins on butt-forward? Nice job, by the way! Quote Share this post Link to post Share on other sites
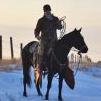
rdl123 Report post Posted July 2, 2014 Thanks Ruark - Yep - I used real woolskin, bark tanned and put the butt forward. Still sewing those up actually. Hand sewing so it's slow going. Anyhow, I have hung the stirrup leather/fenders and have the twist set - I went with the Nevada half twist. Here is a grainy pic: Next is to finish sewing skirts and billets and lace those skirts up - Then oil everything good and assemble! Can't wait to ride this thing! R Quote Share this post Link to post Share on other sites
rktaylor Report post Posted July 2, 2014 (edited) Ron, It's looking good. I can't wait to see the gallery photos when you're done. Hand sewing the skirts (and everything else) is time consuming. However, I think am getting better and faster with all of the sewing that I do. Nonetheless, if I ever sell a saddle, I am buying a machine. Randy Edited July 2, 2014 by rktaylor Quote Share this post Link to post Share on other sites
rdl123 Report post Posted July 9, 2014 To any who are interested - Saddle is more or les done - I have started a new topic in saddle makers gallery... To all who helped me on this project - Many thanks for your advice and help... R Quote Share this post Link to post Share on other sites
BondoBobCustomSaddles Report post Posted July 10, 2014 This has been a good thread. I recently had a young fella call me, he has inherited some tools and equipment from his grand father, and wants to learn how to make saddles. Naturally I wanted to make sure he knew what he was getting into, and the work involved. I suggested that he first join leatherworker and read this thread to get a good idea of what is involved. I think that Ron and all of the others that have added comments, insight, and advice to Ron's first saddle have created a really good snapshot of just what is going on when you decide to get into saddle making. As for the end result, all the time invested by Ron shows in the job he did. Once again Ron, "you did good pilgrim." Bob Quote Share this post Link to post Share on other sites
rktaylor Report post Posted July 10, 2014 I would like to echo Bob's comment. Ron L. was not the only one learning from the posts. Thanks to all who are willing to share. Randy Quote Share this post Link to post Share on other sites