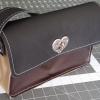
Members Nandy Posted June 29, 2015 Members Report Posted June 29, 2015 I got a few remnants of what seems to be 3 oz leather from Hobby Lobby, I only have the needle that came with the machine when it was sold (don’t look too great) and to my surprise the Bobbins from my Riccar 555 works fine in this machine (I ordered some Friday). I used 138 dababond bonded. I just wanted to do something to keep me awake as I had to stay up all night due to work. I had no patterns and just eyeballed the purse. Cut the parts, glue them with contact cement, let them dry for 30 min or so then take them to the machine. I had a couple of instances that he purse sorta slipped out of alignment. Also, I ran out of thread on the shoulder strap (man, that 138 really goes quick) but was able to get it all lined up and stitch over the last few stitches so it is not too bad. At the end I was surprised it came out decent for an on the fly project, with no real planning and it being my first try. Here are some photos, the wife already emptied her other bag and took possession of this bag. I noticed that the bottom side stiches are not as good as the one on top but then, I am not using a leather needle so who knows. Thanks for watching Quote
Members impulse Posted June 29, 2015 Members Report Posted June 29, 2015 Not a bad effort for first project. You definitely need a leather needle and the top and bottom tensions need to be adjusted. This bag would benefit from trimming the edges closer to the stitching - this would then appear to straitened the stitch lines. Burnishing the edges would also give a more professional finish. I also notice that the left side panel is too long but can be rescued by cutting off the excess. I actually love that this is made From remnants as the colors blend well together. Practice your sewing on leftover scraps and you will be well on the way. Btw what sort of machine do you have? Cheers, Lois Quote
Members Nandy Posted June 29, 2015 Author Members Report Posted June 29, 2015 is a 225 Consew. yes, that one side was off a little and I thought about cutting it but let it go since I was sure I would be revisiting this. Wife already asked for a few enhancements. In my head this would be a bag for just taking the pad with her on those few occasions that she does but she wants something more of full time use. Thanks for your input! Quote
Members DoubleC Posted June 29, 2015 Members Report Posted June 29, 2015 I'm impressed if you weren't using a walking foot machine. And you mentioned it flying so I assume you weren't. I think it turned out well for a project on the fly to stay awake. I'd use it. We are leather workers and notice things other people wouldn't. I think impulse gave you some good advice. Cheryl Quote http://www.etsy.com/shop/DoubleCCowgirl
Members Nandy Posted June 29, 2015 Author Members Report Posted June 29, 2015 I appreciate any input on how to make my projects better And I realize I'm surrounded by experts that do this in a daily basis so it was a bit intimidating posting this BUT how else can I shorten the learning curve other than taking advice from such people? that 225 is a compound walking foot machine. Quote
Members oldhat Posted June 29, 2015 Members Report Posted June 29, 2015 Hello Nandy, i would say this is a great result as a first project and would have left it at that, but since you have asked for ways you could improve i assume you are wanting to learn. So first of all as already mentioned your edges could be burnished or if the leather is too floppy for that you could use some edge dye. Also where your strap attaches to the bag you might consider adding a rivet for extra strength , stitching alone can sometimes come away at these points.I would also probably have lined this bag with fabric to cover the internal stitching. You might even want to consider doing a beaded edge on the next one, they really do look nice. Good luck. Quote
Moderator Art Posted June 29, 2015 Moderator Report Posted June 29, 2015 Wish my first project looked as good. Critique; If the stitching is a design element, then it needs to be perfect. It always needs to be perfect, but more so as to placement and finish if it is a design element. You might consider constructing the bag inside out and turning it when finished. This would "hide" the seams (and the stitching) and make it easier to line the project which is of course a plus. A piped welt for outside is a additional, but not necessary, extra. Keep making bags and try things with each new project. Go to the top merchants and look at their bags. You will see "high end" production bags where the stitching is only a design element and doesn't really hold anything together, except handles that usually are durably stitched and attached. Then there are bags where stitching is really integral and is even hand stitched. But look for ideas, both design and construction. Art Quote For heaven's sakes pilgrim, make yourself a strop!
Members ChiefFilipino Posted June 29, 2015 Members Report Posted June 29, 2015 Nice job. Keep at it! Quote If it doesn't challenge you, it doesn't change you!
Members impulse Posted June 30, 2015 Members Report Posted June 30, 2015 Nandy I was a little reluctant to offer advice as your post was in the "Showoff" category. If you would like future help, please go to the "Critique my work" forum. Quote
Members Nandy Posted June 30, 2015 Author Members Report Posted June 30, 2015 Well, I wanted to show it off but also welcomed any criticism. I will do that in the future. Quote


Recommended Posts
Join the conversation
You can post now and register later. If you have an account, sign in now to post with your account.
Note: Your post will require moderator approval before it will be visible.