Jump to content
TheDogSoldier

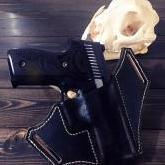
Wrinkled around form after dye and wet form

Recommended Posts

So I know this is probably been asked and told a hundred times. I've found awesome post pertaining to this but---

i ordered Fiebing oil dye. Will that keep the wrinkling or dry effect away after wet forming. I tried the Eco dye water based because I had never dyed before. 

How do you guys achieve a good dye application before a wet form. 

Share this post


Link to post
Share on other sites

OK I'll give it a go. First off, I don't quite know what you are talking about. WRINKLING; never had it occur. Some thoughts though --- first, hopefully you used heavy enough leather. and something other than belly type cow skin. second; don't over wet the damned thing (common mistake). All that is needed is to get your masterpiece wet (NOT soaking) and then allow the item to sit a while 'till it's evenly DAMP but pliable and cool to the touch. Go to town with your hands and especially thumbs to mold. I figure it's  a holster so you will have the shooter (or reasonable facsimile thereof) stuffed down into it -- and that should fit tightly, tightly enough that you should need to use a bit of force stuffing the gun into your masterpiece. Hand mold around the gun 'till you feel comfortable and satisfied with your effort THEN  sit it down and --- run!! don't walk away from it and ignore that voice in you that keeps saying "pull that damned gun out and look at ME!!  Go try to  milk a duck -- do anything but mess with it. Finally after a couple of hours (unless you live in the desert like I do and the temp is sitting at 100+) EASE the gun out of the holster and sit your masterpiece right back down again and allow it to fully dry. Why? 'cause Inside it aint fully dry and in some areas it'll take all damned day to get there. Don't go stuffing your gun back in to see how it fits  until fully dry. Basically, wait until tomorrow. 

Now, as to dye. I use only Fiebing's dyes and have never had any problem. One thing --- ALLOW THE STUFF TO DRY. By dry I mean FULLY dry. Minimum of 12 hours (over nite) but usually 24 hours is best. The stuff can feel dry to the touch very quickly BUT it ain't on the inside of the dead cow skin it was applied to. When dry -- buff the snot out of it. At this time you can proceed to wet mold your item and apply a finish. NOW. all of this takes time and one thing to remember is "Doing good leatherwork is NOT for those looking for instant gratification". My translation of this is "Take your damned time!!  Best wishes and good luck in your endeavor. Mike

Edited by katsass

Share this post


Link to post
Share on other sites
1 hour ago, TheDogSoldier said:

How do you guys achieve a good dye application before a wet form. 

I will point out that Mike is talking about the dye process AFTER the forming process because that is when/where it should happen...

Share this post


Link to post
Share on other sites

Sometimes I dye before I assemble and mold and sometimes I dye after. Usually this is determined by whether I want the stitching to be white or dyed. With a lined holster sometimes I'll get wrinkles if I dye first. Using good quality leather reduces this but sometimes I still get some wrinkles. I do buy my leather by the side and I have occasionally used lining leather from too far down into the belly. I've only noticed the wrinkles with holsters that fold back onto themselves, although I think it's also fair to say those are the only holsters I ever line. I couldn't guarantee that, but I can't think of any pancake type holsters that I've built with a liner. Anyway, When I think about it I'll pre-form the main folds in the leather while it still has some moisture in it from tooling. This makes for a little more trouble when you sew the liner edges since it's not just a flat piece, but seems to make the folds more wrinkle free. 

I do use Fiebings dyes. Sometimes the "pro-oil" and sometimes the regular ones, just depends on the color. FWIW the "pro-oil" is still alcohol based and dries out the leather about the same as far as I can tell. I also use the Fiebings acrylic antique quite a bit and it seems like anything finished with that will wrinkle a little if I forget to pre-fold it. 

Mike's advice is solid and based on a lifetime of hand building holsters. I've been at it for a while but not nearly as long as him. I will also note that I don't let things sit as long as he does and usually don't have too much trouble because of it, although I have had times I wished I'd slowed down. 

To a large degree I think trial and error is truly the best teacher. Build a few and you'll get an idea off what works for you and what doesn't. What works for Mike, or Red Bear, or myself may not necessarily work for you. Leather work isn't a science, it's an art and there are many ways to get a good result. Although t's equally true to say that some things will lead to failure almost every time. Letting things dry 12 to 24 hours is good advice and a good idea.

Good luck with your projects, Josh 

Share this post


Link to post
Share on other sites

Here is what I'm referring to. I like white stitching so I can't do after. 

That is the inside of a fold. I know the Eco ur is water based and dries leather out like this. 

image.png

Edited by TheDogSoldier

Share this post


Link to post
Share on other sites

OK  -- what weight leather did you use AND what type, shoulder, back, side, belly ??. Wrong part of the skin of the poor deceased cow critter can cause problems. I use only shoulder leather. I usually dye prior to molding or even stitching. That allows me to ensure a smooth even dye job. Just to let you know -- black will give you fits in that it will rub off on everything you get near AND it can be difficult to get an even dye job. BUT to answer your question: If using a dauber, wad of cotton rag, piece of shearling etc, wipe on the dye in one direction, all over the thing (As I said,I prefer to dye prior to any assembly)   -- wait a bit ---  wipe on more dye at 90 degrees to the first run  ---  wait a bit  ----  wipe on another coat at 45 degrees to the last and if necessary another coat at 90 degrees to that.  Allow to dry (12 hours at least)and check for full coverage.  HOWEVER!! dead cow skin is not always made up of equal and even density --- variations WILL occur, even from the best of tanneries and dye will show these variations. The trick is to know if it's the leather or your own damned fault. .  In your piece I'd guess that your wrinkle problem was to much water and/or a little too loose on the gun. As I said, the gun getting stuffed into the wet (damp) holster should take a bit of effort to get it in and seat fully. If not -- it will never tighten up. Going in tightly it will slightly stretch the leather and not allow any wrinkling.  Just the opinions of a grumpy old man -- take from them what you will.   Mike

P.S. You forgot to run your edger. If you don't have it, get Al Stohlman's book (about $12) 'How to Make Holsters'. Damned near every holster maker has their copy --- mine was purchased in the early 1960s. and I'll still look at it now and then


Edited by katsass

Share this post


Link to post
Share on other sites

thx for the advice! This was a test run. No edging etc. Ill try again and see what happens. 


Share this post


Link to post
Share on other sites

I have started treating almost all of my holsters with Bick 4 leather conditioner... it seems to help with wrinkles "if they were caused by the leather drying out"  the best thing is make sure you start with higher quality leather... " fleshy leather" will wrinkle a lot more .


Share this post


Link to post
Share on other sites

Yeah,I don't think that's a dye issue.  Looks more like a loose-grained leather issue from teh picture.

I'm not familiar with the products you used, so couldn't swear that didn't affect it.  But I do use Fiebing's dye, and have not had what you show.

DSC00486.jpg

Share this post


Link to post
Share on other sites

Thx a bunch! I think the combination of the Eco water based dye really drying it out and maybe not tight enough pattern around pistol mold. Thx Guys. 

Share this post


Link to post
Share on other sites

UPDATE:

probably the combination of getting them to wet and maybe too loose. This one turned out great. Thanks so much for the help. 

13557934_1759627107652880_7314675496698474534_n.jpg

Share this post


Link to post
Share on other sites

Join the conversation

You can post now and register later. If you have an account, sign in now to post with your account.
Note: Your post will require moderator approval before it will be visible.

Guest
Reply to this topic...

×   Pasted as rich text.   Paste as plain text instead

  Only 75 emoji are allowed.

×   Your link has been automatically embedded.   Display as a link instead

×   Your previous content has been restored.   Clear editor

×   You cannot paste images directly. Upload or insert images from URL.


×
×
  • Create New...