


CedarSlayer
-
Posts
14 -
Joined
-
Last visited
CedarSlayer's Achievements
Member (2/4)
-
I too am looking for such a thing, but a bit differently, I want a recipe. Ideally, a mix that would or brush on, and then rub off leaving behind a nice black or really dark brown in the cracks and depressions. The ideal mix would have a good working time where the coating could be rubbed off, but in a day or so would then soak in and set permanently and not rub of or stain things later. My preference would be for this mix to be inexpensive, easy to make with readily available materials, archival grade, ecologically sound, food safe, and easy to use. And it needs to wear well and look great. Any ideas where to start? Bob
-
That is outstanding! Magnificent work. A good display and a good tool rack, while protecting your tools! Bob
-
Holster for Leatherworking Tools
CedarSlayer replied to CedarSlayer's topic in Gun Holsters, Rifle Slings and Knife Sheathes
I made an Etsy shop and listed a divider set on it. http://www.etsy.com/shop/toolmakingart Bob -
Holster for Leatherworking Tools
CedarSlayer replied to CedarSlayer's topic in Gun Holsters, Rifle Slings and Knife Sheathes
I would love to make you one, but I am not sure if discussing price is allowed in this section of the forums. Again I love making tools, but I don't know if I can discuss price here. Head knives are quite a bit harder to make than just about any other tool I have made. But I would love discussing what you are looking for and enjoy any excuse to fire up the forge and pound metal. The one in the picture was made with WWII era Sheffield Steel. It was cut out in basic shape, brought to heat and pounded to produce the shape. It started out as a pretty large head knife, but I kept messing up the grinding. By the time I got it tempered and ground correctly,it was a small head knife. I wanted the temper to be ideal for stropping. I took a section of the same steel, ground a long edge on it, hardened it, ground it clean, and then variable tempered it along the edge. Thespot that stropped the best was almost blue. However the compression caused by hammering the actual blade made it a bit harder, so I had to temper it a touch softer to get it right. Every time steel is tempered, the outermost layer loses a bit of carbon, so had to grind a bit more off with each experiment. I am pleased with the final result,but it took quite a bit of tinkering to get it right. Sadly I am already like Inspector Gadget, I have to pull out three or more tools before I find the right one as it is. I hope this pouch helps me with that very problem. Thanks! Bob -
After spending more time searching around for my tools than stitching, I decided to make a holster for the mess. It holds quite a few tools, I am a total leather newbie, so feel free to critique this. I would do a lot of things differently if I were to try and make another. All in all though, I am pretty happy with it. I could not find any examples of tool pouches made for leatherworkers, so the design is entirely from my vivid imagination. Two of the tools I used are probably not in the general list of leatherworking tools. One was a Crown Brad Pusher. Just the thing for pushing a needle through seven layers. The other is the Multifunctional Divider I made. Bob
-
Backgammon game I made for a PIF event.
CedarSlayer commented on CitizenKate's gallery image in Our Leatherwork Galleries
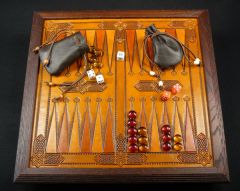 Very Nice indeed, Katherine!
 -
I got the basic design from from Jim Toplin's The Toolbox Book. Jim Toplin got the design from Kit Africa, a ship builder, rigger and fancy work artist. If you want to know more about Kit Africa, he is in Sterling Hayden's book, "Wanderer" From the little I know of Kit Africa, it could easily be an ancient design or something he whipped up with a few scraps of wood and some leather over a few days sailing the South Seas. If you scroll down here, you can see the original plan. Here is my write up on the tool box, on my blog. Bob
-
Sadly mixing and adding the oil as well as applying it, is not something I have managed to get to precision. The other measures work out, since you are literally trying for optimum content. The oil, you will have to develop a feel for. Just as when you oil leather, it kind of take a feel for it. Bob
-
Thanks! I did a bit of a write up on milk paint on my blog. One classic method of treating leather is to do a two layer milk paint treatment. The first layer is light, the second layer is dark but thin. This give a feeling of depth. Milk paint is amazingly durable, but must be added with oil or it will crack when flexed. This can be used to make good solid new leather, look like really old checked leather however. Bob
-
First off, here is my leatherwork tool rack, with lots of room on the right bar, to drill more holes for tools. I do a bit of woodworking and metal work, but I am a rank beginner at leather work, here is my most ambitious leather work so far, my son, Nathan, is the model. Apart from the folding ruler, all the tools in this box where also made by me. The leather is all horse butt. The finish is two layers. Milk, borax and olive oil for the first coating, Milk, concentrated apple juice and olive oil for the second coating. This tool box is delightful, but it takes up a very large area when opened. I am working on a version that remains on one end and also functions as a tool rack. I intend to make it mostly from leather. I decided to ornament it a bit, but seriously I have no clue here. Some of my sketches and the result thus far: I used tea to get the little bit of shading that I have done on it. I am thinking of using vinegaroon to shade it further, but I don't know how much that will bleed. I will try to test with a few scraps, but any advice would be appreciated. I prefer to mix my own stains and such from scratch, so I am avoiding the easy route of going to the hobby store and buying die. Bob
-
What are the qualities of a good head knife?
CedarSlayer replied to CedarSlayer's topic in Leather Tools
Thank you, this has been a good wealth of information. My intention now is to shorten the back of the tang to go just a bit past the last drill hole, but make the grip much longer so that I can adjust it down to the best line. I will use Chicago Bolts to hold the grip on, so If I go too far on my cutting down the handle, It will be easy to put a new one on. I may try making one with a dubbed bevel, just for the education, but I may end up grinding it flat. Flat bevels are easier to hand sharpen. I will be sure to keep posting my progress and mistakes here. Bob -
What are the qualities of a good head knife?
CedarSlayer replied to CedarSlayer's topic in Leather Tools
Thankyou for the input, Ross, Bob and Ben! Your suggestions make perfect sense. My personal preference is for a single bevel so I think your preferences are wise. The only downside with a single bevel, is that it eliminates the option of using a surface treatment such a bluing. I may try for a deep parkerization treatment anyway just to protect the blade a bit. In Al Stohlman's book on tools, he mentions cutting off the end of the knife to make it the right size. So I probably need to trim the tang close to the minimum to give options. To sharpen with a straight bevel, all the way to the tang, this will result in a fairly fine angle. So my guess is that a well tuned head knife has an angle of 7 to 15 degrees and while the blade is thin, the tang is fairly thick. I think I will aim for 12 degrees on my first one and see how well that does. Bob -
Any good tips on Making a Head Knife? I am cheap, poor, a beginner at leatherwork and like to make my own, so I am going through the work to make a few nice head knives. The steel plate I am cutting from is a nice 7/64" thick chunk of old stock Sheffield O1 steel. This is seriously great steel. Easy to temper, and will easily sharpen to as good an edge as any steel known. Some metals will resist wear better. A lot of metals resist rust better, but for sharp, O1 is the classic great. Here is the lot of them cut out. The red shows me where to grind off the edge to get an even circle. I made a radius cutter so that I could mark a radius around a center point. I plan to attach the grip with Chicago Bolts, but leave the center hole. With a correctly placed stud in the hole, this will allow easy sharpening to an even edge. As the blade is used and wears down, I can grind the stud down to maintain the angle. This brings me to a few questions. My plan is to put the bevel on the blade to 15 degrees, and then to put a 18 degree secondary bevel on that with the reference angle stud to allow the 18 degree angle to be maintained. With a washer on the stud, I could then put a micro bevel on the edge to 20 degrees, if desired. Do these angles make sense or are there traditional leather working knife angles that work better? My leather working experience is pretty small, so I have no clue. Also, I put blade reliefs in as I have seen them on a lot of examples. Usually a blade edge is given the cutout, to facilitate easy sharpening. However the few examples of head knives that I have seen, do not have the back edges, the ones facing the users hand, sharpened. Does anyone sharpen these? If there are any other qualities that are ideal for a head knife, I would be grateful for the suggestions. On another note, I am planning to make a few blades for leather cutting that will fit into the radius cutter. It will help me make nice curves in leather. I am poor and cheap, so I have to make my own tools, but if you are interested in the radius cutter, Lie-Nielsen offers one. Mine will open to make a very large circle, and is totally stable. Considering the source, I suspect that the Lie-Nielsen version is every bit as good if not better. Bob
-
I would rob them from existing vises. http://www.ehobbytools.com/index1.html You could do a search on Ebay for a pin vise and find a wide range of them. Bob