


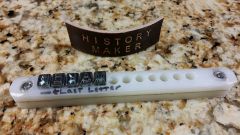
Letter Jig

By JoeSnuffie
- 894 views
- View JoeSnuffie's images
I got a request from my church for 50 bracelets with "HISTORY MAKER" stamped on them and got to thinking how I could bring the cost down. Time is money and stamping this many letters is a lot of time.
I cut a strip from a cutting board, sanded the surfaces smooth, cut it in half and glued the two pieces together with contact cement. I then scribed a center line and, using a wing divider, marked the center of the holes. After marking the holes it was time to drill. Make sure the material is thick enough so that the shaft of the stamp is completely enclosed in the jig, with none sticking out. You want the jig putting even pressure on the stamp and if any of them are sticking out the back, the mallet will hit the stamp and not the jig.
I used a 6mm bit and the holes go all the way through, which makes it easy to pop out the letters with a dowel from the other side. !!!IMPORTANT!!! When drill each hole, after the first, of course, you must place one of the letter stamps in the previous hole. If you fail to do this, the plastic will bend and the hole will not be large enough.After drilling the holes, I countersunk some screws with nuts on either side to keep it all together. You can see that I marked mine to show the orientation and placement of the letters. I did it this way because I hold the jig with my left hand while my right hand holds the mallet.
To use, I place the letters in as far as my fingers can press, making them as straight as I can. Then I smack them in with a mallet and use pliers to carefully straighten them. Because the shaft of the letters is tapered, they will be pretty tight once you set them in. I stamp the first word and then pop out the letters by pressing them out from the back with a dowel. They pop out pretty easily.
I did this for 1/4" stamps but this could be modified for other sizes.
This has saved me a lot of time!
Recommended Comments
Join the conversation
You can post now and register later. If you have an account, sign in now to post with your account.
Note: Your post will require moderator approval before it will be visible.