Ingenero
-
Posts
6 -
Joined
-
Last visited
Ingenero's Achievements
New Member (1/4)
-
1T Arbor Press - simple punch and stitching chisel mod
Ingenero replied to Ingenero's topic in Leather Machinery
That's a good idea! I was thinking some type of tubing might help, hadn't thought of 3/8 tubing. And I've purchased similar letters on AliExpress - probably have what you're looking for, I've purchased some solid letter stamps from them. Not fancy, but work great and don't cost an arm and a leg. -
Stitching chisels/irons and pricking irons reviews and information
Ingenero replied to Northmount's topic in Sewing Leather
Bit of a gravedig - but I thought my $0.02 might help someone. I'm a new leather crafter and thought my input might help someone. I started my work with a decent set of diamond irond from Wuta - they definitely weren't the highest end, but worked well enough for me to determine that I loved leather crafting, and that I wanted to get something more refined. They stuck in leather, even when I used a smidge of wax on them. If you're starting the craft, I'd recommend them if you want to see if you like leather crafting, but also recommend sharpening them if you can do so. So my first tool upgrade was to buy KS Blade irons in my favored stitch spacing. They are night and day with my Wuta irons - incredibly tiny but clean holes, incredibly easy use without sticking. If you do enjoy leathercrafting and want a first tool upgrade, I would highly recommend nice irons. I'd also note that you probably won't need reverse irons with these - use them straight on and you get incredibly precise stitch marks on the other side to. They're a thing of beauty. Maybe not aesthetically, but definitely to use and in their result. A word on stitch spacing - don't do what I did and try to figure out pattern size using standard French iron sizes so the stitches are all even. Iron "SPI" numbers don't indicate stitches per Imperial Inch (the American one), but per Paris inch, which is equal to 27 mm rather than 25.4 mm like Imperial inches. Hope that saves someone time they would have wasted trying to figure out why 10 SPI irons made less than 10 stitches in an Imperial inch or why your stitch lines were never precise regardless of how many times you run the numbers. If you are fine making an uneven stitch now and then and aren't a math geek like me who wants things to line up nicely, ignore this and do what you want. I can't imagine anyone noticing unless you're at the top of your craft (in which case, why are you reading stuff from me!). But if you're a perfectionist, just get metric irons in 3 mm or 4 mm (or 5 mm if you dislike stitching) - they'll make the math SO MUCH EASIER. I suspect anyone who isn't a master of leatherwork could tell any change from the standard French 2.7/3.38/3.85 mm (or 10, 8 and 7 SPI) irons. Good luck! -
Manual Strap Cutter Machine: Opinions/Recommendations
Ingenero replied to DieselTech's topic in Leather Machinery
I'll be interested to hear your experience...I'm unlikely to buy one any time soon, but am curious how well it works. I did initially look for cheaper Chinese options, but didn't see anything comparable - they were all far more manual. -
1T Arbor Press - simple punch and stitching chisel mod
Ingenero replied to Ingenero's topic in Leather Machinery
If anyone stumbles across this in the future (I hope you have flying cars!), it not only works well, but has made it a lot easier, and far quieter, to get my stitch holes marked and ready for use. Just make sure to use the right surface underneath the ram (I use a cutting board with some scrap leather on top), and think about how to keep the arbor steady if you're not going to bolt it down (I'd recommend weights). What it has done is let me make progress while my kiddos are sleeping! I definitely can't complain about that. -
Hello all! I'm new to leather working, but have been reading a lot here and decided to join, largely to say thanks for all of the fantastic information! While I'm new to leather working, I have some relevant experience in sewing, basic woodworking, and gunsmithing (so more wood and metalworking skills), which I'm already finding really useful. I'm looking forward to learning more here!
-
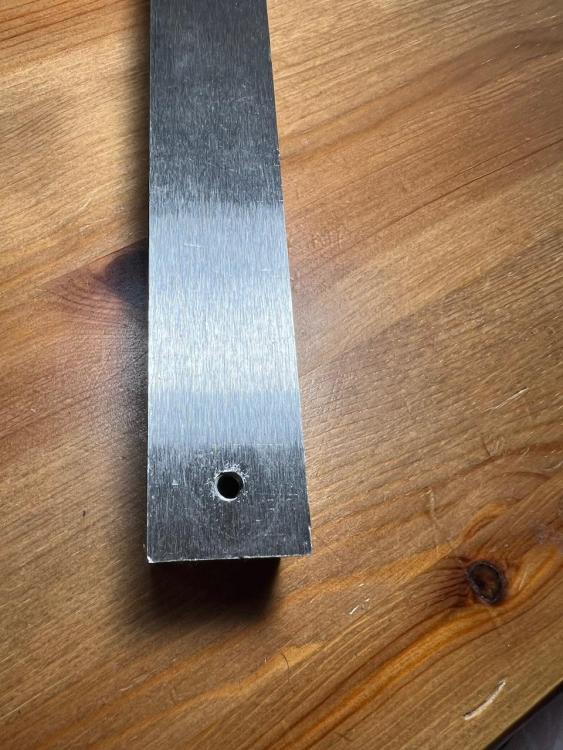
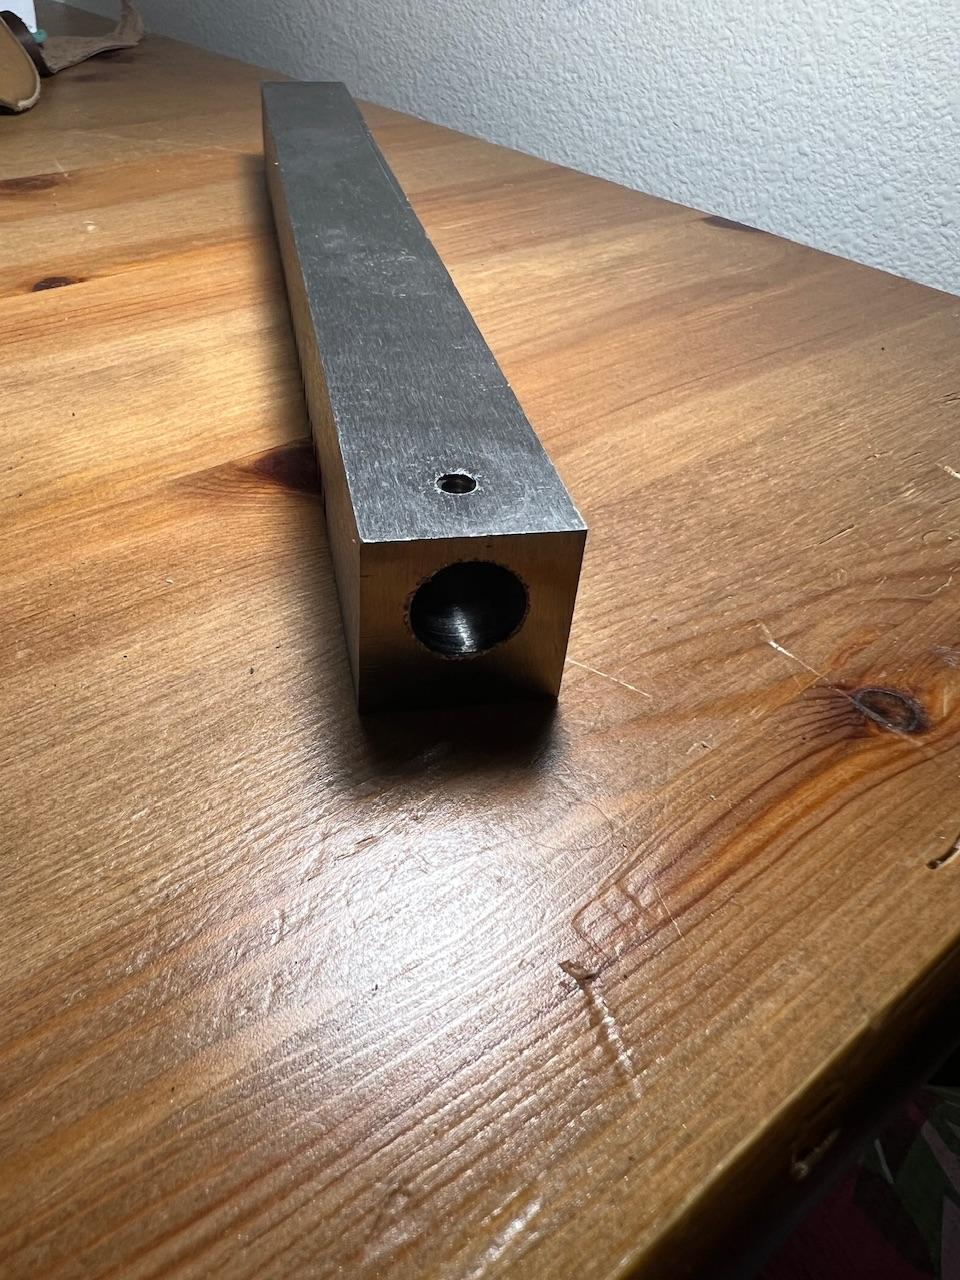
Hello all! I'm new here, but have been reading posts for a while and learning a lot, and decided to share a project I'd finished that might help others. I've seen a few posts on modifying a 1T Harbor Freight Arbor Press to accept punches or stitching chisels, but those involved using a lathe or having someone with access to one machine a slot in to the arbor ram/rack and drill and tap a hole for a set screw. I managed this entirely with a drill press and a tap, which may be more accessible for people. This should work with any inexpensive 1T drill press - the design is pretty universal. A couple of caveats. I already had the drill press and a really good set of metal drill bits - that made this doable without being super pricy. If you have general drill bits (the "wood and metal" types), I'd suggest getting a metal specific bit as drilling even mild steel will tear them up pretty quickly. If you're not going to be doing this often, an inexpensive bit should be fine. Finally, unless you have a tap for steel already, you'll need to buy one. Be careful to ensure it's intended for steel - an inexpensive Harbor Freight set will have the caveat that it's intended for use on plastic and soft metals (like copper) but not steel, so be careful. What I used: Drill Press - DO NOT try this with a hand drill, you won't be able to drill the hole straight enough and are liable to break your bit. 1/2 inch (12-13 mm) drill bit intended for drilling mild steel Drilling/cutting/tapping Oil - I used Kroil, but most lubricating oils work well. Tap and corresponding drill bit (I used a 10-24 tap and 5/32 inch metal drill bit - make sure it corresponds to a machine screw you can buy in the proper length) machine screw with the threading corresponding to the tap (I used a half-inch screw, I'd suggest one that's 1/2 to 3/4 the length of one of the short sides of the ram) Tap Wrench Some details about the Harbor Freight Arbor Press ram/rack (in case someone needs more dimensions - I couldn't find this online) Dimensions: 9 3/8 x1x1inch 1.5 inches at top and at bottom untoothed 20 teeth, 0.25 inches tall, 3/8 inch spacing Procedure: I started by chucking the 1/2 inch drill bit in the drill press and positioning the ram on its end (tallest dimension vertical) under the 1/2 inch drill bit with the bit slightly off-center of the ram (see the image of the ram end below). This made the process of drilling and tapping the set screw hole easier. Ensure the top of the ram is 90 degrees to the drill bit (a carpenter square works well, so does anything that's definitely square) - that ensures your hole isn't skewed and your tool will be reasonable straight, plus you won't accidentally drill out the side of the rack. I would highly suggest clamping the ram in place - it makes the drilling process much easier. Next, put some cutting oil on the drill bit - it'll help ensure a cleaner hole, keep the operation cooler, and make things easier to clean up. Now drill - slowly. You should drill in to the metal a few mm, pull back, and drill in again, repeating until you have a hole about an inch deep. Stop for a minute when the arbor ram's metal begins to feel warm, add a few drops of cutting oil on the bit, and drill further. Again, don't push it and try to get this done, that's a good way to break a bit or hurt yourself. Once the hole is deep enough (around an inch to an inch and a half, or 25 to 40 mm), unclamp the ram and lay it on its side (longest dimension horizontal) with a side other than the one with the rack teeth vertical. That will make the set screw accessible. Now unchuck the old, larger drill bit and chuck in the smaller drill bit corresponding to the tap. Add cutting oil and slowly drill until the bit breaks through in to the original, larger drill hole. Ensure the hole is clean (run the bit up and down a bit), then unclamp the ram and clean up the metal chips on it. Next, put the tap into the tap wrench, add a couple of drips of cutting oil, and slowly tap the hole. Once you're through in to the main hole, unscrew the tap, and clean everything up. Ensure no metal chips or excess oil remain on the ram to drop on to your leatherwork. Take your set screw (machine screw) and ensure it properly runs in and out of the set screw hole - and check that it properly holds your tools. Put your ram back in the press (you'll need to remove the set screw first), and use your new tool! Now I can work on things without my wife yelling at me at night.