BillinOK
-
Posts
101 -
Joined
-
Last visited
Content Type
Profiles
Forums
Events
Blogs
Gallery
Store
Everything posted by BillinOK
-
 Really nice work, Fritz. I wish my son-in-law could see your work. He has just started building knives. He called me the other day wanting leather to build some sheaths.
 -
Holster Making Video Overview
BillinOK replied to particle's topic in Gun Holsters, Rifle Slings and Knife Sheathes
After 3 1/2 hours I got to see it. Very well done. It's always interesting, after doing leatherwork for years, you can always pick up something new or different from someone else. Thanks for posting an excellent presentation. -
Holster Making Video Overview
BillinOK replied to particle's topic in Gun Holsters, Rifle Slings and Knife Sheathes
Well, I'd love to watch it, BUT I live out in the country at the end of the DSL line. So it's slow downloading, too slow. If I try to watch the video it buffers about every 5 seconds. Has anybody made a DVD and be willing to send me one? I would sure pay for it to be sent. -
Speedloader Pouch
BillinOK replied to gregintenn's topic in Gun Holsters, Rifle Slings and Knife Sheathes
Ok, I found one and it is pretty plain. I believe this was for .357 cal, and probably safariland speedloaders, that straddle the belt. You would have to round the corners and fit the snaps in the right place. The best I can remember, as your are looking at the pattern, it is in the completely open frontal view. The shorter portion (top of photo) 1 3/4" would be the top of the pouch. The bottom long piece would be behind the belt (police duty belt 2") and bend upwards toward the top front of the belt. The short top pieces would have the female snaps, and the bottom long pieces would have the male snaps. Like I said they is very plain jane. I would rounds the corners, then grove and stitch. If you are making this for a narrower belt, then shorten the pieces. I would make a heavy paper pattern the get the right fit. Also this was form fitted (wet) to the loaded speedloaders. If this picture is too hard to see, PM me with your email and I will send the full size version. Hope this helps.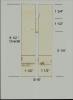
-
Holster Interior Conditioning
BillinOK replied to Bob A's topic in Gun Holsters, Rifle Slings and Knife Sheathes
I line just about all holsters that I make unless the customer doesn't want it. I use Lexol and I also use neats foot oil. That said, I've noticed some other preps here on the forum and I would like to try those also. The lexol does pretty good at conditioning. Neats foot is good also. -
Mark Is your friend wanting an "IWB" crossdraw? They can be hard to access, depending on his/her size and arm length. Several years ago, I made a crossdraw for newspaper sports editor. He wanted it easily accessible, outside the pants and fast draw. There were no "safeties" on the holster, just the angle and tight molding to hold the gun in place. So it depends on what he/she wants. Just like Twinoaks said pay close attention to the molding. You might also post in the holster section http://leatherworker...hp?showforum=29 for addition ideas.
-
Knife Sheaths
BillinOK replied to plain ol Bill's topic in Gun Holsters, Rifle Slings and Knife Sheathes
No, no not ignorance, just a thought. Your "grooved" line around the edge at the top of the sheath. I know this involves extra sewing and work, but you might try and see what you think, and even sewing the belt loop around the grooved line. Once again, your work, knives and sheath, is beautiful.
-
Need Help Molding Holsters
BillinOK replied to RMB Custom Leather's topic in Gun Holsters, Rifle Slings and Knife Sheathes
Are you talking about an actual vacuum sealer? and any pictures? I have been hand forming and boning holsters all along and this sounds interesting. I have been looking at the press but a little leery. I like this idea better. If you need to, PM with all the details....Thanks -
Knife Sheaths
BillinOK replied to plain ol Bill's topic in Gun Holsters, Rifle Slings and Knife Sheathes
Very very nice knives and sheaths. Have you considered sewing the entire sheath? I, for one, really like visible thread. Just my 2 cents. -
S.o.b. Holster
BillinOK replied to BillinOK's topic in Gun Holsters, Rifle Slings and Knife Sheathes
I agree. These holsters are really only good for small handguns. I've made quite a few of them, for smaller handguns. -
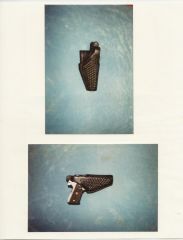
Law Enforcement Rig
BillinOK replied to BillinOK's topic in Gun Holsters, Rifle Slings and Knife Sheathes
Thanks so much guys. I've been in law enforcement for 30+ years. Yes my fingers were sore from the sewing, especially that holster. Had to use pliers to pull the needle through. Wish I would have had my present Tippman aerostitch, it walks right through that thick leather! What a relief. -
Law Enforcement Rig
BillinOK replied to BillinOK's topic in Gun Holsters, Rifle Slings and Knife Sheathes
Sorry for the large picture. For some reason I've lost the edit button ??? -
Citation/Note/Check Books
Images added to a gallery album owned by BillinOK in Our Leatherwork Galleries
-
-
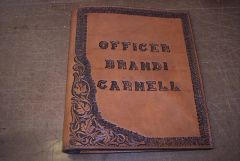
From the album: Citation/Note/Check Books
© © leatherworker.net
-
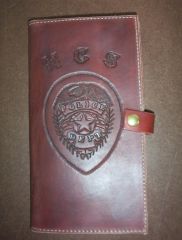
From the album: Citation/Note/Check Books
© © leatherworker.net
-
-
-
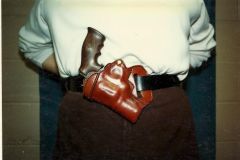
From the album: Holsters
© © leatherworker.net
-
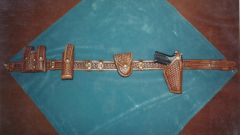
From the album: Holsters
© © leatherworker.net
-
From the album: Holsters
© © leatherworker.net
-
From the album: Holsters
© © leatherworker.net
-
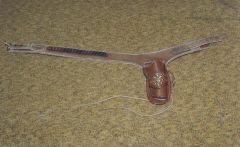
I use to make these SOB holsters all the time. On this one I tried to warn the customer that the size of the gun and holster would be uncomfortable in setting. But that's what they wanted. These were really fun to make and don't take too much time. Once again this was hand sewn. When I was first asked by a customer to make them a "SOB holster" I said "what"?! ha ha Well I found out what they were talking about!
-
This rig was done for a deputy. The belt is a ranger style belt. The holster was lined and reinforced by request of the deputy. Saddle tan stain was used, then a good rubbing with lexol. This was made prior to me getting a sewing machine, so it was all hand sewn.
-
Just got my great grandfather's leather kit (pics)
BillinOK replied to bigo5552000's topic in Leather History
Wow does that ever bring back memories. That was my first kit. Wish I still had the box! I talked to my teacher/mentor about 10 years ago about the tools we had back then. He told me, let me show you something. What he showed me was a rack of all the tools we used back then in Jr. High School. What was even better, he gave me all the duplicates that he had. What a peice of history for me. Of course I still have them and use them. -
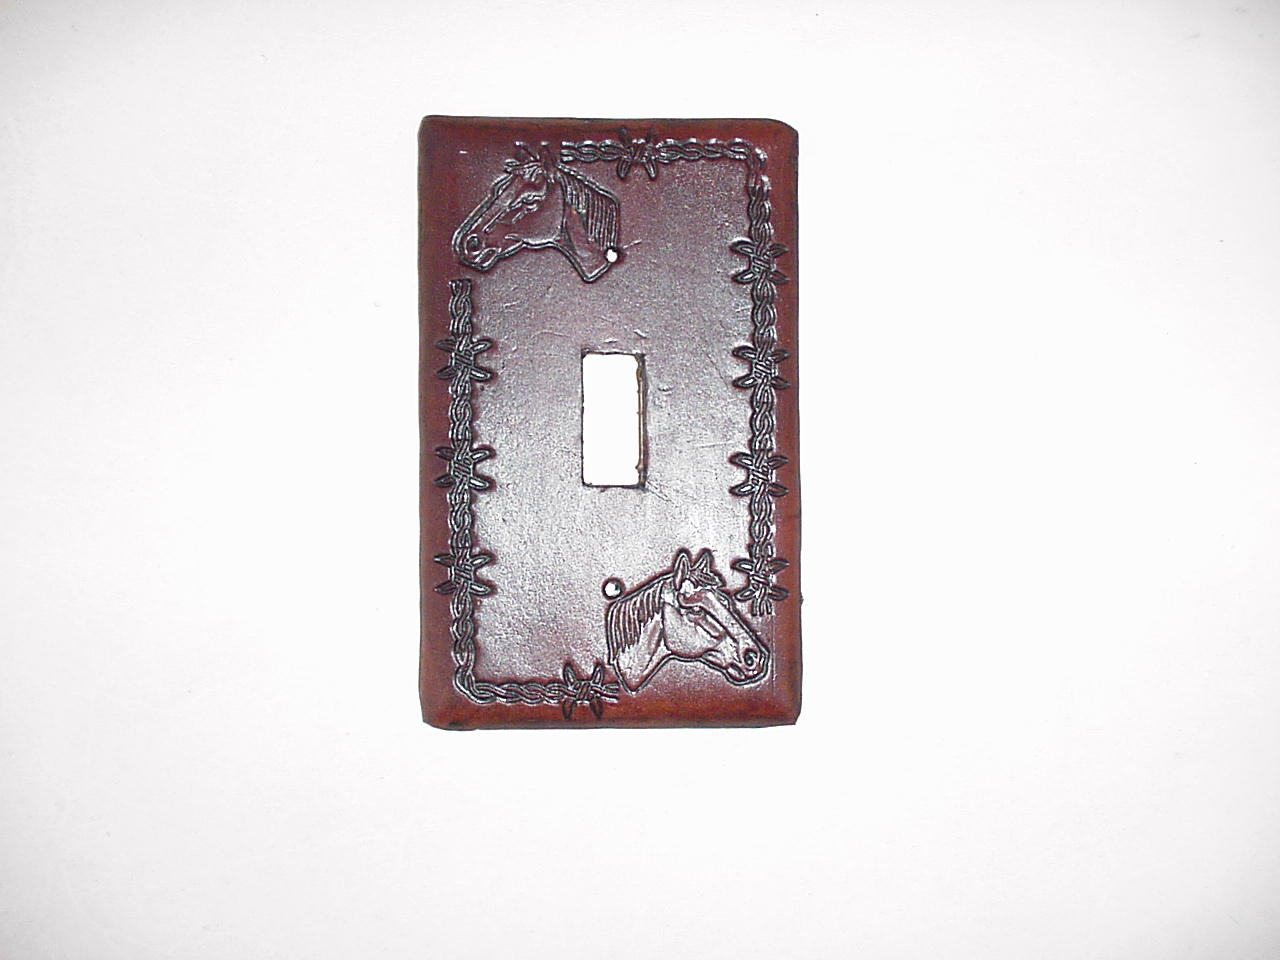
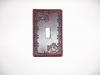
I made a bunch of these, including for myself. This was one of about 20 that I made for a customer. I made several that were basketweave. I made these in all designs. They're fairly simple to make using 2-3oz leather. I bought large quanties of switch and socket plates. Roughed the surface of the plate for the cement to hold better. Had to use caution tooling and stamping because of the 2-3 oz. I oversized the leather, and rubber cemented it to poster board. Did the tooling and finishing right there on the poster board. Punched the screw holes. Then removed the poster board, cleaned, and cemented to the switch plate. I cut out the switch hole then touched it up. After the cement had dried good, I trimmed the excess leather off with a razor knife, then touched up the edge. Used clothes pins to help hold leather down along edges.
-
ha ha ha.let me tell you that hurt. I just sat there in awe at what I just did. Hey I did save my project from the blood!!