anhurset
-
Posts
65 -
Joined
-
Last visited
Content Type
Profiles
Forums
Events
Blogs
Gallery
Store
Everything posted by anhurset
-
Well, what I'm telling you is essentially what I learned from every forum post I could find on the topic, followed by my personal experimentation over the last 5+ years. You want to try to cover the walnuts with the water, but t it's not mandatory as long as you rotate or stir the bag every 15 minutes or so. I did small batches early on and I found with those batches that it works best to boil for 3-5 hours with the bag of walnuts in and then remove the bag (while boiling) and reduce the dye down to the right color/consistency. Remember to add the liquid that drains from the bag back to the dye. You'll probably need to experiment with the steel wool, it doesn't take much and too much will blunt the color. For a 1-3 gallon batch I would wait to add the steel wool until the dye was decanted and I would start with a pinch, something about the size of a dime or penny (remember to de oil the steel wool). The smaller you can make the steel wool "fibers" the faster they will dissolve, so teasing it out and cutting it up will make it go faster. The dissolving rate will depend on how small you managed to make the "fibers" and the temperature of the dye, the warmer it is the faster it will go, but you're looking at about two weeks minimum. You have to be patient with this step, if you try to speed it up you'll likely either make the batch too dark or kill the undertones in the dye and have to start over. Remember to shake the container from time to time, it will disperse the steel wool and aid the dissolving, you'll also need to shake the dye before using as some of the larger pigments will settle over time.
-
I've got a styrofoam male head that I picked up at Hobby Lobby a little over a year ago and I find that its VASTLY undersized. It works well if I'm doing something designed for a woman or a teen, but it's in no way sized appropriately for the average male.
-
This is the head that I use,http://www.amazon.com/gp/aw/d/B00CB046DE?cache=ef0285cc49fda4c40f30bd2d63b890dcπ=SY200_QL40&qid=1408881058&sr=8-1#ref=mp_s_a_1_1 though the price has almost doubled since I bought mine a year ago. The vast majority of these heads are but slightly undersized and this was the only head I could find that had both feature sizes and an overall size nearing normal. Even though it's close to normal it's not perfect, it's a bit on the narrow side for most men and the ears are slightly undersized and set 3/4" too low.
-
It sounds to me like you're looking to make a pair of tassets, a hanging sections of armor designed to protect the upper thigh. Tassests came in two forms, articulated panels designed to flex with the wearer and solid sheets which moved only at the belt/fauld attachment point, either way they should be made of stiff leather. You really should look up some armor construction references, the net is filled with free, easy to find armor reference which should give you a better idea of what materials you need. Try looking at the pattern/construction sections at myarmoury.com, the Armour Archive and Arador Armour Library, there are others, but those are the three with the largest active communities and most often updated resources.
-
Here in TN they start hitting the ground in mass in mid September, as long as they're on the ground they're usable, so just tell the family friend to give you a yell when they're falling. With the soak method it doesn't matter what color they are, green, brown, black, or how rotten they are. You also don't have to dry the husks, just take the nuts, husk and all, pack them into a bucket/barrel/trashcan, cram as many of them in as you can, cover them with water (they'll try the float a bit) and then loosely cover the container. You're just trying the keep debris out, the nuts will need to vent a bit because they are going to ferment and you don't want your container to explode. Check them once or twice a week and top off the water a bit as needed, when the husks start sliding off with gentile hand pressure they're ready, down here in TN it usually takes about two weeks to get to the sloughing point. You've got a choice once you reach this point, you can either go ahead and peel them and make your dye, or you can weight the nuts down, top off the water and wait a bit longer. If you keep them submerged and don't stir them the tannins will destroy any bacteria in the liquid and create an anaerobic environment, this drastically slows the decay of the nuts while at the same time leaches more tannins and color into the water. This method gives an instant punch to the dye color as there is more color in the initial boil water, it also allows you to ignore the soaking nuts for an extended period of time. The last batch I boiled up was in May of this year, from nuts I harvested in late September of last year. There was no mold, the tannins and anaerobic environment saw to that, and the nuts were no softer nor more fermented than they had been a few weeks after I started the soak. Regardless of which way you go with the soak you'll need to peel the husks. You'll be doing the next step with your hands, so unless you want to spend the next 7+ days with brown fingers wear some gloves. You're just separating the husk from the nut, it's easy and shouldn't require any tools, though sometimes it's nice to have a knife to create a starting slit. You can toss the nuts if you want, but you'll loose a fair amount of husk meat on the nuts and adding them to the boil seems to make no difference to the dye. I've used husk alone and husk and nut and I've seen no real difference. At this point I toss everything in an old pillow case, tie it off, toss it into my boil container and add the soak water. Use that soak water! It's got a massive amount of color and tannins in it and without it your dye will be weak. When I do small batches (very rare) I'll do the boil in the house, it will put off a smell, not bad, not good, but it can get strong with the multiple hours of boiling. Most of my batches are big though, usually ending with 6-7 gallons of dye, so I do most of my boiling outside, in a washtub, over a fire. Whichever way you go you're looking at several hours (minimum of 3, but more likely 4-5) of boiling. It's hard to describe what you're looking for in the dye, it needs to be thicker than water but not really syrupy. You can test small amounts while you're cooking, just make sure it's around body temperature before applying to leather. Once you think it's done let it cool, remove the sack of husks (set it in a separate container, it's full of dye and you don't want to waste it) and strain as you decant. The straining doesn't have to be super fine, I use a little wire mesh kitchen strainer, you're just trying to get any big chunks. Find some way to suspend that sack of husks so you can drain the rest of the liquid from it, squeeze it out too, that's the ambrosia of dye trapped in there don't loose it. Add your alcohol, a minimum of 1 cup alcohol/2 quarts dye. The last I read Chuck Burrows had stopped adding alcohol to his dyes and swore that it upped the color. I haven't tried it yet, but if Burrows swears by it then it must be worth a shot.
-
Medieval/renaissance/fantasy Pattern Pack
anhurset replied to mrdabeetle's topic in Patterns and Templates
Actually leather armor appears to have followed deferent designs and design parameters than metal armors, though considering how little medieval European leather armor has survived (if I remember right there are a couple of vambraces which appear to have been parts of full arm harnesses and most of a single full leg harness) it's almost impossible to have an appropriate understanding of their design and construction. There are hundreds of composite armors such as coat of plates and armored jacks, but in the end those are more metal armor which happens to be held together with large sheets of leather, fabric or a combination of both. The armor patterns in this pack are inspired by metal armors and as such they should be layered in the way one would if constructing it out of metal. I'm not stressing historic accuracy here, I'm stressing proper construction based on what was done in period to ensure that the armors move and lay properly. -
I've used two methods to remove the oil from steel wool, soaking in acetone and allowing to drip dry and dousing with a flammable liquid (acetone, lighter fluid, denatured alcohol, etc) and then setting it on fire. I've found both methods to be equal when it comes to oil removal from fresh steel wool, in the end I tend to fall back on the soak and drip dry method as the douse and light method can be scary. I pour acetone into a bowl and swirl pads individually ensuring that each are saturated to the point of dripping and then hang them, outside, to dry. Nitrile gloves will protect you from the acetone if you're leery of skin contact. Lighting the solvents on fire can be really sketchy, if you go that route then I really suggest using lighter fluid simply so you can see the flame. Acetone and denatured alcohol both have a tendance to burn with a near invisible flame. Yes, technically you want the walnut husk, the outer fleshy skin surrounding the nut. You can buy dehydrated black walnut husk from natural dye suppliers and I've heard of people using the walnut cleaning medium sold by ammunition reloading companies, both routes are a bit expensive though. Harvesting yourself is really the cheapest route, I know walnuts can be found in the northeast section of Utah and the Navajo, Hopi and Zuni all are known to have traditionally used walnut dyes so I would assume that they can be found in the four corners region. Utah's a big state though. Butternut, pecan and hickory husks can all be used too, though they do result in slightly lighter colors.
-
Medieval/renaissance/fantasy Pattern Pack
anhurset replied to mrdabeetle's topic in Patterns and Templates
Not an actual archaeologist yet, I've still got a couple of semesters to go. Degrees and titles mean little though, some of the most knowledgeable people I've met have had nothing more than a highschool education. Passion, the ability to research and the willingness to critically examine ones opinions are far more important than a piece of paper. -
Medieval/renaissance/fantasy Pattern Pack
anhurset replied to mrdabeetle's topic in Patterns and Templates
Actually, while that sounds logical it doesn't hold true when compared to original pieces. Faulds, the lower banded skirt seen on some armors, can be seen in original pieces to overlap both upwards and a downwards. The same can be said of articulated breastplates, tassets (hanging thigh armor) and cuises (non hanging thigh armor). Do an image search for 14th or 15th century articulated breastplates, while a few will exhibit a downward overlap the vast majority will be seen to overlap with the upper edge exposed. Also check out Brian Price's "Techniques of Medieval Armour Reproduction", it's a great reference which shows both originals and reproductions and gives some explinations as to why armors were built the way they were. -
I've managed VERY dark brown, but never quite black with black walnuts. You can make "iron black" without vinegar, de-oiled iron/steel immersed in water and allowed to rust the slow way. Im talking 1-2 years before you start getting an acceptable black and 5 years for a really good black. No vinegar smell though. Down here in the South you can often fnd 55 gallon drums that have been setting that way for a decade. If you run across something like that and have a chance to salvage the water do it, transfer it to a useable container feed it a bit of iron/steel and top off the water from time to time.
-
There seems to be no need to use a mordant of any type with leather and yes the salts would likely cause a problem with cracking and over drying of the leather. It's best just to ignore the mordants and any info in regards to boiling the material you're dying, in general hot liquids and leather do not mix well. I'm unsure how long is too long when it comes to immersion dying, most of my pieces stay in for far less than an hour and I've only done extended soaks, 8+ hours, a hand full of times. In fact, it was those extended soaks which turned me off of coffee dyes, long soak times, long drying times and a color range I was just never happy with. Using vinegar will result in a vinegar odor which will dissipate fairly quickly if the item is left in an open breezy area with plenty of sunlight. If you use vinegar for any reason make sure that you neutralize it with a baking soda and water bath and then rinse with clean water to remove the excess baking soda. I've heard of people venting their vinegaroon until it no longer smells and while I've managed to decrease the odor, I've never been able to completely eliminate it. The smell doesn't really bother me, but I always make sure my customers know what to do to speed up the dissipation. I rarely immerse leather in liquids above body temperature, as stated above, hot liquid and leather don't mix well. As to the cold, I keep my dye vats in a kitchen with no temperature control (I have a VERY understanding wife), so hot in the summer, cold in the winter. I've noticed no impact on my walnut dyes, but cold temps do affect my vinegaroon to the point that I've he had to start storing it in the living room during the winter. I'm not sure about temps below the low 40s though.
-
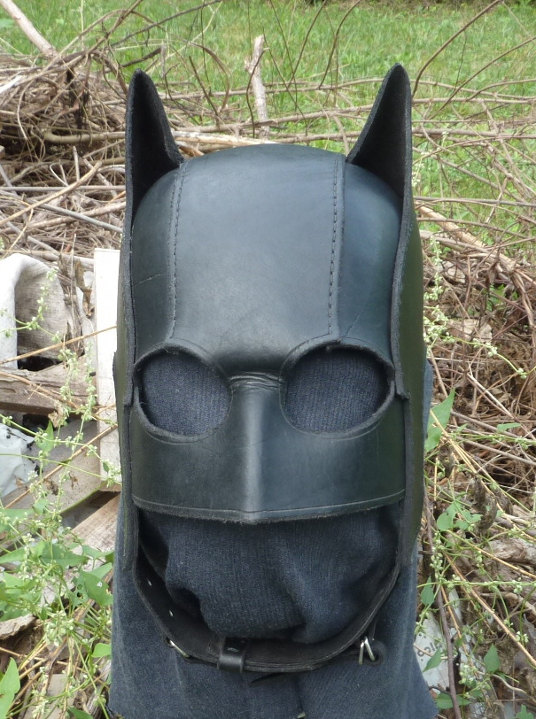
Yep, I've got the same problem, made two of these Rockabilly Batman cowls/helmets a few months back.

-
The confusion name wise comes from the use and the actual meaning of the word 'calcei'. For reenactors and some historians and archaeologist the term calcei refers to a specific type of boot like footwear worn by the late iron age Roman military, but in Latin calcei simply means shoe. Roman authors and historians, both in period and modern, tended to label anything not obviously a caligae as calcei, including barbarian net style shoes (which I would argue are in reality a moccasins and not a true shoes). The barbarian net shoe went on to influence the civilian calcei, which in turn influenced the net shoe, by the end of the Western Roman empire it becomes almost pointless to attempt to class them as differing types.
-
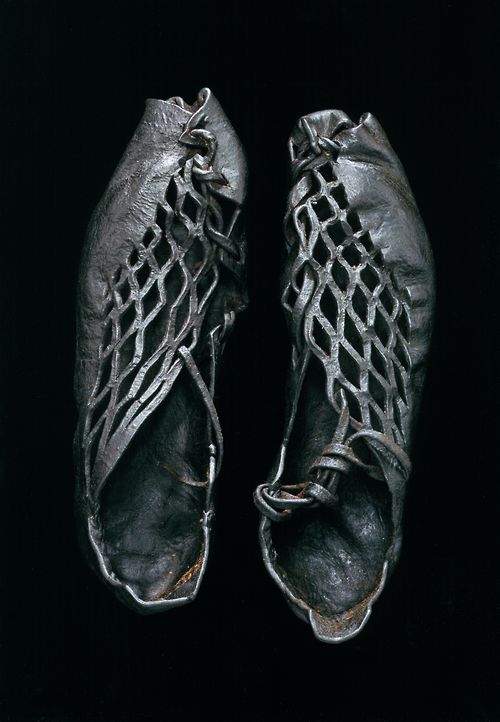
OP stated that the time period is 400-600CE, which is early to mid Anglo-Saxon. While I agree that full blown Roman boot style calcei are too early, shoes resembling civilian style calcei shoes (refered to as net style shoes at times) were fairly wide spread leading up to the Anglo-Saxon era. The shoes in the attached image date to 400BCE-400CE (while that's a huge swath of time it's about average for carbon dating on bog finds), they were found in Denmark and are a very good example of how wide spread the net style shoe was leading up to the Anglo-Saxon era. In the end think about it like this, if you wouldn't wear Converse All Stars when reenacting the early 19th century then you shouldn't wear York type IIIs when doing early Anglo-Saxon.
-
While the York type III is a nice shoe it's a bit late period for Anglo-Saxon reenactment and has little to nothing in common with the Roman calcei style shoes in use just before the Anglo-Saxon invasion. In reenacting, when period correct designs are unavailable, the use of an earlier period design is always preferred over that from a later period.
-
The two examples shown on the Angelcynn site are based on extant examples of net style shoes which date to just before the Migration period and may have carried over into the MP. The info here, http://www.heatherrosejones.com/shoesnettop/, is a bit old but still good and they give a pattern for at least one type which should be adaptable for other styles. If this is the first time you've made footwear then I should warn you that you're likely in for a lot of frustration, though the net style shoe is a bit more forgiving fitment wise than closed style moccasins and shoes.
-
That's odd, I checked it before I posted and it was working, it's definitely not now. Apparently that was their old site, here's the info from the new one, http://www.angelcynnreenactmentsociety.org.uk/home/pagan-anglo-saxon-clothing. Sorry about that. Angelcynn is one of the more exacting Anglo-Saxon reenacting groups, If you note, their section on footwear gives suggestions for styles around their time period, but no examples from that period.
-
Does your group's dressing guide not include an acceptable footwear guide? It should, a clothing and footwear guide is the first thing any half capable group should produce. If they don't, then I suggest you look at guide from a longstanding group known for its accuracy, like Angelcynne (their clothing guide can be found here, http://mahan.wonkwang.ac.kr/link/med/england/anglo-saxon/culture/dress.html). Honestly, Saxon/Angle/Anglo-Saxon footwear is a rough topic as there's just simply not much to go on. We've got a load of archaeological remains from before that period and a mountain from the periods after, but that time span is slim especially in regards to leather and textile items. I second the suggestion on " Stepping Through Time", unfortunately it won't quite give you what you're looking for.
-
Check eBay for "brass rivets and burrs", the first three hits I get seem to be what you're looking for, they're not cheap though.
-
How to make Grey Dye
anhurset replied to tat2's topic in Dyes, Antiques, Stains, Glues, Waxes, Finishes and Conditioners.
This is simply a recipe for vinegaroon/vinegar black/iron black. Yes a weak versions will turn leather gray, but over time, as the oxidization continues and the leather absorbs oils it will continue to darken until it eventually turns black. It may take years for it to turn black (though I have seen it happen in days, it really depends on the amount of tannins in the leather), but it will happen. -
I meant to say something about that, but completely forgot. As stated above you can't really change the color vinegaroon imparts, you can, however, use the oxidization process to alter the color of other natural dyes. Small amounts of iron (de greased steel wool) added to the dye will both darken the resulting dye and cause color changes in the dye. Adding it during the boiling process is easiest, though it can be added afterwards. When I say a small amount I'm talking less than a 1/4 of a pad of OOOO steel wool to 5 gallons of dye. More can be added, but I've noticed that it tends to mute the untertones and causes the color to look a bit lifeless. Natural fiber dyeing guides will give an idea of the resulting colors caused by adding iron, but the end result will likely be different due to the iron/tannin reaction within the leather.
-
I have found this step to be completely unnecessary. I used to husk the nuts and blend until I came across a Native American recipe from the 18th century which suggested soaking the whole nuts in water until they fermented and the husk started sliding off (usually takes about two weeks). You can boil with or without the nut itself, it really doesn't make a difference, sometimes I do, sometimes I don't, it really depends on how much husk material I have after peeling.I most definitely agree that you should check the natural dyes thread at CAS City, there's a lot of good information there, make sure you go through the entire discussion though, a lot of the recipes evolve through the thread. There's also a recipe in The Book of Buckskinning vol. VI. I've tried coffee and tea dyes a few times and have never been happy with them, they tend to require a lot of soaking, 12-24 hours, to achieve at most a very light brown color. A 1:1 mix of walnut dye and water, brushed on, gives essentially the same color in far less time and gives the option of darkening by adding multiple coats. Don't overlook fiber dyeing recipes (ignore the mordants and boiling/soaking times), they're good guides for determining if an ingredient will work, what color it will givegive and how light fast it is. Generally speaking, if it works for fabric, it will work for leather.
-
Storage would depend mainly on the acidity of the dye, I would expect mason jars would be fine, I would suggest inspection acting the lids from time to time for rust. Vinegaroon is the only thing I have dealt with that was seriously damaging to metal. I tend to use plastic containers, most of my dying is done via immersion, so for me it's more sensible to use buckets, so I use six gallon buckets with lids with air tight gaskets. I do keep a small amount of each dye I use in smaller containers for when I do a brushed on finish, for those I tend to recycle whatever I've got laying around, mostly gallon vinegar jugs left over from making vinegaroon and empty liquor bottles. If you're not going to freeze the dye then you'll have to add something to retard mold growth and the least dangerous thing you're likely to find will be isopropyl alcohol. With walnut dye, one cup of alcohol to seven and a half cups of dye is just enough to keep mold at bay without being noticeable odor wise, the tannin odor is infinitely stronger. I've heard of people using no preservatives and just dealing with the mold, either scraping it off with each use or simply ignoring it, but then you'll be dealing with possibly dangerous mold. I'll take the minor alcohol contact from fishing items out of the vat, usually less than 20 seconds on the skin, over dealing with mold any day.
-
Without fail, the color extraction process is going to be boiling, toss the intended ingredients into a pot, add water and boil. Some of them will require a full rolling boil (I get the best result from walnuts by boiling the crap out of them) wile others, such as onion skins will work well by taking them to a rolling boil and then reducing to a simmer. A rolling boil will extract color faster than a simmer, but some items don't respond well to that level of heat for an extended period. Regardless of boiling or simmering you're looking at hours of heat and usualy a couple of water refreshes before you reach a useable dye. After you achieve the color and consistency/viscosity you're looking for allow it to cool and decant into containers. You've got a couple of options when it comes to storage, you can freeze the dye which requires no preservative, but does require thawing before use, or you can add rubbing alcohol to lengthen shelf life. I use alcohol, 1 cup of 90% isopropyl per 2 quarts of dye. Others use more or less, but I've found this to be a good ratio, I've got an old (5 years old to be exact) container of walnut dye using this ratio and it has never shown a willingness to mold. I use natural dyes straight from the barrel without cooking out the alcohol and have never had any issues, other people insist that the alcohol needs to be cooked out before use, but I just don't see the point in that, it's extra work which serves no purpose. Isopropyl on leather is a lesser evil than the denatured alchohol found in factory dyes and the amount of alcohol I suggest is an infinitely smaller quantity than is found in those store bought dyes. When it comes to dyeing you'll have to experiment, you'll get a different color depending on application, brush the dye on gives a different tone than imersing the leather, altering the number of layers applied or the amount if time the leather was immersed will also alter the resulting color. The leather itself will alter your color results too, no two hides will give the same color. The amount of oil applied after dyeing will alter the color depth too. Practice and experimentation are paramount when using natural dyes. With the black walnut dye I make I can get shades as light as a yellowish tan all the way to beep dark chocolate brown, it all depends on my method of application and the amount of dye I apply. I definitely suggest you try natural dyes, theyre far less messy than spirit and oil dyes, cheap, easy to make and once you figure out the tricks they're easy to use.
-
I've seen carved and painted wallets from the 70s which were used until they died, the paint was faded but still there. That doesn't mean it will hold true for all painted eliments on wallets, you're dealing with a mountain of variables.