Nooj
-
Posts
125 -
Joined
-
Last visited
Content Type
Profiles
Forums
Events
Blogs
Gallery
Store
Everything posted by Nooj
-
On my first holster I kept the distance even around the trigger guard (1/2 inch) and I had quite a bit of space between the stitching and trigger guard once it was wet formed. On my most recent holster (Taurus pt1911) I "cut the corner" a little where the curve is on the trigger guard, as well as marked my stitch lines slightly closer, and the fit around the trigger guard was almost perfect. I don't have a set method or lots of experience- I just thought I'd share what worked for me, based on the two I've done. Good luck :-) Nooj
-
Leather Bracelets?
Nooj replied to Sixer's topic in Purses, Wallets, Belts and Miscellaneous Pocket Items
Hi- If you would rather use a buckle instead of a snap button, perhaps some watch band hardware would work well. I saw several websites with small buckles googling 'watch band buckles' (some were kinda pricey for a tiny buckle though). Nooj -
Making Your Own Dummies
Nooj replied to Bobby hdflame's topic in Gun Holsters, Rifle Slings and Knife Sheathes
While I like the thought of buying the gun that I'm making a holster for, since I'm only a hobbyist, it's not the most practical. Budget willing, I'll do it though :-) In my case, I'm extremely slow in my production, and have had a friend's pistol for a number of weeks now- so, if I were to be able to make a dummy for a reasonable cost and time investment, I wouldn't have to hold someone's gun very long and I'd have the dummy for future use. That's just me though. I don't have a shop or even a dedicated work area, and I work a lot- plus I procrastinate. Also, I would prefer an accurate dummy over wet forming using the real firearm. Nooj -
Making Your Own Dummies
Nooj replied to Bobby hdflame's topic in Gun Holsters, Rifle Slings and Knife Sheathes
That's exactly what I was thinking of doing. The only worry I had was whether or not the silicone used to make the mold with would seep into the little nooks and crannies and cause trouble. There is another site that has similar products, and some how to videos. www.alumilite.com Nooj -
Couple Of New Holsters
Nooj replied to Big O's topic in Gun Holsters, Rifle Slings and Knife Sheathes
Nice looking holsters, Big-O. I especially like the shape and two-tone on the smaller one :-) As far as the dual carry thing (strongside/crossdraw) I wonder if you could use another layer for the strongside beltloop, and that way the two carry options wouldn't be going under the same piece. So you'd be able to stitch along the tunnel for the crossdraw carry , making it more stable. It would make it a bit fatter on the backside though... Does that make sense? I was just thinking about how to stablize it a bit and still keep both wearing options. Keep up the good work, bud! Nooj -
First Holster Project- Iwb
Nooj replied to Nooj's topic in Gun Holsters, Rifle Slings and Knife Sheathes
Thanks for the complements and suggestions guys! I've leaned a good bit on this holster, and hopefully will continue to improve. I'll leave this one the way it is- It'll be a reminder to slow down and take my time ;-) Noah- I'm very fond of your finishing technique, like the sheath in your avatar. I may attempt a similar concept on some future projects. What's the old saying- imitation is the sincerest form of flattery? Nooj -
First Holster Project- Iwb
Nooj replied to Nooj's topic in Gun Holsters, Rifle Slings and Knife Sheathes
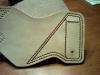
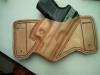
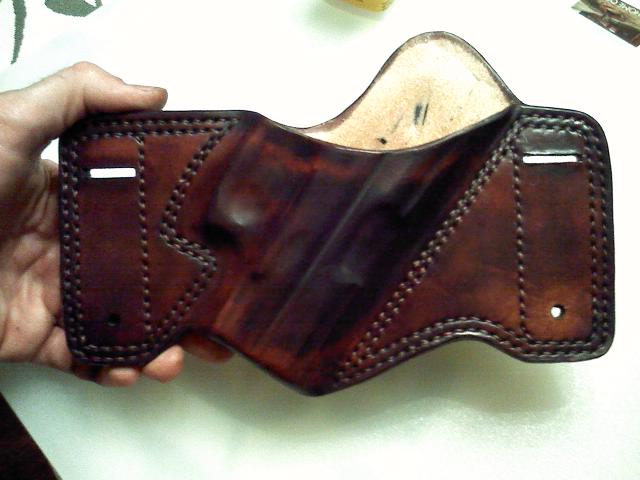
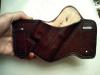
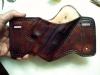
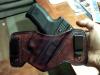
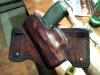
Here are more pictures for ya. The first is showing where I trimmed the rear to allow for a better thumb hold when grasping the pistol (I also trimmed the front down a lil). There is one pic after I finished airbrushing it. I used dark mahogany, and went around the edges with bison brown. And then a shot of what it looks like when you get antsy and don't wait for the dye to dry before trying to seal it, lol. The last two are the finished product. Thanks for lookin! Your input or suggestions are always welcome :-) Nooj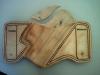
-
First Holster Project- Iwb
Nooj replied to Nooj's topic in Gun Holsters, Rifle Slings and Knife Sheathes
Thanks for the replies, yall. Being that this holster will be stuck in my pants, I guess coloration really doesn't matter after all. Katsass- Thanks for the advice. It's all well taken. The stitching around the trigger is a lil too far out- I layed out my stitch lines 1/2 inch from the outline of the gun. I guess I thought the stitching would pull up closer to the gun when formed- I'll adjust the next to account for the compound curves in that area. Since you dye before forming, are you using oil based dye? I used the Eco-flo water based stuff, so I did my forming prior to dyeing because I didn't know if wetting it down would affect it. Other than that, the sequence of events you discribed are what I had in mind. Nooj -
First Holster Project- Iwb
Nooj replied to Nooj's topic in Gun Holsters, Rifle Slings and Knife Sheathes
Well, I ruined it... After spending quite a while airbrushing it to perfection (ok, maybe not perfection- it was my first time using an airbrush, and my first holster or leather project I've done) , I wasted all my efforts by trying to proceed with sealing it before the dye had cured. Now it's a muttled, tiger striped mess :-( Oh well- ya live, ya learn. I did trim around the grip and trigger guard some, so that I could get a better grab on the pistol. I was almost pleased with the finish before I screwed it up, Grrr! I guess I'm still happy with it though- being a rooky, I guess I can't complain ;-) I'll put up pics tomorrow. Nooj -
First Holster Project- Iwb
Nooj replied to Nooj's topic in Gun Holsters, Rifle Slings and Knife Sheathes
Thanks for the complements and constructive criticism! I certainly see plenty of things to improve on. You're both correct about the coverage around the grip and rear of the trigger guard. I'll more than likely trim it to allow for a better grip before I dye it and finish the edges. Yes, the green tape is holding the perfectly good pencil I carved up to use as my front sight channel. The pistol shifted sometime during the forming, and isn't quite centered (rear sight is a little off to one side, and the muzzle end is slightly canted as well), so maybe that is what gave the illusion of having no front sight channel. Thanks for the input!! Nooj -
Hi everyone- I've been looking around and reading from all the wonderful members here for several months. I recently began my first holster project- an IWB holster for my Taurus 45. I've always been interested in leatherworking, and my need for holsters is what finally drew me into doing it. There are several things I could've and perhaps should've done different thus far; But, I'm somewhat pleased with what I've done so far. I fudged out the pattern on the backside of some cardboard (miller high life, no less), and have stitched and wet formed it so far. Tomorrow I hope to dye it. I'll post pics as I progress and for critique :-) I know there are many things that I can improve on... A lot of which I've noticed- but perhaps the experienced eyes here can point out things I may have missed to help me improve. Glad to be here. Glad to be able to do this. All glory be to God! Nooj