Lil Doodler
Members-
Posts
66 -
Joined
-
Last visited
Profile Information
-
Location
Austin
-
Interests
Leather, guns, guitars, cars
LW Info
-
Leatherwork Specialty
holsters
-
Interested in learning about
everything
-
How did you find leatherworker.net?
google
Recent Profile Visitors
The recent visitors block is disabled and is not being shown to other users.
Lil Doodler's Achievements

Member (2/4)
-
Precise application for Tokonole, glue, dye, grease, oil
Lil Doodler replied to Lil Doodler's topic in Leather Tools
Thanks for your question. To prevent the glue from setting up, leave a bead of glue hanging outside the tip, just like with a caulk gun. When you use the syringe the next time, wipe/pull the bead on the end of the tip off. After that, I push a little out to clean the passage before applying whatever the substance is onto the project. When the syringe gets low, clean the tip off (if necessary) and suck up some more of whatever to refill. If somehow the substance inside hardens, just throw the syringe away. The syringes are inexpensive - cost less than a buck. So far, I haven't had to throw any away. -
Precise application for Tokonole, glue, dye, grease, oil
Lil Doodler posted a topic in Leather Tools
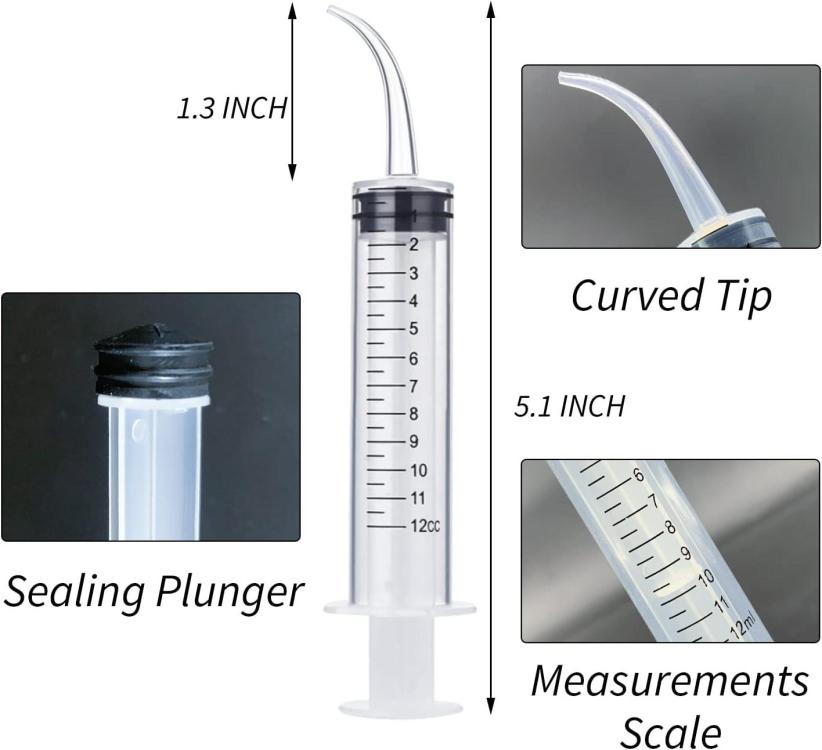
Howdy! I'm wondering if anyone else uses Dental/Vet syringes? I did a search for syringes in the forums, and saw only medical metal needle type syringes. These are intended for Dental use or vet use, but I've found they're perfect for many other applications where a small or precise amount is best. I first used them on the inside borders of leather before sewing. Holds the leather in place so it doesn't shift around. Just a small bead is all that's needed. I don't use powerful leather glue in this situation because it's just to hold the leather pieces together while it's being sewn. It's easy to use Elmers or Tokonole in the syringe on leather edging. Where there's a valley or gap between different layers of leather, precisely fill it and let it dry before applying another layer or top layer. You can easily trim the tip to get a larger bead for wider/thicker edges. After finishing using the syringe, leave a small bead outside the tip to dry up and seal it until the next use (just like a caulk gun). The syringes can be also used for leather paint, dyes or oils. With thicker fluids, it's harder to pull in and push out but it will work. I also use these for lubricating machinery, guns and even doors with oils and grease. It's really efficient at putting oil on the inside rails of slides and bcg. These are fairly inexpensive. On Amazon, I got a 10 pack for under $10 including tax. Although these are disposable, I have yet to throw one away. https://www.amazon.com/gp/product/B0C9HF3SRQ/ref=ppx_yo_dt_b_search_asin_title?ie=UTF8&th=1 -
Thanks for the feedback! The cow horn I have was "sanded" No hair inside or out. No stink lol The cow horn seemed to work better than a bone folder that is glossy/glass smooth After hearing from y'all, I'm tempted to buy and try a rougher surface (unsanded) elk or deer horn
-
Good thing about ripstop nylon, Sunbrella and some similar synthetics is that you can use a hot knife tool or even a soldering pencil (depending on the thickness) (besides using a laser to cut) and have a no fray edge. I found a 3/8" thick x 12" x 24" tempered glass to put under the ripstop nylon or Sunbrella when cutting with a Sailrite hot knife. I found you can use almost any metal foil to block/protect rfid cards. I use thin copper foil on a roll bought from a hobby store.
-
I was wondering if anybody here uses cow horns for smoothing out/burnishing leather edges? They seem to work well for burnishing for me. I use the wide part of the horn for longer areas. Smooths out the edge without too much effort. The pointy end is very convenient for inside curves, even tight ones. Is there a downside to using one of these? Thanks
-
Great job putting that together! A while ago, when Hobby Lobby still had 40% off coupons, I bought a Logan 450-1 mat cutter for straight cutting leather. I found that sometimes the veg-tan would slip when making long cuts. To fix that, I put some anti-slip tape under the straight edge. The tape was too wide, so I had to trim it to fit. Works good now. If you have slippage problems, here's what I used: https://www.amazon.com/gp/product/B07MKG5BRF/ref=ppx_yo_dt_b_search_asin_title?ie=UTF8&psc=1
- 11 replies
-
Howdy! I saw someplace on the web that some people use Elmer's white glue to cover up gaps on the edges where layer(s) of leather meet, to make a very smooth edge. Some mix the Elmer's with acrylic paint or Edge-Kote before applying. Some hit the smoothed edge with acrylic paint or Edge-Kote after. I think if that works, it will make finishing edges faster and easier. I did a search of the forum, but didn't see anything, so I thought I'd ask to see if anyone is using this and had good results/long term good results. But the search results were more about gluing leather together with Elmer's, not as an edge treatment. If you've tried this, please let me know what results you had.
-
Thanks! Great input/ideas
-
Howdy! I'm curious . . . Does anyone use a tension gauge to measure tension from the needle or bobbin? I think it might be handy, especially when switching to different material thickness involving changing needle sizes and thread weights. I've seen some bobbin thread tension testing devices from TOWA that handle bigger bobbins, but nothing for a bobbin for a Juki 441 clone. I guess in the end, no matter what, you'd have to fine tune according to how you see the stitches in the material you are using.
-
Great jig for sharpening the round knife! If I may suggest, there's always different ways to sharpen round knifes. I saw on a holster making video by Bianchi that he uses a grinder with a polishing\buffing wheel with white polishing compound (not the polishing compound that Tandy sells). When he works on a full rig holster project, he has a couple of sharpened round knifes handy, so when one begins to go dull, he picks up another one. He says that you can tell when a round knife is getting dull when you can hear it cutting the leather. It's true
- 10 replies
-
It looks like things might have changed from when I bought my Premier Ranch Tuff Sheds. At the time . . . . What I did with my 12 x 16 Tuff Shed was to order it with a roof ridge ventilation option. So hot air will easily escape out the top of the shed. I also added an inlet vent, low, close to the floor between the studs. That allowed cooler air in so that when the hot air exits out the top, there will be cooler air drawn in. Rather than buy theirs, I bought my own, something like this https://www.amazon.com/Duraflo-621218REC-Recessed-12-Inch-18-Inch/dp/B00HF5UCWE/ref=sr_1_19?dchild=1&keywords=Duraflo&qid=1601505200&sr=8-19 Another option I took was to get the better roof material with lifetime warranty with light color shingles to reflect the sun's heat. I live in Austin Texas, and it can get really really hot here during the summer and fall. But inside my Tuff Shed, it's actually a tad cooler inside than outside in hot weather.
-
If I may suggest an answer to a closely related question . . . After deciding which ones to make holsters for, what gun are you going to use to make the holster? To make a holster, you need a gun to figure dimensions, to use to mold the leather to the gun. It could be your gun, or a friend's gun. If it's a holster for a customer's gun, they probably won't want to part with it. You could buy one of each gun you wish to make holsters for, but it would be costly. Some people use a "dummy" or replica of real firearms. They're less expensive than the real thing, don't have to worry about damage to the dummy when handling it or using it to mold the leather. One source of cast aluminum replicas is Duncan's Customs in Michigan. https://duncansoutdoor.com/duncans-customs/ Good Luck to you
-
Press Plate Embossing Plate Maker?
Lil Doodler replied to whitakermk's topic in Leatherwork Conversation
Thanks for the information! Much appreciated -
Press Plate Embossing Plate Maker?
Lil Doodler replied to whitakermk's topic in Leatherwork Conversation
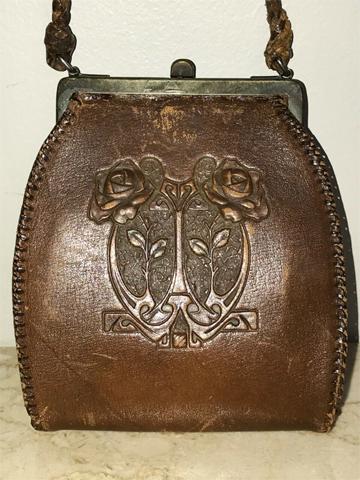
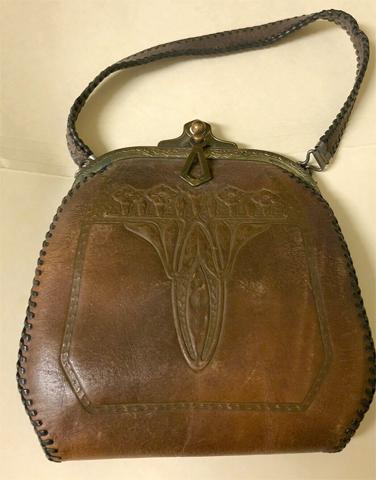
Hi, May I ask? Could these embossing plates work on chrome tan leather as well? I'm interested in art nouveau. There was a lot of leather items made commercially a century ago using that style of design. I've been wondering if they did (they must have?) use embossing plates. Most of the items were fairly small - under 8" x 8", and all seemed to use chrome tan leather. To give you an idea of the type of finished product, Here's a couple examples of purses If they didn't use an embossing plate, how do you think these were made. They don't look carved. Thanks in advance for your help


