


camano ridge
-
Posts
1,907 -
Joined
-
Last visited
Content Type
Profiles
Forums
Events
Blogs
Gallery
Posts posted by camano ridge
-
-
Some times I use the oven some times I don't either way they usually come out pretty hard. Who are you getting your leather from and what part of the hide are you using?
-
Springfield charges by the square foot that you purchase. Call and talk to them they are pretty good people to work with and will answer all of your questions.
-
Looks pretty good. The loops might need to be tightened up a bit. They should be tight enough to lock the holster in place so it does not try to pull out of the loop. You should have to work almost force the holster into the You shouldn't have to worry about folding the holste. Once it is in place put the pistol back in the holster and form the holster and loop. If you don't have the pistol use a hammer handle to open the holster up.
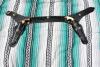
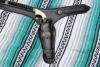
Here are a couple of pictures of one I just finnished. You can see the loops are quite snug. These are for 7.5" barrels so I had to almost fold them in half. They op[ened upe and shaped just fine.
-
When you fihure in the shipping it will cost you a little more then Tandy. However the quality of holster will be much better and worth a few extra dollars.
A side is a lot more money. If you are going to do a lot of holsters and cut your own straps the side might be the way to go, however the side has belly leather and usually some neck leather. Belly leather is not good for holsters.
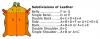
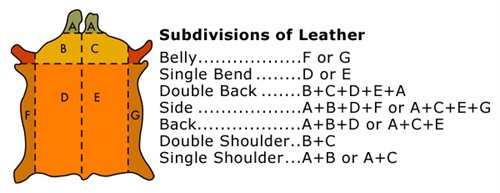
This may help explain the parts of the hide. Looks like winter bear and I were typing about the same time. sorry for the duplication.
-
My opinion is don't go to Tandy for your leather you can get a shoulder of Herman Oak (US tanned) for a bout the same price as a shoulder from Tandy. The Herman Oak is much better. If you do still want to go to Tandy then get a shoulder. What kind of holster are you making Concealed carry, Western etc.?
-
I make lined sheaths and do just what you said use double layer of lighter leather sandwiching the snap inbetween. Ther is another way to. High desert leather sells plastic caps that snap on the backside oof the snap to protect knife or gun from contact with the blade or gun. I would use pull the dot type snaps. I would not use a clip. You will find everytime you sit down the knife will push up and may come off the belt.

-
Here is a you tube video that will give you some idea of what is involved.
You may also want to check into Wheelskins.com you should be able to order a wheelsking cover for the exact year and model they are about $54.00 they still need to be sewn around the wheel but they are assembled and sized. There is also a you tube video to show you how to sew on a wheelskin cover. Hope this helps. -
Matt, welcome aboard. Actually the Members Gallery is set up for introductions posting of web sites and so on. However lots of people will see you here as well. We are visual people so show us some of your work we always like pictures.
-
lIke dwight said pictues and more description of the project would help. Not sure of some of your terminology. Depending on who you buy your leather from some offer a splitting service and will split to the thickness you desire. Svae you a lot of effort in the long run.
-
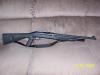
The Benelli Riot gun is a semi automatic and looks similar to the picture below but does not sound like it has the pistol grip.
-
Great we look forward to seeing pictures.
-
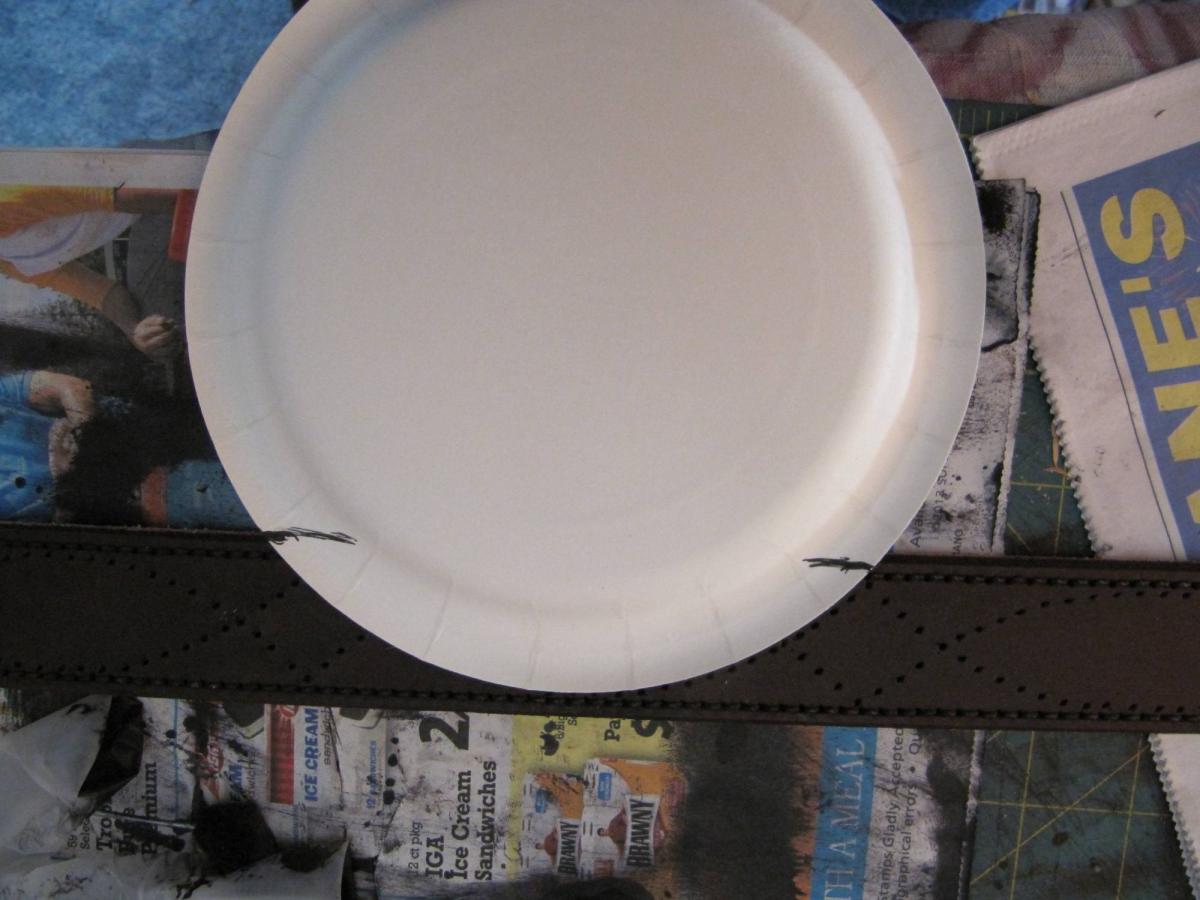
I have never found a ready made template. It is commonly called the gun fighter stitch or boot stitch some people call it the fish stitch. I make my own template depending on the size belt i am doing. it is fairly easy to do, However if you are not into hand stitching don't do it it is a lot of stitching. Below are some pictures that may hel not a tru tutorial but should give you the idea.
For my template. FOr the belt pictured below I usede a 7" paper plate. On the belt crease a groove along each edge or if yo are going to stitch the edges such as on a double layered belt go ahed and lay out your stitch line along each edge. Now place the paper plate so that the curved edge stops just below the top stitch line as in picture one, now makrk each side of the plate at the belt edge. You can cut this portion off to use as your template and line bottom edge of template with bottom edge of belt. Now use a pencil to lightly draw your arc or scribe an arc, move the plate down the belt if you are moving to right line the mark on the left side of your template until it meets the right hand end of your arc and continue drawing arcsuntil you get to the end of the belt or where you want to stop. Now flip you belt around so the opposite edge is now the bottom edge repeat making arcs from this edge make sure the corners of your arcs are directly inline with the corners of the arcs you already created. Once you have your lines use a stitching wheel to mark your stitch holes if hand stitching or follow the lines you created if machine stitching.
The pictures are a little dark, I took a couple of quick pics of a belt i just finished laying out the gunfighter stitch on.

-
For a good Concealed Carry holster you want one that when dry is hard (very firm) to hold its shape onece the weapon is drawn it will not colapse allowing easier reholstering. The heat softens the collagen in the leather and the fibers of the leather tighten (very basic explanation). Also you wet mold the holster arounnd the weapon to give good retention again the heat will cause quicker drying setting the shape of the holster and maintaining the retention. You should be able to turn a weel molded holster upside down and not have the gun fall out yet it should draw easily.
-
If you can get a hold of them and exchange it that is the best way to go. No reason to spend more money to make something fit that should have fit from the manufacture. however if you want it made to fit I woud re mould the holster to the gun or appropriate gun mold. Then add a new stitch line to tighten the holster to the gun It will give a better fit and more proffesional look. What gun do you have. I have sent you a PM (private message) look up at the top the little envalope should be red click on it to open PM.
-
You might contact Chris Andre, Slickbald custom/Makers Leather Supply. He teaches classes I think for his holster making and design class he charges $750. for a three day class. Maybe he can tell you how he breaks down what he charges.
-
I bow to the master
 . Exquisite is the best word I could come up with and that does not begin to say it all.
 -
If you back stitch (it is called a lock stitch) 2 1/2 stitches it will lock your stitch and you can cut the ends off flush. 2 1/2 stitches is my preference not a rule.
-
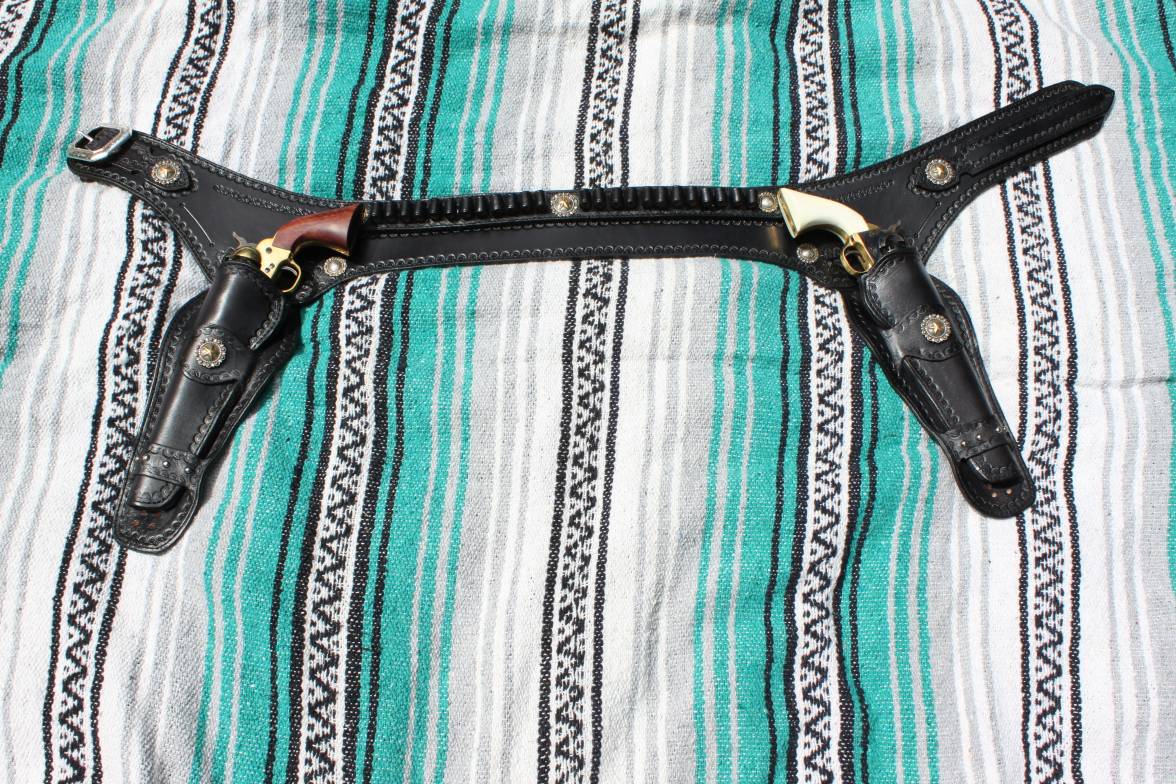
Spots are usually used simply for onramentation. Rivets are used to hold pieces of leather together. They both serve a purpouse and yes rivets can be used for ornametation as well as holding things together. I use both, I just did a Buscadero (Hollywood gun belt) I used domed rivets between every third bullet loop to help keep the bullet loop strip in place then I used domed spots on the belt itself for decoration.
-
Actualy wether the bullet loop strip is damp or dry is one of those discussions of what is better a .45 or a nine mm. That side I always put my final finish on after i have all my loops in place. I do a finger tip application of my finish the use a soft rag to buff. If the loop strip is to be dyed I dye first apply neats foot oil allow the oil to migrate into the leather until the leather is supple enough that it won't crack whe being bent around the cartridges. Then put the final finish on as stated above.
-
You might want to check out Alstohlmans Volume three case making. See attached picture there are two examples of rifle scabards withe scope. Also I have attatched a picture of a scbard for scoped rifle I made some time ago.

-
I just tried it and had no problem http://www.wickett-craig.com/
-
As it says on the plate it is PFAFF 134 if it has the bar for the double needle then it is probably a PFAFF 134-0-92. If you google PFAFF 134 or SYSTEM 134 PFAFF you should find information including you tube videos parts manuals etc. If everything works the price is probably pretty good.
-
If you go to patterns there is a firefighter who has patterns for trade. Even thoe you don't have any to trade you might contact him he may be able to get you started in the right direction.
-
Stitch your holster Then wet the holster and skirt. When weted the stitched holster will be quite bendable. BEnd it until you canget it into the top slot then pull throught he bottom slot. Put the unloaded gun in the holster shape and let dry.


Fs: Wickett & Craig Skirting And Bridle 1.5" Belt Straps
in Old/Sold
Posted
Approx how many belt strips do you have and what is the average length?