


Gawdzilla
-
Content Count
271 -
Joined
-
Last visited
Posts posted by Gawdzilla
-
-
Are you asking if we take laser work?? If so, my answer is yes and I'm sure Roy's would be the same.
I have a special project I would be interested in getting done. Let me see if the person wants to go that route.
-
Roy, does your shop take jobs from outside? Or does anyone know of shops that do?
-
That's actually only one aspect of it. There is also the Maker/Builder side as well. There are a good deal of folks with amazing imaginations and creative shop skills that put copper, brass and aluminum and wood into projects most folks wouldn't even think of.
A cool place to check out Maker stuff is: http://steampunkworkshop.com/ taking modern items and either making them actually run on steam or at least look like they are part of that era through modification. Some fun stuff...
Yeah, that would be the long answer. I have friends who run a steam launch on the Lake of the Ozarks. They plan to restore it to "African Queen" status.
-
http://s691.photobucket.com/albums/vv272/PanchoZilla/Camera%20Stand/
This was made from a few connectors, a few feet of 3/4" PVC and a board. The camera looks down on the item through the hole.
I loaded bags of buckshot into the lower frame to make it stable. You can shoot on the table or move it to the edge and shoot items on the floor. I spray painted some boxes flat white for soft illumination.
I'm sure you folks can improve on this design.
-
And yes, it is an excuse for us adults to dress up. It is a lot of fun too.Where would we be if folks didn't like to cowboy up?
-
Somewhat related: I saw a "Ultimate Factories" episode last night on Porsche 911s. They used 30,000 psi water jets to cut the leather for the upholstery.
-
Sheet metal. It won't "round out" or get frayed. You can get it cheap from a HVAC company, some are happy if you haul it away. A set of hefty shears and a drill and bits and you're in business. And they lay flat for storage without curling.
-
Go here mate http://cgi.ebay.com....=STRK:MEBIDX:IT
Yeah, I saw a couple, but not very many. I wonder if swap meets would be more fertile grounds?
-
Could someone explain steam punk to me in simple terms? I googled it and from what I gather its a bunch of people who dress in old victorian style clothing mixed with modern/futuristic technology?
Short answer: It's an excuse for grownups to play dress up. The concept, as I understand it, it that steam is the prime motive force, not electricity, in our world today.
-
Thanks Suze,
Tom Banwell is the guy I was thinking of. I knew it had a B in the last name. He has some nice stuff on his site. Haven't seen too many Steamers in Las Vegas yet, but there is a Steam Punk Meetup group in the area.
Do we have a URL for his blog, please?
@Tina, that's pretty cool. Where did you get the hardware, if I may ask?
-
Whatever isn't fast enough to get away.
-
I'm finding 3-4 entries on Ebay. Is "craftaids" not the magic word?
ETA: Leather tooling is doing better.
-
Thanks for the info, folks. I'm green in that theme, so clues are nice. Google shows some interesting concepts.

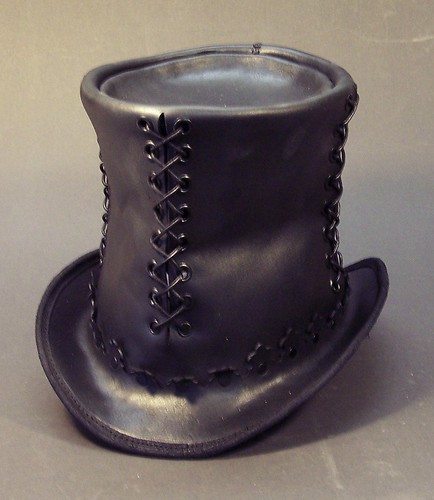
That one looks like the love child of the Aristocrat Top Hat and the Visor. :plot:
-
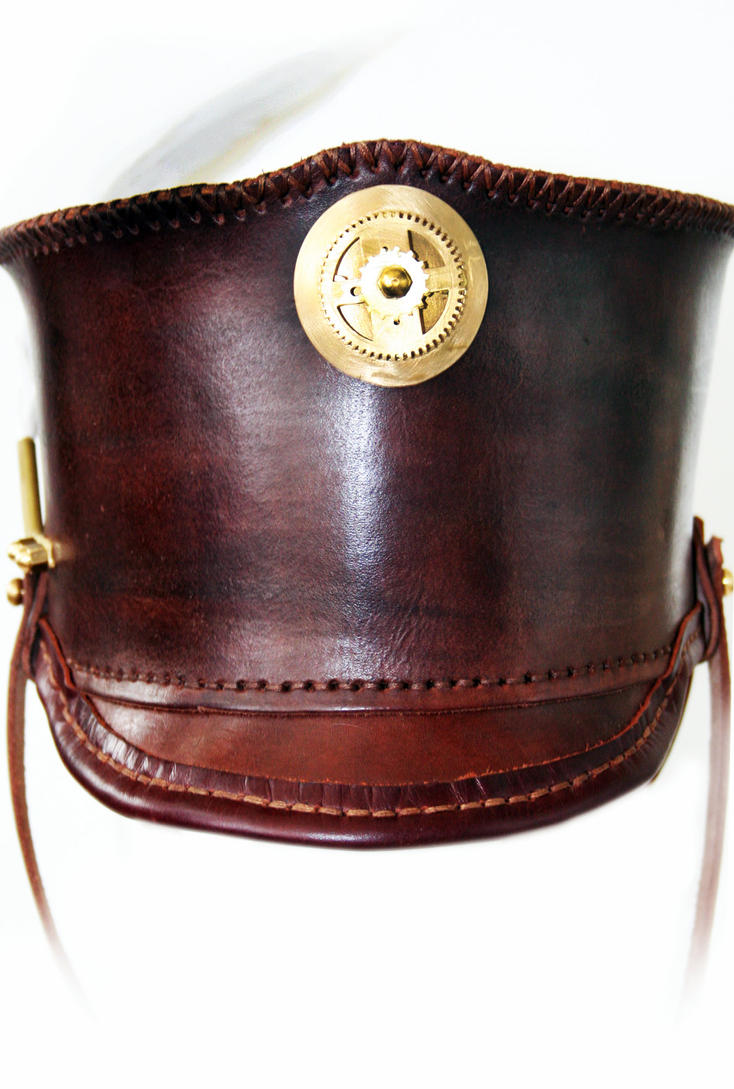
The Steam Punk thing seems to be catching on, which makes me wonder if anybody is doing anything with that niche market?
-
No problem, folks. "All we have is us, so we have everything!"
I've had a lot of steam punk inquiries. These might be a niche market for some folks.
-
The Leatherworker issue before the current one had a nice article on swivel knife practice. Start on a grand scale and work your way down to smaller and smaller detail work.
One suggestion I got that I've found helpful was to start with an ink pen. Hold it like a swivel knife and draw lines.
I also used to practice in a pan of wax. I froze the wax so it was very firm, then hacked away at it. Floating it in a sink of hot water removed the cuts, at least until I got the inspiration to use a hair dryer. Then back in the freezer for the next session. I still use this with the younglings that want to try a turn with the knife.
-
FYI, when you print them, the full page size is 24" X 36". Kinko's, Staples, or your favorite professional copy center will be able to do that for you.
-
-
I'll have digital copies available tomorrow for all four items.
-
Here's my latest top hat, in white acrylic. The lady was antsy or I would have worked on the brim some more. The scarf is one I had from the Endangered Wolf Center, she's going with a lilac lace scarf with a large broach in the front to keep it in place and a hair thingy to tie it together in the back.


-
Well, well, well, lookee here.


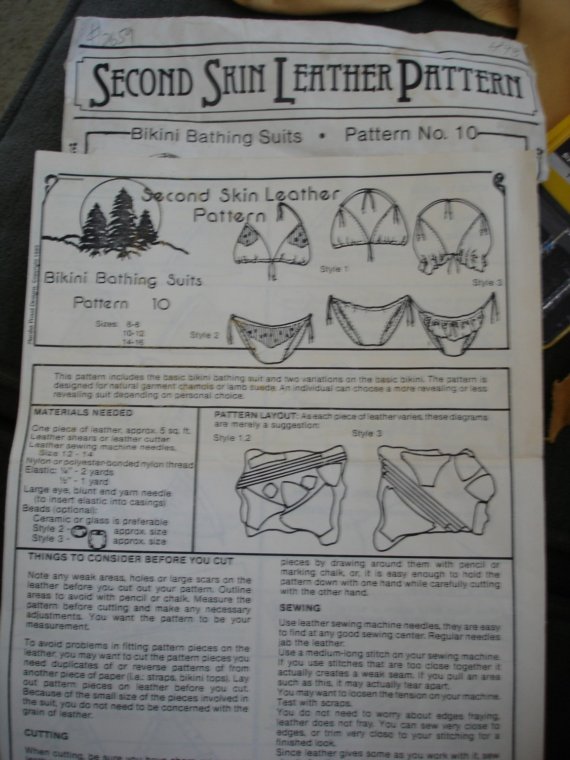
CUTTING
Cut bra cup 2X self
Cut bra cup lining 2X
Cut side back strap 2X self
Cut bikini back 1X self
Cut bikini front 1X self
Cut bikini internal flap (lining) 1X
Cut bow ties 6X self
Cut shoulder straps 2X self
ASSEMBLY
To make the bra and bikini:
- Cut swimwear fabric (self) along the solid lines (note: cutting is done so that 1 cm. turns are included along the edges that are then folded to contain the swimwear elastic within the finishing). Cut the bikini internal flap and the bra cups in a “nude” tricot lining.
- Stitch the dart seam that is marked on bra cup pattern to create the shape of the cups, sewing together the cups on the center front (CF) and line the bra. Sandwich the back straps on left and right at the side seams between the self fabric and the lining.
- Then topstitch the entire perimeter and finish with the elastic turned and zig-zag elastic finish on the backstraps.
- Create the shoulder straps by cutting two strips of fabric as pattern to be folded upon themselves to obtain the finished width of 1 cm; then sewn for their length and attached to bra (see pattern, red dots).
- Cut 6 bow tie shapes. Layer in pairs and sew with RST, then turned right side out, tie the bows in 3 knots to be applied on bikini at the sides and the bra in the middle (CF).
- Insert a closure hook closing at both ends of the back straps.
- Line the bikini front by joining the crotch seam to the back and reverse-layer with the internal flap (at crotch seam) and baste along the sides to the self fabric.
- Join the sideseams and outline the waist and leg openings with elastic. Finally, turn the edges and zig-zag elastic finish.
* Italian size 42 (this is size 36 European or 6 US)
-
Can't help you with the Tandy pattern, but here's another one you can hunt for. If anybody has a lead on either item, please let me know. Summer's coming and my Harley-head friends are going to start whinging again soon.
-
I also have a bottle of Fiebings. What a waste! Acrylic latex paint is the best that I"ve found.
I just did an Aristocrat hat in white acrylic. The results pleased the client. She's "accessorizing" it now. I'll post a pix when it's done.
Interestingly, Lowes doesn't carry acrylic paint. They directed me to Michael's. That place is a gold mine for "accent" item.
-
Taormina, Erice, Agrigento, Trapani, Palermo, Catania, Siracusa...wonderfull places... ;-)
Excellent places! When I was there The Godfather was popular, so naturally I had to visit Corleone. I'm a history buff, so I took time to follow Patton's route around Sicily and then Montgomery's. The food was to die for.

Steam Punk?
in Leatherwork Conversation
Posted · Report reply
Thanks! I'll have to force myself to go back to Hobby Lobby. *smotes forehead with back of hand*