


glennaycock
-
Posts
87 -
Joined
-
Last visited
Content Type
Profiles
Forums
Events
Blogs
Gallery
Posts posted by glennaycock
-
-
That's a great-looking bag! Nice work.
-
I would not even attempt this on modern, all-plastic sewing machines. I used to sew 2-4 layers of 2-3 oz upholstery leather with an old Singer 301 (before I bought my Consew 206RB-5), but it has metal gears. You are likely to break it.
-
The HF deluxe airbrush kit is pretty nice. I did a review of it a couple years back: http://glennaycockwoodworking.blogspot.com/2010/07/review-harbor-freight-deluxe-airbrush.html
You can pick it up on sale for anywhere between $10-20 pretty frequently.
-
I have noticed the same issue with mine. It is a problem with the botom roller, but I believe that the gear is not perfect, because it only does it at certain points on the gear when turning. Let me know what you figure out, I am trying to correct he problem myself.
The smaller bushing works quite well. I would make a few more if I was producing enough to justify it.
-
Is these the ones you use http://www.stewmac.c...ml?tab=Pictures ? How do they blend with alcohol?
I used to buy the powdered Seiwa dye from Goods of Japan on ebay and mix it with alcohol, but they dont list it anymore. I am now keen on finding an alternative (inexpensive that is).
johs.
No, those look like solid pigments. They used to carry Behlens powdered aniline dye. J.E. Moser's is probably equivalent.
-
Not likely, as vinegroon tends to wick through the leather grain under the surface.
-
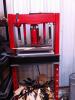 Here is a pic of my press. I have been hand cranking since my dies were not cutting evenly - with my compressor they get too embedded in my cutting board.
I will check to make sure all is level. May just need to have it rewelded.
Your steel plates may be flexing or shifting ever so slightly in the rails, since the jack applies pressure only in the center of the plate. You might consider some 1/8 x 1" steel bars arranged vertically and perpendicular to the plate (like a grating) to distribute the force more evenly.
-
SOLD
-
TOTALLY. BAD. ASS!!!
-
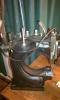
Stupid upload limits...sorry only one pic
-
Share your results because I may have to do it with mine, if you don't mind.
To save time, I bought a stock bushing from Tippmann for $15. It's the same size as the Tandy one (1-5/8"), although the actual dimension measured 1.6". Last night i turned it down to 1.54". This seems to be a good diameter for the 10-12oz Latigo I was embossing. Again, it entirely depends on the diameter of the embossing wheel and thickness of leather. I haven't asked Tippmann yet whether they would consider selling a graduated set of bushings, but I suspect they might.
Good luck.
-
I have a 90's vintage stock, cast-iron Boss that I bought a couple months ago. It is in excellent condition and works great, but unfortunately is not what I need. Includes the original manual, case with extra bobbins, needles, and another presser foot.
$1000 obo + shipping (or pickup)
Located in Houston. Will try to get pictures up tonight. PM if interested.
-
Just curious if anyone else has tried skiving with a drum sander. I have been wanting to skive the ends of my belts where they fold over. I don't have a skiving machine or even a knife, but I do have a drum sander. So I tried a simple experiment to reduce the thickness by half. It worked quite well. I raised the drum up and inserted the belt about six inches from back to front, lowered the drum until it grabbed the belt + 1/2 turn. Then I turned on drum and let the conveyor belt slowly carry the belt through. It worked beautifully. The only issue is that the grain sided needs to be protected from the abrasive conveyor belt.
-
Unfortunately, the Tandy video is very basic.
I have found that since the bottom roller skews downward, you need a thinner bottom bushing for thicker leather. About 1/16" - 3/32" smaller diameter should do the trick (for me). Also, I have found that for 10oz leather, if I just keep the rollers parallel it works pretty well. Of course, this depends on the weight of the leather you are using. I'm going to call Tippmann tomorrow to see if they will turn down some steel bushings for me.
-
Make sure the bobbin is unwinding in the right direction and that your top thread enters the correct side of the needle. I've had similar problems when I run the thread through the wrong side after not sewing for a while. All of my machines have different orientations, and I inevitably forget.
-
It was roughly half price (machine only). I played a bit more with it today. I was able to get better impressions but still heavier on the outside. I realized this is caused by the skew of the bottom roller as you raise or lower it for thickness adjustment. As you do so, the two rollers are no longer parallel. You need a slightly thicker bottom sleeve for thinner leather and thinner for thicker. I was concerned about breaking it by putting too much pressure on it, but this is a pretty sturdy unit. I'm going to make a couple of bottom sleeve prototypes from HDPE. If that works (which it should) then I'll make them from steel. I also noticed that the closer the guides are and the more pressure I put on the leather, the more it wants to skew to the outside.
Good luck. Mine never came with any instructions or direction that worth anything and I got mine from a store. The uneven impressions are common because of how the machine is made in my opinion. My biggest problem is getting the guides adjusted right, they are either to tight on the leather or to loose which causes the pattern not to be straight. I don't use my often but I wish I would have spent a little more and got the Timppmann one it looks better built. I can see if I have the paperwork that came with mine it really wasn't any help just talked about casing leather. If you don't mind what deal did you get on it?
-
I picked up an open box embossing machine from Tandy and several rolls on clearance today. It was missing any documentation other than a small leaflet for assembly/maintenance. Although it appears to be perfectly operational, during my initial tests I was having trouble getting good impressions. Mainly, one side was deeper than the other, or the entire impression was not deep enough. I admit that I was in a hurry and didn't case the leather well like I normally would. I almost regret buying it, but thought it was a bargain.
Also, the depth adjustment wheel on the bottom is odd. It rides freely on the adjustment screw (no pin or set screw), kinda like a lock nut. I'm not exactly sure how that's supposed to operate, other than it occasionally raises or lowers the adjustment screw when the threads bind. I noticed that inside the adjustment screw hole there is a much coarser thread and wonder what that's for.
Anybody else have one willing to share pics or wisdom?
-
Perhaps if you posted a picture of the buckle, some of the experts would be able to better advise you.
-
Very nice! How about some shots of the inside and zippered pouch?
-
Theoretically, the angle on the belt loops (downward to the inside) would create a conic section (tighter loop on the bottom), which would force the muzzle inward. However, since a 1.5-2" leather belt is flexible and doesn't apply that much force, the effect is probably negligible.
Sorry, reading math books today

-
What's wrong with the example piece? It looks pretty good!
-
I inherited my grandmother's 301. It will easily sew 2 layers of 2-3 oz garment/upholstery leather. However, it really struggles on the overlaps of seams, so I bought a Consew 206RB-5 last year.
It's great for upholstery and such, but I don't think it's ideal for the majority leatherworking tasks done in these forums, even though you can run up to 207 thread. Without a speed reducer, it's simply too fast for intricate stitching around tight corners.
I recently bought a BOSS for my holsters, phone cases and belts. It gives lots of control but my arm sure gets tired of cranking that thing.
-
Nice work. I noticed a few knots in the stitching on the strap didn't get pulled down near the end. Did you have any problems with the tension?
-
I used to buy powdered aniline stains from Woodcraft and Stewart-McDonald.


Decided/ing To Make My Own Awl
in Sewing Leather
Posted
For anyone interested in making their own micro-tools cheaply, including chisels and awls, I buy music wire from local hobby shops, where it is commonly sold for control rods and such for a few $ a stick in various diameters. They are high-carbon steel that is easily cut, worked and hardened with modest tools and a blow torch.
You can flatten a rod by heating and hammering it on an anvil or other hard steel object, or use a grinder or sander to rough shape before hardening. Otherwise you might overheat and ruin the temper.
To harden, heat the tip using a blow torch until bright orange for a couple minutes. Then quench in oil (I use olive or vegetable) -- this helps with rust.
I'm not sure if it's necessary to temper such small items that aren't subjected to high breaking stresses. Sometimes I heat them in a toaster oven for a few hours, also in oil to stabilize and distribute the heat..
Finally, use a wet stone or water wheel to sharpen.