drphil
-
Posts
65 -
Joined
-
Last visited
Content Type
Profiles
Forums
Events
Blogs
Gallery
Store
Everything posted by drphil
-
Hey Mark, you dont happen to have a picture of how those have turned out do you? I would love to see a completed pair. Thanks!
-
I agree with Blackey, I am pretty sure footballs are not made from pigskin anymore. Anyhow, I have been thinking over your dilema. All I can come up with are these ideas: 1. Probably one of your cheaper option. Possibly you could use a pebble backgrounder. You can find one at hidecrafters. It seems that this will provide a textured background, but you will need some practice to get all the "dots" exactly even. See an example on this topic about carving oak leaves. It is about the tenth picture in. You will notice that the texture is not perfect, it was likely produced by tooling over a section already tooled to remove tooling marks. This is the normal use for this tool, so you would need a lot of practice to try and get it just right. I think it could be done . . . 2. More expensive option. You could try getting one of these bar grounders from Barry King. You would need the spacing to be perfect and the tool to be big enough. You would probably need to call him and discuss it to get the right tool. You would also needs lots of practice with this tool to get it right. 3. The only other thing that comes to mind is to find a company that makes an embossed (sometimes called printed) textured cowhide with that print. I don't know if such a thing is made in your pattern (but I wouldn't be too surprised if it was). It maybe possible to attempt to make one with a lightweight cowhide and a stippler on the flesh side. . . but I wouldn't try that unless I was pretty desperate. 4. More practical solution. A possible solution that maybe be just as much trouble as all these others is to find a garage sale, goodwill store, salvation army store etc. and find an actual football with the texture you need. Buy it cheap and use it. If you plan to do any tooling on the piece then you could make a separate tooled piece and attach it to the football leather. This might be your most practical solution. Anyway, that is all I can come up with. Hope it helps.
-
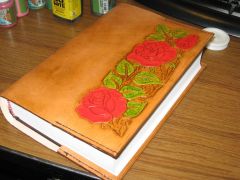
From the album: Projects
This is a Bible Cover I gave to my Mother for Christmas. It is 3-4oz Veg tan leather. I used Eco Cova colors and they worked great. Hand stitched, all one piece, no lining.© © leatherworker.net
-
Thanks you very much murse! That helps a lot. I always appreciate your advise on the forum. I am glad to hear from someone who has had a similar experience.
-
So I should use a dye or stain in a lighter color than the hi-lite/antique. Making the process one of: applying dye, apply resolene, apply antique/hi-lite, apply top coat of resolene. That will probably do it? The resolene will not prevent the hi-lite from getting into the tooling cuts?
-
If I put the resist on first then the Hi-Lite/Antique will I still get a nice brown color on the item? Or will the color just be in the tooling marks/cuts? Thanks!
-
Hello All, Last night I took my nicely tooled piece which took me a lot of hard work to finish and I began the finishing process. I used Eco Hi-Lite on it and all I got was a jumbled mess of sticky brown uneven coating crap. I attempted to correct this with some water etc. Anyway, it got me to wondering, I know most of you all here on the forum routinely do leather dyeing and finishing. I am wondering how? I am also wondering what the different products are for. I hear people say to stay away from Eco products. If that is the case then how do I get the "Hi-Lite" effect? I understand that these water based dyes are really a pain especially when applying a finish. I tried to put Resolene (50/50 H2O) over the Hi-Lite and it just added to the streaking!! It seems the more Hi-Lite I add the more "sticky" and streaky the finish becomes. There must be some happy medium . . . So, it boils down to a few things. What products can I use to retain the "Hi-Lite" effect? Does this normally involve a regular fiebing's dye and then antiquing over top of that? If so, is there a rule about always using the antiquing a shade darker than the dye? Or can I just use the antique paste over the whole thing without any dye (as the antique will actually color the leather). If I do use the antique then can I just use the Resolene (50/50) finish over that and be done? I am assuming that the Resolene (50/50) will not remove/streak the antique. I also noticed that Fiebing's makes a "Hi-Liter" product. Anyone have experience with it? It seems to only come in one color which seems odd. Perhaps I just dont know how it works and what its use is. Overall, I am looking for a process that will allow me to retain the Hi-Lite effect in the tooling and produce a nice even brown color on the rest of the leather. After finishing it will be glossy/semi-glossy and I don't have to worry about it having large problems if a few raindrops get on the piece. Any additional advise toward that end will be much appreciated. Thanks for ANY and ALL advice!
-
Finishing Order
drphil replied to Louro's topic in Dyes, Antiques, Stains, Glues, Waxes, Finishes and Conditioners.
Hey Lou, I only have done this once, but what I did was to color the leather first. I used Eco colors for a Rose carving and it turned out very nice. The color is really like a paint. I put it on first and then dyed the rest of the piece. The dye did not mess up my piece since none of it penetrated the color. It seemed to work well. I do not know if that is the way it is typically done or not, but it worked nicely for me. Also, the finishes worked nicely over the color as well. Hope it helps! -
How thin is your leather? I have hand stitched with veg tanned 3-4 oz just fine many times. I never get bunching. What sort of leather are you using?
-
Ramrod, if you add neatsfoot oil to the item it will get darker. The leather dries out quite a bit after the process and turns a (sometimes streaked) gray color. I then add neatsfoot oil generously and it helps restore the darker black color. I had to put a cup or so on a belt I made over the weekend. I have also heard of some special resolene made for black leather that will help seal it in with a deep solid black color. I haven't tried any "black resolene" but others on the forum have recommended it. One question that I have about the whole 'roon process is what will happen if I neutralize the acid in the 'roon jar before applying it to the item to be "stained". Anyway, just a few thoughts.
-
How To Get An Outline Around Alphabet Letters?
drphil replied to celticakes's topic in How Do I Do That?
I know this is probably not what you are looking for, but I use the alphabet stamps. The stamps impress the leather with the letters. Hence, the letters are formed by depressing the outline of the letter. The smaller letters collect the dye/stain in the depression and so it is dark around them. For bigger letters, I use a ball point pen. I just run it inside the depression and then I get a nice letter that stands out. I have used resist techniques to keep the letter natural color and then use the pen for the outline. It always ends up looking really nice. If you want the outline of the letter to be natural then you will just have to be good. Like they are saying above. -
Used the first batch of 'roon on a Belt. Sure dries out the leather. Put cups of neatsfoot on it.
-
I dont have first hand experience with it myself, but I was at the Tandy store today (in Des Moines, IA) and asked about it. I was told that the Hydroma board is mainly for cutting. I asked about punches etc. They said "I wouldn't use it for punches and would stick with the poundo for that." The Hydroma is pretty thick. It seemed to be about an inch thick. Plus at that price it seemed like a big expense for just cutting especially given that it is not really that long. I suppose if you do a lot of cutting it would be worth it, but if you can't (or shouldn't) punch on it then seems like an expensive uni-tasker. I was hoping it would be exactly what I needed but I ended up walking away. If anyone else out there has tried it, I would like to hear if you think it is worth it or not. -Dr. Phil
-
Does Anybody Have A Good Knife Pouch Pattern?
drphil replied to a kind texan's topic in How Do I Do That?
I don't have a ton of experience in this area but I will offer my 0.02$. First, I would recommend using the above link and doing a wet forming technique. This will produce a much prettier more professional look. It doesn't require special tools, just some wet leather formed around your knife. It will provide the best fit with the best look. I would wrap my pocket knife in saran wrap to keep any moisture out of my knife. Then wet the leather and stretch it over the knife. Just like in the tutorial. Of course you will have to wait till it dries then do some cutting and stitching to a back piece. This can be done pretty easily. Wet leather can really be formed to nearly any shape and when it dires it will keep that shape for the most part. That is one of the really cool things about leather work. Not only can you carve, tool, stitch, etc. but you can also shape and mold. This is your best option. IMO If you still find that too difficult or dont want to do it for whatever reason you can always make a pouch for your knife. The pouch will not fit as nicely or look as professional, but it will hold your knife on your belt. Take two pieces of leather that are bigger than your knife and then just whip stitch around the edges like a small coin purse. you can even put a snap on it exactly like the coin purse if you want. Like this one minus the goofy cat picture. On the back side you can cut two slits for your belt to go through. Let me be clear, this will be a lot sloppier. There will be extra room in your pouch but your knife will probably not "rattle" around. It will work to hold your knife to your belt with practically the least effort involved (except if you just go to the store and buy one lol). All you need for this is 1) leather 2) knife for cutting leather 3)Some sort of lace to do your whip stitch 4) possibly a snap + snap setter. It might also be helpful to have a hole punch to put your whip stitches through, but you might be able to get by without this but it will be more difficult. Obviously I cannot know exactly what you are expecting, but I hope this helps. Let me know if I can be of further assistance. -Dr. Phil -
 Very very nice!
 -
Hey all, I am making a bill fold and put an initial on it. I used super sheene on the initial to resist the brown dye. Well, it turns out that some of the supersheene bled over (outside of the letter). Is there any easy way to remove part of the sheene and dye that little part where the sheene bled over? or do you think it would be easier to just use some acrylic paint and paint it over? I'm just trying to clean it up, cause at this point I would just scrap the piece if I can't get this worked out in an asteticly pleasing way. I am open to any suggestions. Thanks!
-
Hey everyone, I have been doing leatherwork for about a year and have progressed slowly. I am attempting to make a dog collar for a large dog (he is a great pyrenees with a 22 in. neck). I was wondering if I should stitch and rivet or just use the rivets. With this large of a dog it seems like the rivets might not be strong enough. If he gets it hooked on a fence the rivets may actually pull out. If you all have any suggestions about this and anything else related to making dog collars please let me know. Also, It is imperative that this thing be waterproof. What sort of product should I put on it to keep the water out. Any tips on finishing such a piece would be much appreciated. Thanks!!