


Mike Craw
-
Posts
578 -
Joined
-
Last visited
Content Type
Profiles
Forums
Events
Blogs
Gallery
Posts posted by Mike Craw
-
-
Thanks Sam!
Mike
-
Is he still making them, and do you have any contact info?
Mike
-
I wold like to purchase one or more stamping tools by Jay Lynn Gore. I am more interested in owning a stamp that he made than I am in a specific type of stamp. If anyone has duplicates of a particular stamp that they would like to part with, please let me know.
Thanks!
Mike
-
Hey Mike!
I always sort of figured I'd do better pushing a strap cutter than I have pulling it. I'm glad to hear that it is working well for you. Just remember, like a round knife, left hand BEHIND the blade

Mike
OK, why the hell don't you ever see dumb spelling mistakes until AFTER you hit "Post Reply"???
-
On the topic of your Blue Gun being off, I got a Rings 1911A1 and thought it was kind of slim, but I didn't pay much attention until I molded a holster to it and couldn't get my Springfield 1911A1 into it. I thought maybe Springfield beefed up their guns a little so I dragged out my Dad's old WWII 1911, and it wouldn't go it there either.
Wonder if Rings would take it back?
Mike
-
Hey Mike!
I think he had a lot figured out!!
Mike
-
Mike,
thanks for the quick response. I'll check it out.
Mike
-
Is that video on-line, and if so, how would I find it?
Thanks,
Mike
-
Hey Guys!
Here is a copy of a microfiche (sp?) of original blueprints of the Mod. 1912 Military Pistol Holster. This model has a drop swivel. A later model M-1916, has the military wire pistol belt attachment and a belt slot in the rear. The holsters were both for the M1911 pistol, but were designated by the years that the final designs were accepted by the War Department, 1912 and 1916 respectively.
This document was provided to me by Jodie Wesemann, Museum Specialist at the Rock Island Arsenal Museum. She's a really neat lady and is trying to digitize the micro films before they disintegrate, and she's doing it in her spare time.
Hope this helps,
Mike
-
Over all, the saddle is simple, neat, and beautifully finished. I'm sure you can see and feel things that make you crazy (I can see stuff on my work nobody else in the world can see) but in the photos it looks flawless. The stitching on the back of that cantle binding is outstanding. Somebody's going to be really happy with that one!
Mike
-
St. Simons Island here!
Mike
-
Hey Dan!
You won't be disappointed in the work that Lonnie does, or in the tools you are getting. Everything he does is first rate. As you mentioned, he's also a great guy to talk to.
Lonnie now runs the operation owned by the late Ellis Barnes. If you wanted to know anything about the history, metallurgy, or construction of Craftools, or anything about the Tandy Company, or leather work through the years, Ellis would gladly tell you how it was. Often you didn't even have to ask! I miss talking to him.
If you get a chance to see Lonnie, please tell him I said HI!
Mike
-
I go with the undersized Blue gun. I have a Rings 1911A1 and it's a good 1/10 under in the width of the slide.
Mike
-
An earlier ShopTalk! article was all about knives and showed some that Jim Jackson had made from the description Don King gave him about the ones he built out of nails and a piece fo wood with a tin can swivel. I know you can search the current main article on the Proleptic web site, but I don't know how/if you can search past ones. I'm pretty sure I kept the article, but I don't know how I'd put it online from the hard copy. Might check with the folks at ShopTalk! about getting a digital reprint if they'd be willing. It was a fascinating article.
Mike
OK, just went through my files and found my copy of the article. It's entitled, "Swivel Knives, It's All In The Hand" and it was written by Nick Pernokas. It's a nine-page article with quotes from Jim Jackson, Lonnie Height, Bob Douglas, Chuck Smith, Robert Beard, and Paul Zalesak. There are photos of swivel knives from Jim Jackson's collection and the Don King Museum as well as new manufacture from Chuck Smith and Leather Wranglers.
I must have printed my copy from the Proleptic website, since my copy doesn't show the headers or footers, so I can't give you the issue number or date. It might be worth contacting ShopTalk! on their website at www.proleptic.net to see if they would be willing to share it online.
Hope this helps,
Mike
-
I just went into my profile and tried to change my avitar, which I believe is the little square near your name when you sign on and when you post. I uploaded an image of my new maker's mark I got from Jeff at Gray Ghost and the image shows in my profile as being my avitar. For some reason, the image that show when I sign in is still the graphic of the round knife. Did I do something wrong, or am I not using the right terminology for what I'm trying to do?
Mike
Disregard previous, the new image shows on the post of my question, so I guess it did what I wanted it to do!
Mike
-
Hey Sandman!
Several months ago, I tried to get the original Government contract papers which I believe should contain the specified cutting diagrams. All I was sent was a few cover sheets and a letter stating that I could here a contract researcher or come to Washington, DC myself. Both are pretty cost prohibitive. If you manage to find an accruate pattern, would you please share it?
Thanks,
Mike
-
KND,
CALL STEVE!
I bought a Cobra 4 less than a year ago and I couldn't make it sew no matter what I did. Steve spent hours with me on the phone going through various re-threads, tests, and fixes. Finally he asked that I send the head back to him and that he would pay the shipping himself. When I got the machine back, it sewed like a dream. I'm still not convinced that it wasn't something I was doing wrong, but Steve assures me I'm not as incompetent as I think.
If Steve had reason to be short or disgusted with anybody, it was me. I figured that I was too old to learn a new trick and that I should just go back to hand sewing like I'd done for the past 25 years. Steve never got out of patience or lost his sense of humor (although I came close a couple of times.) He stands behind his products and will make it right regardless. One of the nights we spent an hour on the phone was when he called me out of the blue on a Saturday when he could/should have been doing something with his family.
My Cobra now sews better than I could have imagined and I'm working on raising my abilities to meet the machine. I can't say enough about Steve and his organization. There are alot of folks on here who can help you, but Steve is your best option. He knows that machine as well as anyone and he really lives and breaths service. Call him.
Hope this helps,
Mike
-
Hey Bob,
I can't swear as to the "right" time to use them, but I use them real close to the end, and for sure after I'm done beveling all around the flower and thumb-printing the leaves. I found if you lift before and then thumb-print, you loose most of the lift. After I use the lifter, either one I made from a broken spike or the kind you hit with a mallet that I got from Lonnie Height at Hackbarth, I go over that area with a backgrounder since either kind tends to burnish the background a little.
Hope this helps answer your question.
Mike
-
I must be missing something...I see the links to the green laser sights for those weapons but not the demonstrator green guns?
No, you're right, I miss-read the listings. Apparently they offer only the Glock.
Mike
-
Dan,
If you click on that and go to the website, they have quite a few others including H&K, Beretta, and Kimber.
Mike
-
Hey Aurelie!
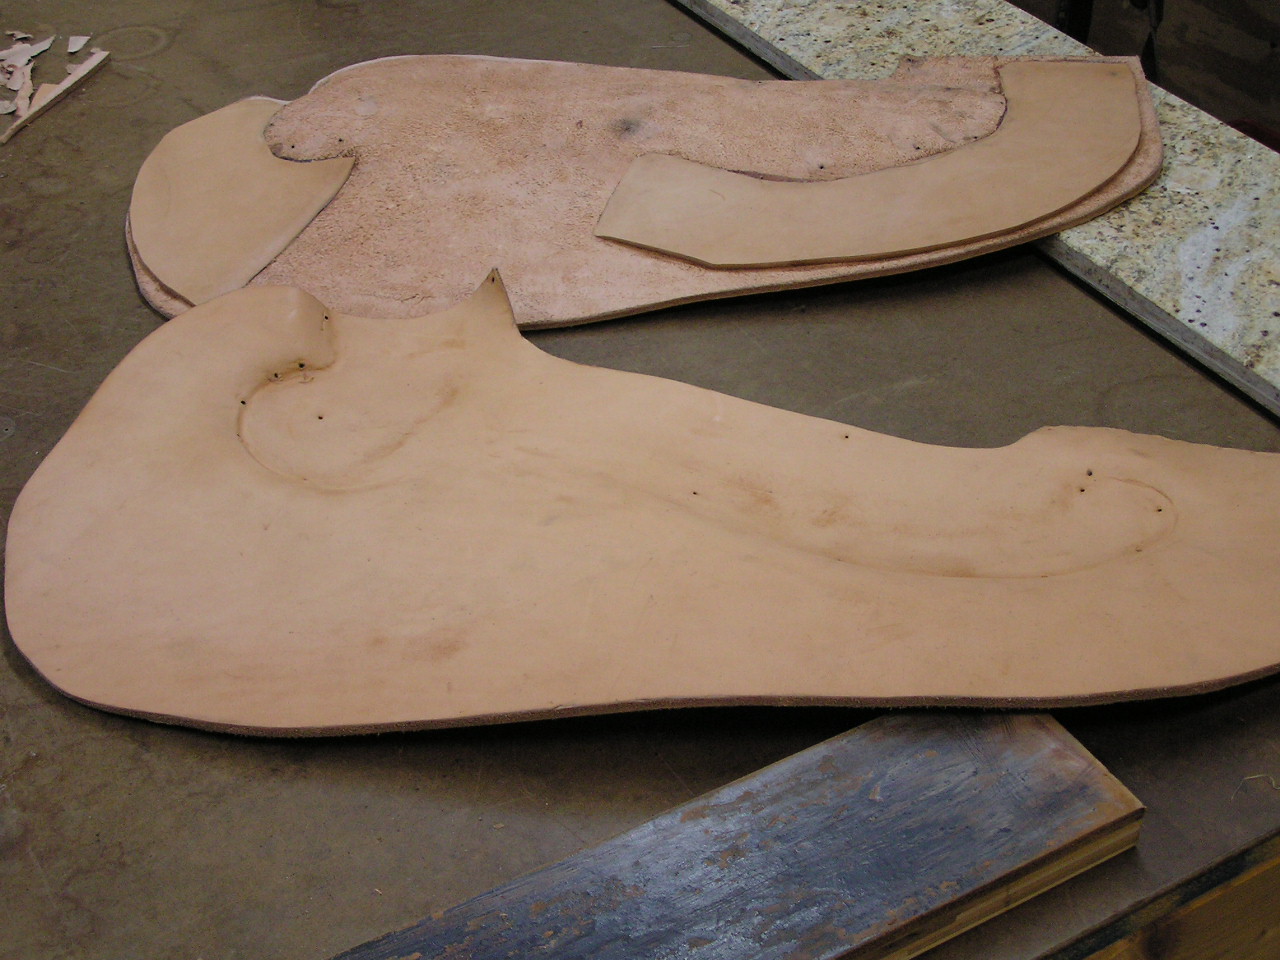
Since someone else posted a different topic and your topic went away, I thought you might not get an answer to one of your questions. It took a while to find the attached photo of the bottom of a pair of skirts on a saddle I made for a lady that shows the blocking and filling to deal with the "bump" on the bottom of blocked skirts.
The skirt at the top of the photo shows the bottom of the skirt with two pieces of leather that have been cut to the shape of the pocket formed by the bars. The edges of the cut-outs have been skived to flow smoothly onto the raise portion of the bar pocket to minimize the bump as it sits on the horse's back.
I hope this helps explain smoothing out the bottom of blocked skirts by filling with other leather.
Mike
-
Does anyone here have any idea why the saddle style is named "Mother Hubbard" saddle?? (Mother Hubbard must have been a remarkable woman since she gave name to a western saddle style ?? just a thought! )
Also, did the old time Mother Hubbard saddles have a ground seat (full- or half seat )under the mochila ?
A history lesson , please!!!
/ Knut
OK Knut, I'll take a shot at this.
I have been given to understand that it derives from an old nursery rhyme about "Old Mother Hubbard" who went to her cupboard to get her poor dog a bone...
I don't know if the original printing of this included an illustration of Mother Hubbard in her bonnet, but plainswomen were often depicted in a bonnet that incorporated a large, stiff rounded piece that went over the head from one ear to the other and was tied with a bow under the chin to shade the face. They are sometimes referred to as "Mother Hubbards" although the dress is actually the item that bears the name.
The one-piece leather covering of the saddle is very similar to that bonnet.
And yes, all the ones that I have seen have goundseats.
That's what happens when you become a Grandpa, you start being able to quote nursery rhymes...
Mike
-
Use "Japanning" when you search. Its basically black shellac, their are recipes out their to make it.
Great, thanks! I guess I left out an "N" when I searched it.
Mike
-
Mike. A Gig in this context is a light 2 wheel carriage so a gig saddle is a harness saddle. To this saddle a back band is attached to connect the shaft tugs to. These tugs hold up the shafts of the carriage. On top of the saddle are 2 terrets. These a rings to guide the reins from the bit to the driver.
In the attached picture, the gig saddle is on the left of the railing and on the right side of the bridle/winkers.
Barra
Hey Barra!
Man that was quick!! Thanks so much for the information.
Mike
Question On Machine Sewing A Fitted Holster
in Gun Holsters, Rifle Slings and Knife Sheathes
Posted
Hey Andy!
Most of us have developed patterns for the firearms we make holsters for that are developed from "dummy" guns or the real thing, that involves tracing around the firearm and then adding some additional room to lay out the stitch line. The holster is then sewn, without the gun. The leather is then dampened or "cased" and then the gun put back into it damp, and formed by hand. 7 oz. leather is just fine for both parts.
Tandy has a book by Al Stohlman that will teach you the basics. I got that book in 1981 and it was the basis for all the holsters I've done since that time. There is a member on this site named Particle. He has a video of his method that will answer the questions you have asked and a few you haven't even thought of yet!
Have fun with it!
Mike