


lightningad
-
Posts
504 -
Joined
-
Last visited
Content Type
Profiles
Forums
Events
Blogs
Gallery
Store
Everything posted by lightningad
-
From the album: A Newbies Progress
-
From the album: A Newbies Progress
-
From the album: A Newbies Progress
-
From the album: A Newbies Progress
-
From the album: A Newbies Progress
-
From the album: A Newbies Progress
-

From the album: A Newbies Progress
-
From the album: A Newbies Progress
-
From the album: A Newbies Progress
-
From the album: A Newbies Progress
-
From the album: A Newbies Progress
-
From the album: A Newbies Progress
-
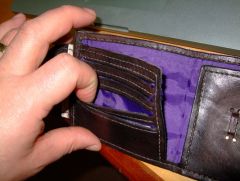
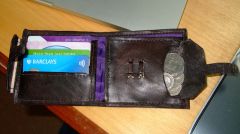
on mine i put strap of leather across the front top of the kindle, then attached a tongue behind where the kindle sits, which then folds over the top of the device and tucks in between strap and kindle. My Kindle (other post) adam
-
My First Kindle Cover
lightningad replied to lightningad's topic in Purses, Wallets, Belts and Miscellaneous Pocket Items
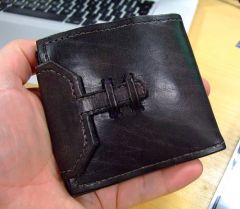
yeah...i've been thinking how my next one will be incorporating some brass extras. I already have a bag of tin watch cogs that could be used, but i need to develop my ideas before jumping straight in (which is usually my problem!) -
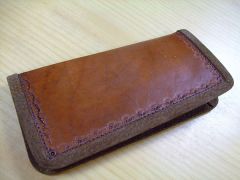
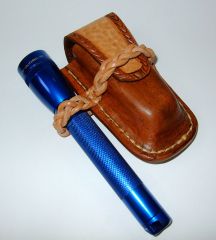
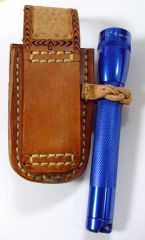
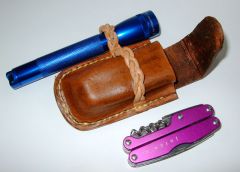
Having just bought my wife a Kindle, i decided to make the protective cover myself rather than buy the rather naff Amazon cover. Whilst thinking of a theme, i felt that the steampunk thing was really apt for an electronic book...so designed the stamping to reflect that. Its coloured using a few different Fiebings dyes - my favourite is most definitely the English Tan. Since i took the photos, i have adapted it slightly with a tongue at the top to stop the kindle from sliding out if the cover was carried upside down. My wife is really pleased with her kindle and cover, and i'm really proud of the finished item... love to hear your comments... adam
-
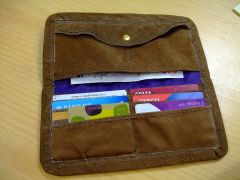
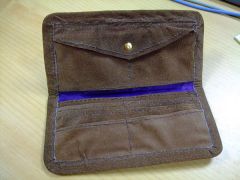
Another Handmade Wallet
lightningad replied to reddevil76's topic in Purses, Wallets, Belts and Miscellaneous Pocket Items
looks really nice, but i do have one question...Do the credit card pockets get progressively deeper or are they each a specific depth to prevent the cards from being pushed too far in? will have to post a pic of my latest wallet as soon as i get in snapped! adam -
thanks Tony...looks like i'm better start saving!
-
very nice. What size hide do you find you need to be able to make a decent sized bag such as that? Its something i fancy a go at, but the initial cost of the leather is rather intimidating. adam
-
or these in Manchester... Joseph segal
-
hmmm - i would probably go for larger size. I haven't made a quiver, but i do know the arrows i have are about 32/33" long ( I have quite a big draw on my bow!) As for the background - its a reversible one with white on one side and a soft gey on the other (well it is on mine!). Just a thought - I'd be tempted to get a bit arty for stuff like archery kit. Rather than a sterile white tent, why not find an old mossy log and lay it on a sheet which is pegged up at the back to give an endless cove effect, then lean your quiver against the log. You can still light it with the bulbs and reflectors you get. Should give you a much more interesting image that is in keeping with the romantic ideas of Robin Hood and his band of murderous thieves! For the sake of spending £15 on bayonet mounts from B&Q and a couple metres of electrical cable, you could have all you need to get started with your lights. It might not look as professional to you, but as long as the photos are well lit, the viewer will have no clue how you lit the shot. And its the end shot that really matters.
-
Hi Chavez - this is the one i have and it costs a bit less than the one on Amazon but looks almost identical.... Calumet Portacube For lighting i built a frame that stands around the outside of the cube and has 6 bayonet mounts attached (2 on each side) . I then use daylight balanced fluorescent bulbs (make sure to get the same mount as your holders) which i bought off ebay a couple of years back.. I think i paid about £12 for 6 bulbs. I don't use all the bulbs at once though. I tend to vary the positions of the bulbs to help add some depth to the models i photograph. Photos taken using Portacube - These are not leather goods, but wedding cake toppers my wife sculpts. The principals remain the same though! I have found that to really lift the images, I will have three or four bulbs in the holders (I also prop white foamboard behind the bulbs to bounce as much light back into the cube as possible), I have also mounted a bayonet holder onto a spigot that fits in a "Manfrotto Magic Arm" which allows me to position a lamp in front of the cube, and re-position it really easily. As for portability - i keep the bulbs stored in a box safely removed from the frame, the Cube folds flat, and the foamboard is stored inside the flat cube. The Frame is pretty flat, apart from the feet. Depending on the camera you use, you will be able to improve the images by learning how to use the manual modes. My little digi cam is mainly auto, so i can't really set exposure or aperture, and have to rely on the auto features to try get the shot i want. Because o this i tend to stick to using a DSLR. As the model being photographed is not moving, and my camera is on a tripod, i can have a long exposure and a smaller aperture. This helps get a deeper depth of field. The biggest giveawy that something is small is a shallow depth of field. And don't forget to white balance your camera to the light being used. adam edit:- forgot to say, the curtain method will probably work fine as long as you are a reasonable diy'er, and dont mind a fair amount of mucking about. The cube i have is great because its so quick and easy to put up and fold away. If you go the shower route, be careful to pick a pure white, as any kind of tint in the fabric will affect the overall colour balance of your lights. Also, be wary of the plasticised materials as these could be affected by the heat given out by the lamps.
-
no stains used - just rubbed in some beeswax after the sanding. Being a hard wood helps it to work as a slicker (i think!).
-
i made myself a folder/slicker from Black Walnut - shaped on a belt sander before a final smoothing with sandpaper - works really well, and no ants required!
-
thanks Ken, i did read the article months ago, so will have to go back and read it again. I will be trying the overnight method tomorrow as i have been experimenting with using bicarbonate of soda to darken some leather by dunking it for an hour before removing it. I'll be tooling it tomorrow, so looking forward to seeing what its like. rgds Adam.
-
Ken - why do you leave it overnight in the bag? I assume there are benefits to this method and Its one of those things i see many mention, but as i have only ever wet the leather then left it a few minutes to return to its normal colour before tooling, and never had a problem with the tooling i'm intrigues by the need to leave it so long. adam