vaalpens
-
Posts
147 -
Joined
-
Last visited
Content Type
Profiles
Forums
Events
Blogs
Gallery
Store
Everything posted by vaalpens
-

Technical Bush Craft Knife And Sheath
vaalpens replied to rgepting's topic in Gun Holsters, Rifle Slings and Knife Sheathes
Beautiful sheath and pouch. This is pure eye candy! It looks like you are using 4 chicago screws through the welt. What is the reasoning behind using chicago screws vs rivets. Is it to adjust the tension or purely cosmetic? -
New Bk-2 Sheath
vaalpens replied to vaalpens's topic in Gun Holsters, Rifle Slings and Knife Sheathes
Thanks for sharing the ratio you use. I prefer the satin less shiny look and would start with a 50/50 ratio when I try Angelus 600 for the first time. -
Another Holster Lining Question.
vaalpens replied to vaalpens's topic in Gun Holsters, Rifle Slings and Knife Sheathes
Mike, thanks again for the insight. Covering the trigger guard is just something I have not done and is something I want to try to see what difference it makes in the retention. Regarding rivets etc. This is mostly for me to learn to work with them and will only incorporate it as a design feature, not for strength. For rivets I am only looking at copper rivets. Copper rivets has a place in sheath designs and I like the old school look of copper rivets. This will be a holster for me, so it will be a good time to try out different methods and design feature. Your comments and insights are always highly appreciated! Following is the second and last holster I made showing the open trigger guard/no retention around trigger guard.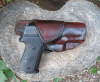
-
Another Holster Lining Question.
vaalpens replied to vaalpens's topic in Gun Holsters, Rifle Slings and Knife Sheathes
Mike, thanks again for providing some colorful insight in how you work with two pieces of leather. I have seen the work you have done and has confidence your method is something I want to try. One thing I did not mention is that this time I will make sure the trigger guard is covered. I know you have suggested that before and this will be the first time that I incorporate a covered trigger guard. My design is getting there, and I am just trying to finalize my belt loop. Need to decide if I want a one piece that is folded back, or maybe a separate piece fastened with something other than stitching. I am also seeing if I can incorporate the usage of tee-nuts, chicago screws or copper rivets in my design, just to try something else. This is still a learning experience. -
Another Holster Lining Question.
vaalpens replied to vaalpens's topic in Gun Holsters, Rifle Slings and Knife Sheathes
Thanks for the information, and it looks like I will get a bunch of information. This is the good part. I will read all the advice, learn from it, and then pick the a little bit from everybody's feedback and apply it to my project. I know I need to study up a bit on patterns, but for now I am creating my own and learning from it. Hopefully in the near future I will take that next step and try and learn from the masters outside of this forum. -
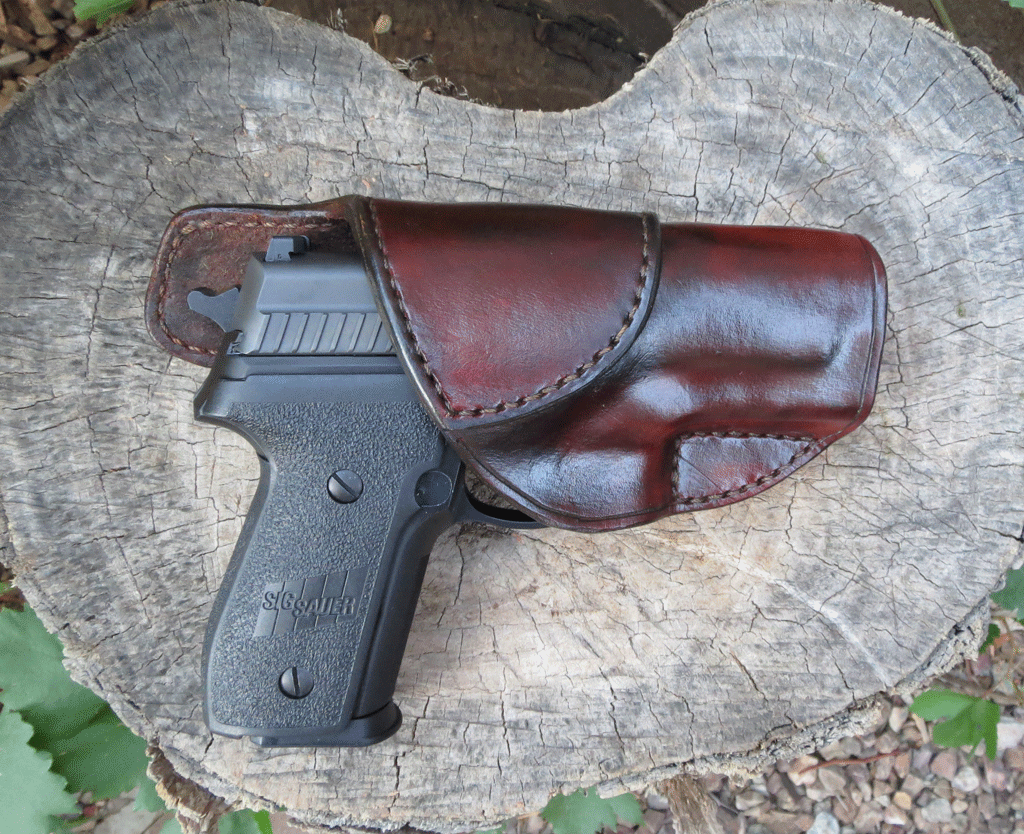
I apologize if this question has been answered many times before, but I know the astute members of this forum will be willing to provide guidance, comments and critique where necessary. My next project will be another holster, but this time I want to use two pieces of leather back to back to provide some extra stiffness and a better looking inside of the holster. I know this is supposed to be a holster with a lining, but I am looking at it as a piece of leather with two smooth sides. My questions are not about the type or weight of the leather, but rather how to work with the two pieces of leather. Following are some of the decisions I have already made and some tasks I am researching to decide how it should be approached: This will not be a pancake holster, but more like a hip or avenger style holster where the leather is folder around the gun. I will probably use two pieces of 5/6 oz or combining 5/6 oz with something heavier The outside will be dyed with an oil dye, but I'm not sure if the inside should be dyed or just oiled with neatsfoot oil and then finished. Now the big question; Is it better to just glue the two pieces together and then just use it as one piece, or is it better to bend/fold the pieces around the gun before gluing it together. I am just concerned that if I handle it as one piece the the outside will maybe stretch more, or the inside will show wrinkles. Then again my thought is that if you fold the two pieces separately, then the gluing is more difficult and maybe won't have a good enough bond. Thanks in advance for any advice!
-
New Bk-2 Sheath
vaalpens replied to vaalpens's topic in Gun Holsters, Rifle Slings and Knife Sheathes
Thanks again for the advise. I have bought some oil dye and will see if it makes any difference. With holsters I like the harder result, but with a sheath I prefer something that feel more natural. I see you indicate you cut the angelus finish by water. What ratio do you cut it? So when you cut it, does it give it a more natural less shiny look? -
New Bk-2 Sheath
vaalpens replied to vaalpens's topic in Gun Holsters, Rifle Slings and Knife Sheathes
Thanks for the how-to steps you have provided. It will help me start the new process with more detail which should help me get going quicker. Interesting that you are using the spirit dye. I have just decide to try out the Fiebing's oil dye since I have heard that the spirit dye leaves the leather harder than the oil dye. You are correct that the medium brown comes out very dark. What I have found is that if I wet form first, then the brown comes out lighter since the dye does not penatrate as well after forming and drying. -
New Bk-2 Sheath
vaalpens replied to vaalpens's topic in Gun Holsters, Rifle Slings and Knife Sheathes
Thanks again for the help. Do you use an oil based dye with the airbrush or is there some special dye that should be used? Also, do you use the airbrush to apply the resolene, or is that done with a dauber or something else. With all this great advise I am receiving, looks like my only limitation is now time and budget. -
New Bk-2 Sheath
vaalpens replied to vaalpens's topic in Gun Holsters, Rifle Slings and Knife Sheathes
Thanks for the advise! I have seen Angelus 600 and mop and glow being mentioned a few times in the forum and will have to put them on my growing list of things I should try out. -
New Bk-2 Sheath
vaalpens replied to vaalpens's topic in Gun Holsters, Rifle Slings and Knife Sheathes
Yes, beauty is in the eye of the beholder. I am also lucky that my wife also think the pieces I am creating looks great. I only started a few months ago because I received a small starting kit and I wanted the create a holster that was functional for me. I also had a tough time finding a holster for my gun, since it is not a Glock. From most of the posts I have seen it looks like using an airbrush is the way to go if you want to be more artistic with shading. I will only probably get into airbrushing once I can get to a finish that I like. Currently I finish with leather balm atom wax, which looks good, but I don't think it gives you that professional look yet. -
New Bk-2 Sheath
vaalpens replied to vaalpens's topic in Gun Holsters, Rifle Slings and Knife Sheathes
I never thought of putting the diamond awl in the drill press. Thanks for the great idea! My diamond awl is one piece with the handle and I will have to cut of the handle or buy just the diamond awl without the handle. This is definitely I want to pursue. It can't be much more difficult than using a drill press and a sharpened needle. Even with the needle I have to stop the drill, line up the hole, start the drill and then lower the drill, one hole at a time. At least with the drill press each hole should be straight, and you just need to make sure the blade is at the correct angle. -
New Bk-2 Sheath
vaalpens replied to vaalpens's topic in Gun Holsters, Rifle Slings and Knife Sheathes
Thanks! I have seen some of the holsters you have done and they are pieces of art where mine are just holsters and sheaths fit for personal use. Hopefully one day I can get to the point where the finish on my holsters looks as professional as yours. -
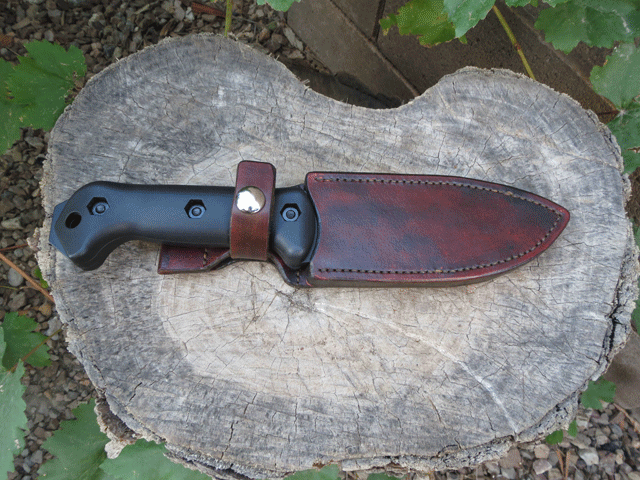
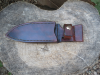
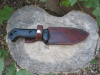
I just finished my first complete sheath and is happy how it came out. The sheath is for my BK-2 and will probably be used for day hikes where there is no need for survival items to be added to the sheath. I think it is called a Randall type sheath and I have decided to dye it to go with the black BK-2. The only Issue I found was that it seems that some of the wax from the stitching thread remained on the sheath, which resulted in some spots where the dye did not take that well. The stitching holes were drilled with a sharpened stitching needle, since there was no way I could use a diamond awl through 3/4" of leather. Sheathe was finished with neatsfoot oil and then leather balm with wax. Thanks for looking and any comments will be appreciated.
-
New Holster, Well Sort Of.
vaalpens replied to vaalpens's topic in Gun Holsters, Rifle Slings and Knife Sheathes
Thanks. It is not that big. It is only about 3.5" x 1.5" and does not weigh much. -
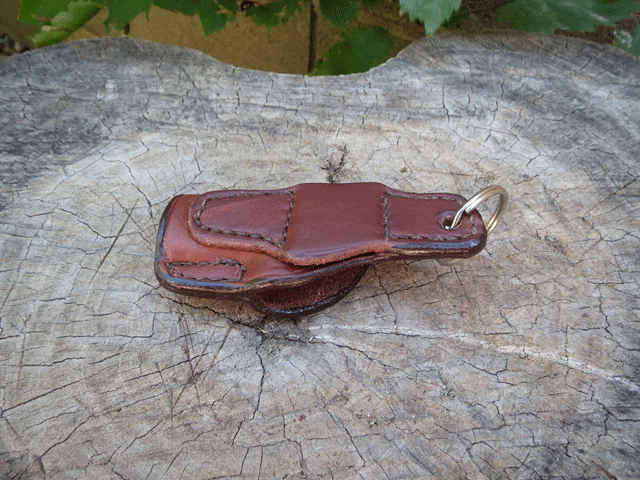
I decided to scale down one of my holsters and make a holster key ring. Stitching was done by hand and stitching holes were made with a diamond awl. I think the design lends itself nicely to a key ring and the sweat guard works great to hold the split key ring. Burnishing is difficult with such a small piece, so I used some edge kote. The piece was wet formed, neatsfoot oil applied and finished with leather balm. Any comments will be appreciated.
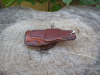
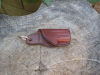
-
Leather Sandal Key Chain
vaalpens replied to vaalpens's topic in Purses, Wallets, Belts and Miscellaneous Pocket Items
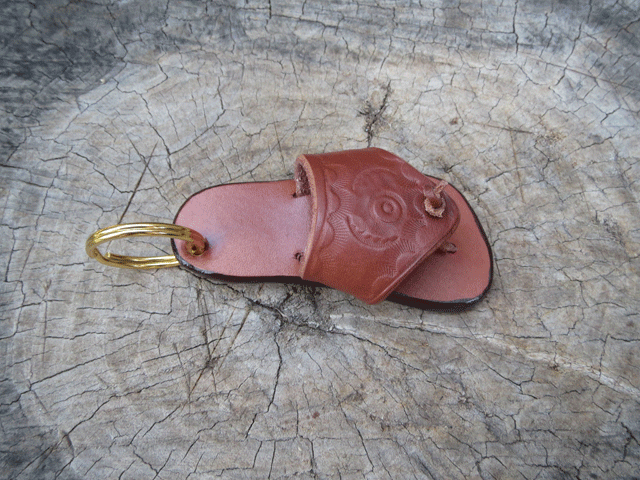
The sole is two layers of leather with the top layer having two slots where top piece is pushed through and glued between the two layers of the sole. In the front there is a hole in the top layer of the sole where the piece of leather is pushed through, folded and again glued between the two layers. -
I had this 30 year old leather sandal key chain that was falling apart and decided to make a new one so that I could retire the old one. This is my first leather key chain I made and it was fun scaling things down. Any comments will be appreciated.

-
Holster With An Offset And Drop
vaalpens replied to vaalpens's topic in Gun Holsters, Rifle Slings and Knife Sheathes
Dwight, thanks for the advice. The few holsters I have done so far are not very tight to the body since I normally just have one belt loop. With a spare tire around the waste, I prefer not to have it to tight. This offset will be more for a quick draw and not used for concealment. Ia m also not planning on using it for competition, since it won't be legal for men. I am new at making holsters and try something different every time I make a new holster for myself. You can probably never have enough holsters collecting dust. Thanks Charl -
Holster With An Offset And Drop
vaalpens replied to vaalpens's topic in Gun Holsters, Rifle Slings and Knife Sheathes
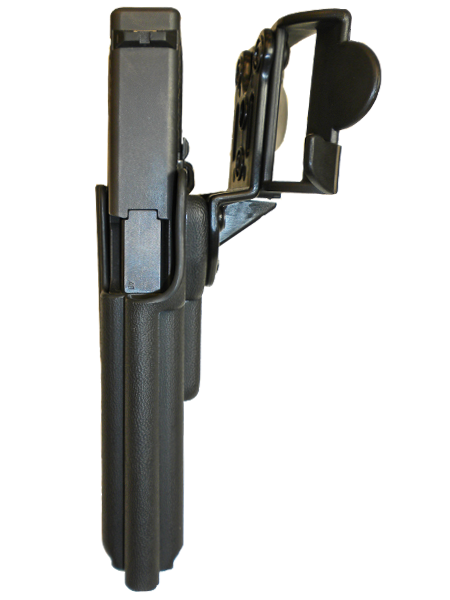
I know ladies prefer something with an offset and they could be used in competition, although I don't think it is IDPA legal for men. I won't be using it in competition, but would just try out the design and see how it could be implemented with leather. This is a picture of a non-leather offset holster.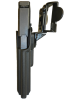
-
With my next project I would like to make a holster with an offset and an inch or so drop. Can anybody maybe point me in the right direction on how to incorporate an offset in the holster. My idea is to maybe use a piece of formed kydex hidden between two layers of leather to give me the offset. The offset will be just to have some space between the grip and the body. As always, any bit of help will be highly appreciated.
-
Altoids Pouch For Bk2 Knife
vaalpens replied to vaalpens's topic in Gun Holsters, Rifle Slings and Knife Sheathes
You are correct that the edges could be a bit better. Some of the edges have been beveled and burnished, but with one of them I had some problems. I just got it to a point where it was acceptable to me. The little tabs on the side was a last minute idea to make it different from other pouches I have seen. It is one of those pieces that will be in the outdoors and will get scuffed up. I will just have to accepts the blemishes. Thanks for the advise. -
Altoids Pouch For Bk2 Knife
vaalpens replied to vaalpens's topic in Gun Holsters, Rifle Slings and Knife Sheathes
Thanks for the nice comments. -
Mike, As always, thanks for the sound advise. I like the idea of the plywood to create the flat surface. Those sheaths you have created are just pieces of art. Hopefully they are for display only and not being used in the outdoors. Thanks again for the help. Charl
-
Bob, Thanks again for the advise. This is where the fun part starts. I now need to take all the good advise I have received and make a decision which piece to apply to my project. The remaining pieces of advise will then be stored in memory for future use. The concho shape idea is a great one and I will probably try something like that in the future. It gives a different shape and perspective to the medallion. Thanks again for the help. Charl