braden
Members-
Posts
10 -
Joined
-
Last visited
Profile Information
-
Location
Canada
braden's Achievements

Member (2/4)
-
Compared to many who post on these forums I am a very novice leatherworker. However, based on my own limited experience, I would definitely say that the proper application of neatsfoot oil as a preservative/restorative agent has it's place within the craft. I think Bruce's point is well taken. For myself, being a relative newbie, I consider application of neatsfoot to be along the lines of a 'baseline' industry standard practice. Kind of like how 440C is like a 'standard' baseline for stainless steel: there are many other specialty alloys having different characteristics, arguably superior under certain circumstances, but 440C is universal. Likewise, in leatherwork, I have read/heard about many different mixtures of oils, tallows, waxes from fish, bears, deer, cows, bees, etc. and different methods for applying them. I am sure that many of these recipes/mixtures do produce good results with many possibly performing even better than neatsfoot oil. However, to continue my analogy, this kind of knowledge is hard-won through experience and it's probably for the best if novice leatherworkers don't try and render animal fats to finish their first project (also that kind of thing isn't sold by the gallon). Similarly it's probably for the best if you don't try to make your first knife out of M390 or something. Start with 440C, see how it goes, gain some experience, experiment a bit, and then branch out. The second point I want to make is that the argument 'hides are skin' and should be treated as such is logically flawed. I doubt at this point it will affect how anyone feels about treating leather, but anyhow... Yes, 'hides are skin' when they are still attached to the ass of an animal. However, the 'skin' is transformed into leather through varied chemical processes (i.e. tanning). It was an animal's skin but now it's leather; the two are obviously related but are not the same. This would be akin to arguing that preserving mummified remains should require lots of water; when the mummy was alive it was a human person, made mostly of water, who drank lots of water, and so therefore as a mummy he must want a drink of water! Not so. Just because the 'skin' wasn't being 'drenched with a very heavy oil once a year' when it was still on the cow's ass is irrelevant. The skin has now been transformed into a different material and a new set of rules may now apply. Some food for thought. The point about too much oil transferring to clothes, etc. is well taken. I imagine this is a mistake that everyone makes once. Braden
-
when you say equipment; what kind of equipment would you need? i was thinking along the lines of putting some dye into a bucket, along with the hide, and rolling it around for a while. i'm thinking of a deer hide, not cow hide which would be a lot bigger and thicker. i agree about buying the drum dyed sides but what if you're after an uncommon color like blue or green? thanks, braden
-
hi guys, i'm familiar with different techniques for applying dies to smaller pieces of leather. for thinner leathers and larger pieces (let's say a couple of square feet) dip dyeing becomes pretty impractical. has anyone tried, or does anyone know of, a do-it-yourself drum dying technique? before i go mcgyvering myself, just fishing for any links, instructions, if anyone else has tried this, etc. thanks a lot, braden
-
hey tinkertailor, yes, could also be salt, good call. i was going to try with distilled water regardless, but just fishing to see if someone more experienced already knew the answer. thanks. i'll definitely try the distilled water. braden
-
hi guys, i am looking for some advice/tips on how i can avoid getting what i assume are marks from dissolved minerals after wet forming, as shown in the image below. in my process i am tooling and dying before wet forming and after the piece dries i am always seeing these markings in varying degrees. in most cases after some buffing and application of a conditioner, or some neatsfoot oil, etc. the appearance is greatly reduced, often no longer really visible. but sometimes it's impossible to remove and obviously undesirable. just wondering if anyone can confirm for sure it's a result of hard water or is it for some other reason? thanks a lot, braden
-
hi guys, for a while i have been looking for a nice set of alphabet stamps for leatherwork. most of the sets i have seen are very huge (3/4" is smallest i have seen) and frankly pretty ugly; the font types are terrible. the other day i came across these stamps on etsy: https://www.etsy.com/ca/listing/164192944/canterbury-uppercase-alphabet-kit-6-mm they are not designed for leather but rather for stamping some softer metals. just wondering if anyone has tried them on leather before? no doubt they will leave an impression/mark but just want to know if the results were considered 'satisfactory' by someone else who may have tried already. thanks a lot, braden
-
Is There A Tool I Can Use To Draw/cut Markings As In These Examples?
braden replied to braden's topic in How Do I Do That?
hey guys, thanks for your suggestions. i will give the swivel knife a shot and post some of the results. neat idea about clamping the leather against a piece of wood also. i wasn't really interested in the wood grain design per se (it just happened to be the piece i chose as an example of the tool marks) but it's definitely an interesting thing to try anyways. -
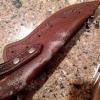
hi guys, i am hoping someone will be able to let me know how the designs in the example images are created. i am a novice leatherworker but most of the tools/techniques i have seen for tooling leather involve mainly stamping. but in these examples a tool is being used to remove some of the leather, kind of like a stitch-groover, but i imagine it must be different somehow since the ends of the lines all taper nicely to a point, which i don't think you can achieve with a standard stitch-groover. also i would like to point out (in case there is some confusion) these examples are *not my own work*; they are from 'wasteland oddities' vendor on etsy.com, linked here: https://www.etsy.com/ca/shop/WastelandOddities?ref=l2-shopheader-name i would have liked to reach out to creator directly but i don't have a facebook account and don't want one. anyways, any advice on how this tooling effect is achieved would be greatly appreciated. thanks!
-
Where To Get Quality Needles For Stitching Leather?
braden replied to braden's topic in Sewing Leather
thanks chief. i did a search and found other threads dicussing the john james harness needless as well as different sizes. there is also a link to a vendor http://www.fineleatherworking.com/ that sells these needles and will ship to canada (very nice 'needles only option') for $6.00. thanks again for your help and suggestion! braden -
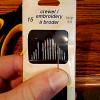
hi guys, i am working through my first project where i'm doing a good amount of hand-stitching. the stitching is turning out nicely; i don't really have any problems there. however... i did have quite a bit of trouble in the beginning with the 'stitching needles' i got from tandy (linked below). they're much, much too big and i snapped 8 needles (8 needles to do about 12 stitches!) before giving up on them. http://www.tandyleat...g/1195-033.aspx i went to fabricland (which is a fabric and sewing supply store here in canada) and bought a few packs of needles in the hopes of finding a good size. luckily i did find one (shown in attached image) that is a better size for what i'm doing. using these needles i did about a hundred saddle stitches without any trouble. problem is: i don't really know what size/type of needle i've got! based on the packaging i would guess the pack i bought has needles in sizes 3-9 (and probably i was using a size 3) but not sure. can anyone take a guess at what size/type of needle i've picked? and also i've you could share a supplier for quality needles? i don't really want to keep buying these 'variety packs' of needles when i really only want the one size. thanks a lot! braden


