Tosch
-
Posts
131 -
Joined
-
Last visited
Content Type
Profiles
Forums
Events
Blogs
Gallery
Store
Everything posted by Tosch
-
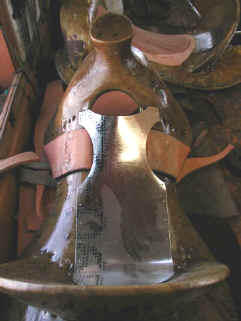
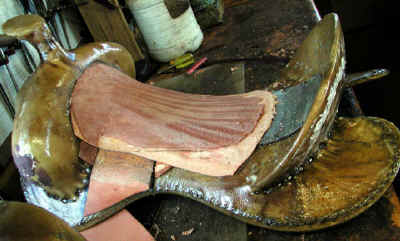
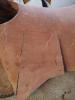
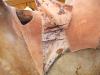
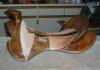
This is part 2 on groundseats. Key words: bar risers , channels, lump.. Darc responded to my question regarding "lump": Hi Tosch, you could replace "stretched over" with "installed over" if you are talking about the tin strainer instead of the leather strainer. I have seen seat tins installed under the bar risers and over the bar risers. The reason this was able to be done is because different seat tins have different shapes... some manufactured ones (like the one in the photo I posted) have curved areas for the stirrup leathers to pass between the edge of the bar and the edge of the strainer. Other strainers cover the bar in the stirrup leather slot area so they must be put on over the bar risers to create a slot for the stirrup leather. Not sure if it makes much of a difference to anything...just depends if you make your own tin from scratch and how you make it... or if you use prefab tins, how they were manufactured. As far as the lump that you are curious about, I have posted three photos with this post to show you why there is no lump. The first photo shows the bottom edge of the bar; note the thickness of the leather between the two red marks... it is roughly the same thickness as the stirrup leather. The second photo shows where the leather is cut to create the channel that bar risers would create. Note the two horizontal lines at the top; Everything below the bottom line on the top piece of the ground seat will be cut off. The area between these lines will be left intact on the top piece of the ground seat, but everything underneath will be cut right through the ground seat for the stirrup leathers to pass through and around the bars of the trees. The stirrup leather will sit in the channel on the top of the bar so there should be no noticable lump. You might wonder why someone would make their ground seat this way instead of with bar risers. There are downfalls to both styles depending on the skill of the saddlemaker. First, in the style shown here with no bar risers, there is a risk of scoring the rawhide of the tree when the leather is cut to create the channel. If the rawhide is scored, it is only a matter of time before it splits and weakens the tree in an area that could be considered the weakest area of the bar (the wood is the thinnest and narrowest in the stirrup leather slot area). If a saddlemaker is careful when cutting these areas, you should be able to do it without scoring the rawhide. Another challenge is trying to keep the depth of the channel roughly the same as the thickness of the stirrup leathers. If the channel is too shallow, you might have the lump you mentioned and it probably wouldn't disappear over time... that would require the thickness of the stirrup leathers to become thinner. If it is too deep, the top finished seat that you sit on could start to sink into the area as the saddle ages. This requires skill and experience on the saddlemakers part to try and keep the stirrup leathers flush with the rest of the groundseat. The benefit of this style of seat is eliminating a layer of leather in the seat which brings you closer to the horse and shaves a little weight. It can also create a slightly narrower seat with less rise in the front. Some may consider the weight savings to be minimal, but shave a little weight in several different areas of a saddle and the finished saddle is substantially lighter. Critics of this style sometimes tell you that you risk scoring the rawhide and the finished seat is weaker in this area. I already explained the scoring part and I don't know anybody who rides on the crown of their seat. Incidentally, I make both types of seats (bar risers and no bar risers) depending on my customers weight, height, and size and what kind of riding they do.

-
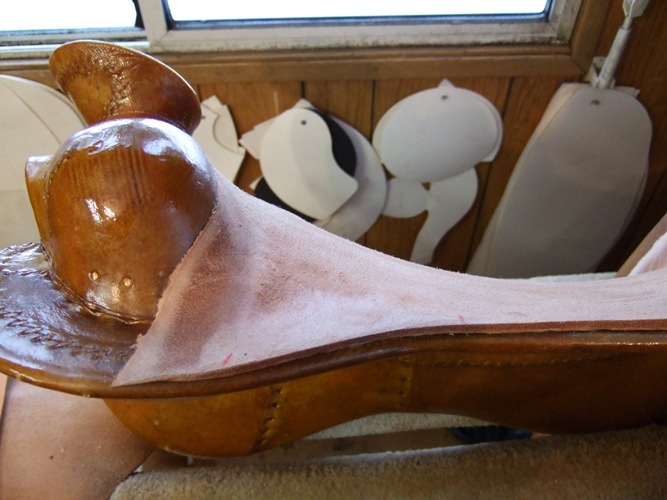
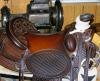
This is Part 1 on groundseat and how to do them: key words: leather, tin, bar risers Darc's explanation / answer to a WH Forum members question: Hi ......, as a saddlemaker, my opinion of tin versus all leather groundseats is that both types of groundseats can be made to feel like a little piece of heaven for your butt and both can be made to cripple you after a long day. For any newbies to the terms... the ground seat is the build up leather underneath the finished seat you sit on. When the saddle is made, the groundseat is shaped to provide the rider with a secure, balanced position (hopefully) that will allow the rider to stay balanced with the horse. There are as many styles of groundseats as there are saddlemakers as most saddlemakers do things their own way. Some of the things that can affect the groundseat shape are the tree, the way the leather (and sometimes tin) is applied to the tree and then shaped, and the saddlemakers experience or perspective on groundseat shape. Quality trees play an important aspect because some of the shape of a groundseat is actually built into the top surface of the bars of a tree. .....'s question refers to the first, or sometimes second layer of the groundseat which is the strainer. Strainers take up the space between the bars and provide support for the rider's weight so that you aren't feeling the inside edges of the bars pressing against your pelvic area. The strainers come in a few varieties including leather, tin, and fiberglass. I have attached a few photos to show you the two most common types which are tin and leather. I have never done a tin seat myself, but have seen them put in a few times and am quite familiar with the process. To dispell any myths that tin seats are bad, some of the top saddlemakers around use seat tins... Dale Harwood and Jeremiah Watt are two such makers. Some makers believe that the seat tin is quicker to install and not as heavy as the leather strainer. My own opinion is that I can put a leather strainer in just as fast as a tin strainer and the weight difference is extremely small. Some makers and riders will tell you that the all leather seat will mold to your butt and fit better over the years as the leather strainer gives slightly with use. Others will tell you that the leather strainer will sag over the years leaving you with a bad seat. My own opinion is that if the seat strainer is installed properly, it would take some serious misuse and neglect for it to ever sag enough for the rider to feel a big difference. What is most important with the leather seat strainer is for the saddlemaker to select a good piece of leather from the hide (I like nice tight grain) and then stretch it very tight over the bars. In the picture below which shows the leather seat strainer, you will see two rows of nails running the length of the bars... you might also be able to see some black spots near each of the nails. The process is one of using a seat spike to stretch the leather over the bars and then placing a nail while the leather is under alot of tension. The process is then repeated on the other side of the bar continuing back and forth until the strainer is secured. This is done while the leather is slightly wet, when the leather dries it shrinks a little and should leave the strainer tight as a drum. If the strainer can be easily flexed, the process was a failure and the strainer may very well sag over the years. Incidentally, the last picture shows a tree with "bar risers" on it; Bar risers create a channel on the bars for the stirrup leathers to sit in. Either type of groundseat (tin or all leather) can be made with or without bar risers. On an all leather ground seat, the seat strainer would be stretched over the bar risers. If not using the risers the strainer would be stretched over the bars of the tree as shown in the other photo. As concerns the seat tin, some makers and riders will tell you that because the tin is rigid, it will never shape to your butt... of course there is no chance of it sagging either. I think in the end it is important to choose a saddlemaker with the experience to deliver a properly shaped seat, regardless of strainer type, which suits you and your riding style. Off the topic of seat strainers but still talking about groundseats, I have heard a few people who have mentioned getting the groundseat shaped to your butt by either going to the saddlemaker's shop while the seat is being shaped or by having the tree sent to you so that you can sit in it. My own opinion is that if this works for you or gives you a sense of security that the seat has a good shape, then by all means do it. On the other hand, sitting on a tree that has a ground seat in it will not give you the same feeling as riding the saddle when the horse's movement is affecting where and how you sit the seat. A good saddlemaker should be able to make a "generic seat" that will put a rider in a secure, balanced position and be confident that their customer will be happy with that seat without ever having to sit on the groundwork while it is being shaped. Of course, for customers with specific needs ie. physical problems or weight issues, an experienced saddlemaker should be able to shape the seat to accomodate these issues to a certain extent. Hope this helps, Darc


-
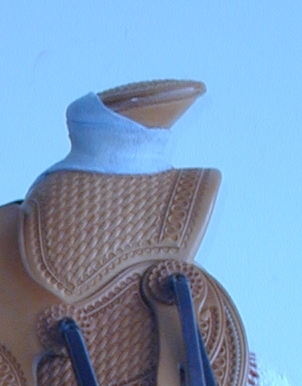
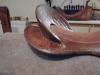
Question by a WH Forum member: " How to tighten a horn wrap" On my Wade with a post horn, I have a mulehide wrap on the horn. The wrap is having a tendancy to come loose. I have taken it into a couple different shops and they used a chinaman to retighten it. After a branding this past weekend, it is now loosening again. What can I do to prevent this? I am dallying the right way, is the wrap loosening when I run a little slack in the rope? Greg's answer: If you are a right handed roper the wrap should be going clockwise and you dally counter clockwise, exact opposite for a southpaw. Sliding rope should not loosen your wrap. If they are nailng the finish end of the wrap under the gullet pull those nails out and just leave the tail under the the start of the wrap to hold it this way you can grab the tail and pull any slack through as it appears from time to time. Depending on how tight the wrap was done it can be amazing how much slack I guy can find dallying. Maybe Darcy could post a picture of a wrapped horn with the tail passed under the start as it does't matter if you start nailed under the gullet or from a fork screw the technique is the same just the positioning is different. Greg Darc's answer: Hey ..... I've posted a bunch of photos showing different wraps that are started in different places with a couple nailed in the gullet and a few with the fork screws that Greg mentioned; As he said, it doesn't matter how the wrap was started but it helps to leave a little handle to take up the bit of slack when it does happen. Check the area where the wrap ends... the tail of the wrap should be underneath where the wrap started and this should be a real snug fit; the start of the wrap should be pushing down on the tail of the wrap. I've seen forks that if you don't place the screw in the right place, you get very little tension there and it's easy to slide the tail underneath. While in Oklahoma, Greg showed us a neat little trick to get the tail under the start of the wrap, but if you try to do this any other way, you really have to work at it to get that tail underneath... that's how tight it is through there. Another thing to look at is how tight the wrap is overall. On my wraps you can't peel up the edge of the wrap anywhere after I tighten them. Check the top edge going over the horncap and top lip as it passes under the cap; you shouldn't be able to roll that edge at all. If you find that you can roll it, you might want to tighten it again. It helps if you soak the wrap for a while (mulehide doesn't absorb water to well). I usually get the wrap as tight as I can by pulling it by hand and then use the chinaman after the passing the tail under the start of the wrap. Saddlesoap on the wrap and the chinaman strap helps allow the tail of the chinaman to slip while tightening it. After I have it as tight as I want it, I usually leave the chinaman on it over night with the end of the wood handle wedged down against the cantle so that it can't loosen itself as it dries. If you can post some photos of your fork and horn, it might give us a better idea why it's loosening off. If you can't post a couple of photos, have a look at the photos below and see if your wrap looks similar to any of the ones in the photos.


-
Ok, so I will go ahead and post 4 posts. If however you professionals think it is of no interest to you, then admin, please, delete the post(s). Tosch
-
About a year ago Darc and Greg responded to a lot of questions by non-professionals in the Western Horseman Forum. Some quetions and responses I saved to my computer so I have them handy whenever I need it, including 1) "How to tighten a horn wrap" . I saved the question and the responses by Greg and Darc. 2) Also responding to a question Darc explained tin vs leather groundseat and making a groundseat with/without bar risers with lots of photos, too. It is a longer 2 part response and I saved this also. ... 3) And finally I saved Darc's answer to my question regarding pull on tree from a flat-plate vs an inskirt rigging, again with lots of pics. If 1) and/or 2) and /or 3) are of interest and if Darc and Greg agree I could copy it in here. Darc and Greg - I beg yoour pardon that I did not first ask you whether it is ok to make this offer. But you invested a lot of time and patience to answer lots of questions on that forum and "knowing" you ....and if it would be helpfull for someone here..... If however my post here is off - I am sorry. Tosch
-
Is it possible?
Tosch replied to JustWakinUp's topic in Dyes, Antiques, Stains, Glues, Waxes, Finishes and Conditioners.
I know of a product called "effax leather balsam" . A quick google search came up with this US source for it http://www.adamshorsesupply.com/browse.cfm/4,19.htm I used a very little to make reins (harness leather) more pliable, I let them sit over night and apllied another light coat. They got w a y too pliable. An old saddle from the 1940/50 with very stiff leather, I put it on and it became pliable again. However I do not know whether they have chanced the formula ( but mine also contains the ingredients they mention in the ad), I have mine for more then 10 years and I do not use it anymore untill I need something to be very pliable, so I avoid using it. Use it very sparingly , let it sit a while , roll the strap back and forth between your hands and let it sit another day or two. If needed do it again, but use it sparingly. If you want something to be much more pliable - this will get it done, I am sure. To not affect the tooling - because it does have a darkening effect - you might want to use it only on the back side of the strap. Tosch -
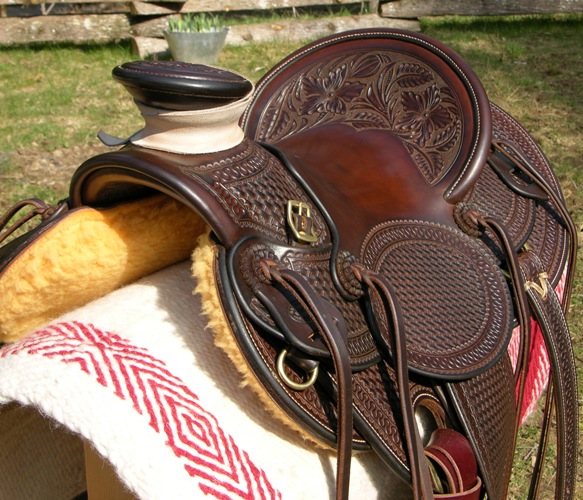
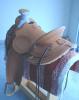
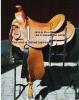
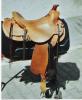
Being "just" a rider, I always have a close look at the seat shape of a saddle. I only see a very few that I really like. This one looks very very good to me, must be very comfortable! Great ! You made it for me, didn't you ? Tosch
-
When you google Trick Saddle the first result page will name the websites of at least 3 saddle makers who make trick saddles. The websites also show pictures. I would assume they could lead you to a tree maker, too, although I wonder what would be different in terms of structure compared to other trees or available tree options (beside the horn). Thus I would assume the treemaker of your choise could supply with what you would need. Tosch
-
Position of Rider on a Horse
Tosch replied to David Genadek's topic in Choosing the Right Saddle for the horse(s)
I have to add to my previous post: Looks like not all spanish horseback bullfighters or rejoneadores sit that far forward, this one does not and his horse makes great movements , too. And if you look at the "Doma Vaquera " videos the riders definitely sit further back. But they all ride horse built differently than the QHs and they ride totally differently, whatever that means. I watched the Nuno Olivera video David G mentions in one of his posts here http://leatherworker.net/forum/index.php?showtopic=901 The pictures are not very clear but to my untrained eye it looks as if NO would be riding the cantle and sit in position B. The saddle sits over the horse's shoulder.Here http://youtube.com/watch?v=90CEwvZQVYw&feature=related one can see another interesting riding style with the saddle not sitting over the shoulder as NO's saddle does. I think this topic is interesting enough - and it were nice if you , David G, would rejoin and address some of the questions the professionals here had come up with like showing a tree sitting on a horse and explain what is there to see. And maybe even piece together a summary from articles or comments or other forum distributions you have made to give a well rounded picture of your views to the other professionals here, that were great. I guess even if the end result would be that you and the other professionals here still disagree that were ok, too, but others would have a chance to better understand your views. - And now I shut up - Tosch -
Darryl, thanks a lot! Tosch
-
I have seen at least one post which has been editited later on by the author. So it can be done. But looks like I cannot figure out how to do it. Please . Thanks Tosch
-
Position of Rider on a Horse
Tosch replied to David Genadek's topic in Choosing the Right Saddle for the horse(s)
Looking again through David G's thread at the other forum (link here on pag.2 ) and at other topics there, I ran into a suggested you tube video about a bullfighter and a palomino horse. I do not know which video was meant, but I came up with these 2 (and others) you tube videos I thought I share with you. http://www.youtube.com/watch?v=qDshJC6u7dY and To me it looks as if the rider(s) sit far forward and the saddle(s) ,too. As far as I understand the Vaquera saddle does not have a wooden tree but is make of special stuffed straw, but don't quote me on that. I think the riding skills are amazing. I think you will enjoy watching the riding. Tosch -
JAM, I do not have a link handy but 3 or 4 weeks ago Keith Seidel explained in a post how far down he drops his inskirt rigs and why. You might want to hunt up his posts. Tosch
-
Position of Rider on a Horse
Tosch replied to David Genadek's topic in Choosing the Right Saddle for the horse(s)
Greg, I assume, in order to being able to ask for a tree you would need to supply David with some photos/measurements of the horse the tree is intended for. You will find more info here http://www.aboutthehorse.com/web/saddlefittingguide.shtml . You know now where to place his tree on the horse, so this should not be an obstacle anymore. Tosch -
Position of Rider on a Horse
Tosch replied to David Genadek's topic in Choosing the Right Saddle for the horse(s)
Darc, Greg: On purpose I kept a tight rein on myself not commending on some things, I wanted to keep my remarks "down to the facts". Glad you read it. Tosch -
Position of Rider on a Horse
Tosch replied to David Genadek's topic in Choosing the Right Saddle for the horse(s)
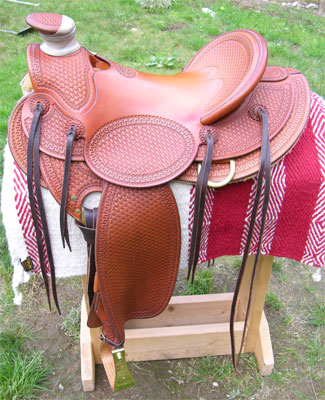
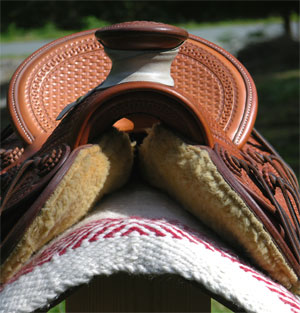
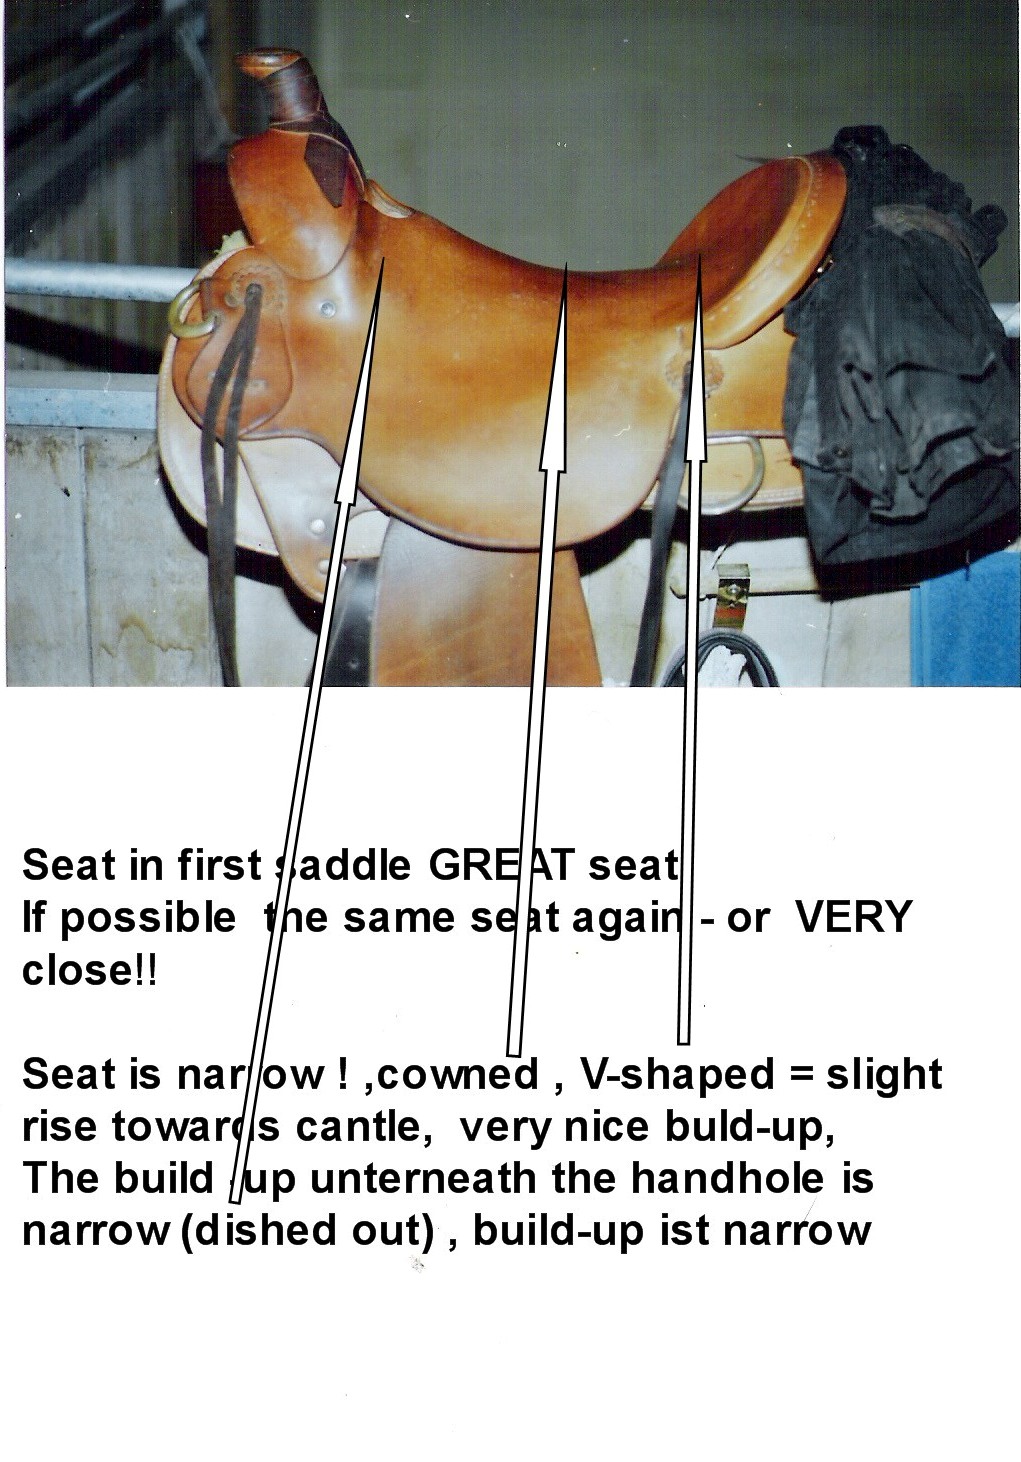
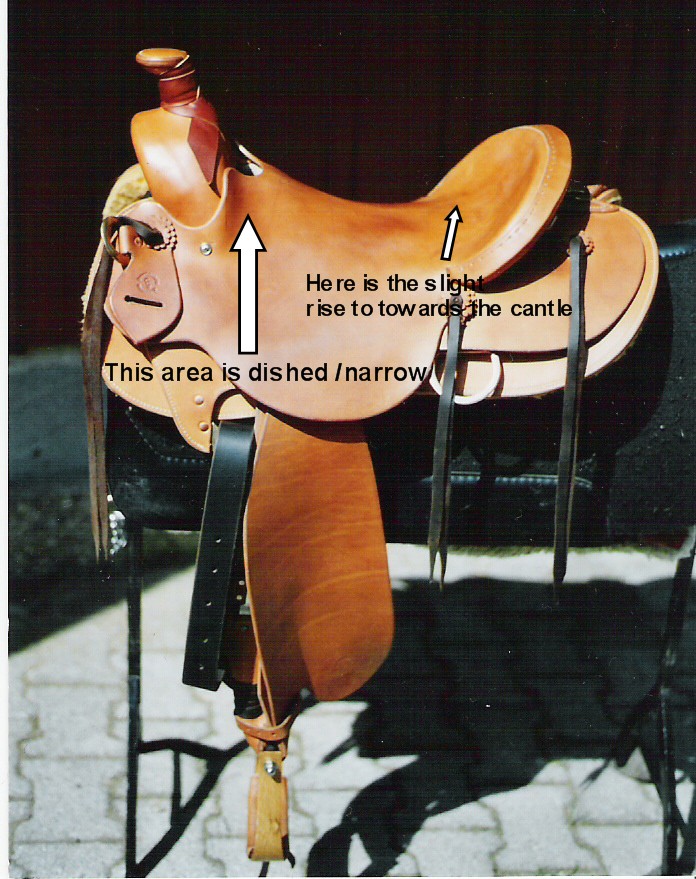
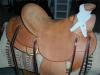
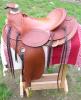
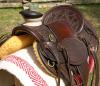
I prefer a slightly v-shaped seat with the low spot in the middle (a hair behind) of the seat, a fairly low build-up with a bit of dish to sides of the build-up and a slight rise towards the cantle. This seat lets me easily sit in the middle of the saddle with the ability to move as desired. When I first rode in this saddle I rode it for 3 hours ( a long time for me) , nothing did hurt and I was as fit as at the beginning of the ride and felt perfectly balanced the whole time. The pics show what the seat looks like from different perspectives. I also like a dish that is there when I want it, a 3/4" dish seems to fit the bill for me. In a seat to long for me I brace against the cantle with my feet stigging out in front - no good at all. Tosch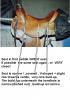
-
Position of Rider on a Horse
Tosch replied to David Genadek's topic in Choosing the Right Saddle for the horse(s)
In this thread http://leatherworker.net/forum/index.php?showtopic=2760 David posted a link to a forum where he explains and discusses his preferred seat incl. some pdf files with interesting drawings and explanations he did not post here. ((Quote: Here is a link to another forum where this point is being discussed end of Quote )) You have to register to the forum and (a few days ago) have to read through 8 pages...I think it might be worth doing it for people really interested although it had been nice if David had given a summary here. In one pdf it is advised to line up the front of the gullet with the high part of the withers. Otherwise (my interpretation) you could not get the rider to sit in position A. Thus the front of the bars go over the shoulder (blades), which is the reason (my interpretation) the front of the bars are (extremely) flared out "to free horse's shoulders" http://www.aboutthehorse.com/web/trees.shtml . So that -assumingly - the bars do not touch the shoulder blades but provide a structure for the seat to be placed this far forward. In one of the (pre-crash??, cannot find it anymore) threads about trees for the spanish mustangs were pics with SM with David's saddle on them , and some people commented the saddle sits up way too high, exactly that is the right position in this line of thinking. I attach some of the pdfs (if it works) which are published in the above mentioned public forum. Again I encourage you to go to the forum and read for yourself. This here is just my extract. And it is a very interesting read - in more than one sense on the word. In the meantime this might be an "appetizer". Tosch David_Genadek__orientation_1_.pdf David_Genadek_rigging_position_1_.pdf David_Genadek_spine_movement_1_.pdf David_Genadek__orientation_1_.pdf David_Genadek_rigging_position_1_.pdf David_Genadek_spine_movement_1_.pdf -
Grumpy, Phone number for Timberline Saddle Tree Company should be 435-789-8228. Say "hi" to Randy from the Swiss tourist who asked lots of questions and took lots of pictures when he toured the facility last May for about 2 hours. Tosch
-
JAM, you might also want to look here: http://leatherworker.net/forum/index.php?showtopic=1952 and also want to follow the cross-reference you can find there. I would think you will find valuable information in the discussions there. Tosch
-
GREAT, LOL, I nearly spilled my morning coffee... Tosch
-
Steve, just a thought: your are in fly fishing, too, right? So, when can we admire a saddle with a fly fishing scene on your new webside? That might even attract more people to stop by who just like you enjoy not "only" great saddles but fly fishing, too. What are other's experiences? Are scenes besides roping and such are sought after? Just wondering. Tosch
-
Steve, site is very easy to navigate through which is great. Your email adress should reflect your business name. So maybe you want to either change you business address to "flynsaddle.com" or get another email address. The link in the column on the left is titled "saddles" . When the section opens it says "custom saddles", to be stringend you might want to rename the title to "custom saddles" so the viewer knows what to expect when the section opens. In this section you say " BASE PRICE SADDLES INCLUDE" but a base price can nowhere be found. Since you mention "base price" I would expect a base price somewhere. If you do not want to mention a base price or put in a price list somewhere I would encourage the viewer -hopefully a potential customer - to contact you by a line like "call to discuss your needs" or something otherwise as a potential customer I might think the price is not mentioned because it sooo high that it is out of reach. In the same section these lines are in there twice : - Standard Rear Cinch, 1 ¾" Billets - Latigos and Good Quality Front Cinch What I like a lot is that the individual sections are not overloaded, yet they give a good impression of what you do. And what you do looks great! (If I just knew how to change the typing!!!) Tosch
-
I have a copy of Verlane's 2003 booklet which includes a drawing of "narrow waisted" bars (bars are narrower from around the center of the fork to approx. the point of cantle) and also a 4 page chapter on "Gender & Seat shape, why men and women require different seats" with text explanations and various drawings. If of interest, I can try to put the 5 pages in a pdf and try to "somehow" upload it (assistence appreciated!), just let me know. Tosch
-
I have come across Verlane's way to do it: https://www.siegelofca.com/view_verlane.asp?id=178 Tosch
-
Special requirements for down-hill built horses?
Tosch replied to Tosch's topic in Saddle Construction
So the tree maker works hard to build a good functional tree. The saddle maker works hard to position the rigging correctly. And then - nevertheless- the tree cannot function as good as it theoretically could because of a "conformation defect" in probably most of the horses you build saddles for since "it is hard to find QH that is not down hill". Isn't that frustrating? Tosch