


Yetibelle
-
Posts
358 -
Joined
-
Last visited
Content Type
Profiles
Forums
Events
Blogs
Gallery
Posts posted by Yetibelle
-
-
Here is one way to get it done.
-
I have screws that are the size of a grain of sand. Magnets are awesome for this, I have them now in all over the place. Also a magnet pen that I can extend and poke around in the hard to reach areas. I also have the magnet tray. (see side story)
If you have a shop-vac, clean it out really well and then go over the Machine and the floor and you may be able to get it that way.
-Recommend-
Performance Tool W1265 Large Magnetic Nut and Bolt Tray
Master Magnetics 07228 Magnetic Pick-Up Tool, Telescoping, Retrieving Magnet, 25" Length, 3 lb Hold
Side Story: I was stripping a machine over the summer and I was taking off the parts in sections and I place them in plastic pint containers (from left over take-out). This way I can snap a lid on them and let them soak in special sauce to get the grime off. I thought I had a great system. The kids next door were running around and playing and in slow motion I saw the basket ball heading full speed right into my sorted parts and screws. They flew up and all over I think some even made it to the next state over. I was lucky borrowed a magnet nail sweeper, then realized I should be using magnets more often.
-
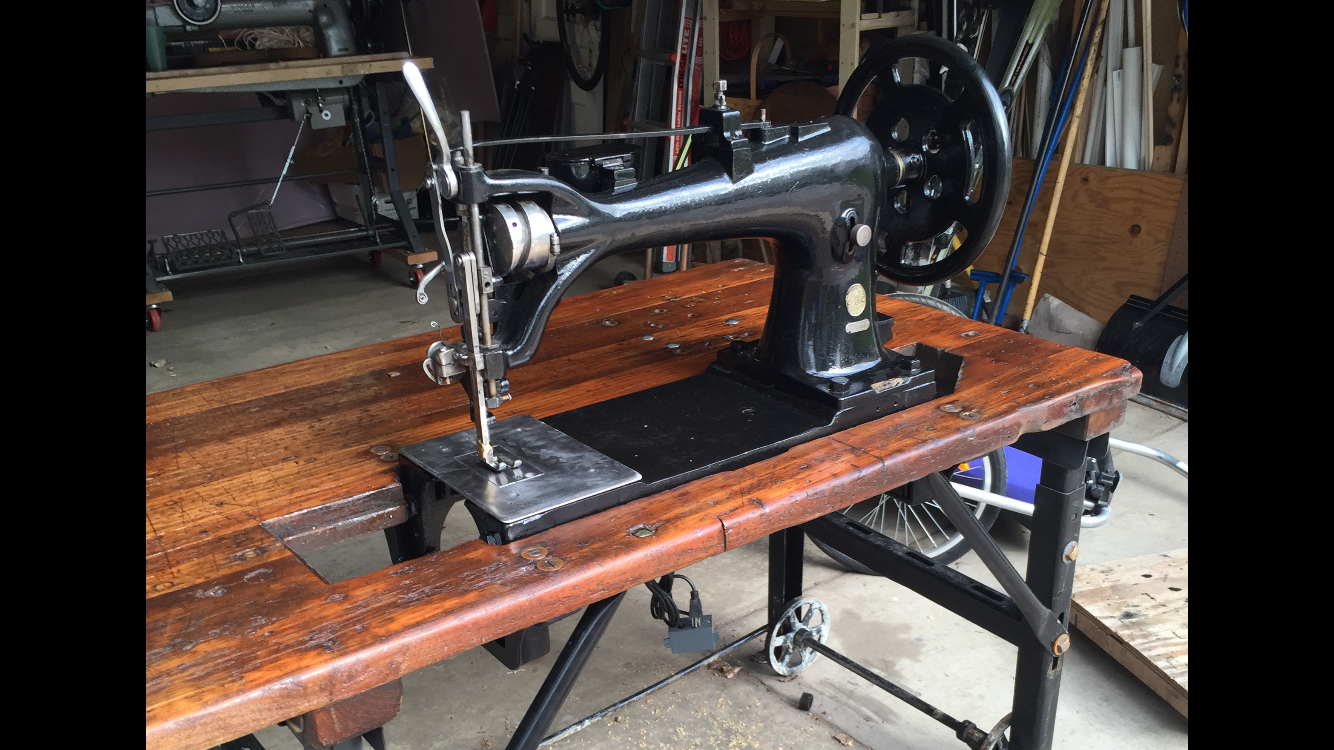
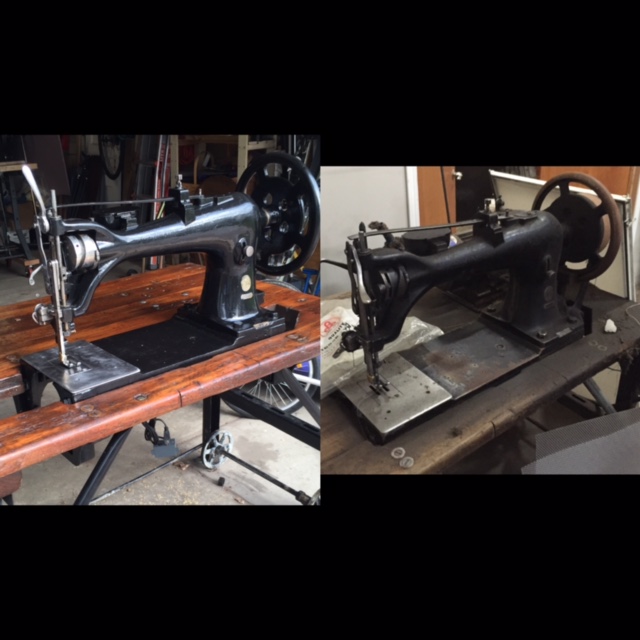
Here is the Singer 7-33 I restored. I just cleaned it up, and then mixed 50/50 paint thinner to paint and applied 3 coats I believe. I just used Rust-Oleum high gloss black enamel and a good brush. Had I stripped it all the way down and smoothed it out it would have looked brand new. I think I will try that on the next one. Now I want the gold leaf the logo back on. But I need a Singer stencil.
Some before and after pics.
-
I really appreciate your enthusiasm for detail. I'm sure with enough effort you can get the machine apart. Get some micro lube in there and it will eventually saturate and loosen up. Now back to your process, how do you plan on baking the paint on? This sounds fascinating. I think that paint has come along way since the machine was made 100 years ago. You can now really get close to the same finish with over the counter enamel paint and some wet sanding. Plus since you already stripped it down it should go on really smooth now.
Just for fun here is the video of how it was done. You can see one of the machines that screws the top/bottom together at 14:50. The "japanning" starts about 15:10. The whole video is great.
http://movingimage.nls.uk/film/1592
-
I love my 111w155. It's the "go-to" machine. I do sometimes wish it had reverse, but its not a big deal really. I am running 207/138 on it now, but I think it does better with 138/138.
-
Where are you located? I can keep an eye out.
-
Yeah nothing looks obvious from that, looks like a great machine. I understand the specs your trying to get. I was just wondering if going slightly smaller made and difference? Could be a loose screw on the feed dogs assembly, causing some play left or right? I had that, when I used a bolt down there that was not standard it didn't pull right untill I had it all correctly tighten down.
-
Wow that is great. I have never stripped them down that much. I'm going to give that a try.
When i re-paint them I mix 60/40 or so paint thinner and thick oil enamel paint. The paint thiner makes it go on smoother and fill the cracks. It takes a few costs of painting wet sanding and such but it comes out nice. Or take it to an auto painter. Get a real coat on there.
Nice work
-
Yeah the first time I saw that I thought. This must be a prank....how can Salerite leave that up there? Plus who would sew like this, for real? I was tearing-up it was absurd. I have a 221 featherweight that sews leather better than that.
Still he makes a great effort, if you read the YouTube comments, he follows up - he will use a better machine for leather next time.
Good idea...
-
Well the parts guide says around 1959.
https://www.universalsewing.com/images2/parts_lists/all/gef9sp0n.pdf
-
Sorry I can't resist.
-
How did you get that so stripped? plus how do you plan on "jappaning" it back to black?
I like the idea of the clear-coat.... it does look great "naked" .
-
Here are my .0002 cents.
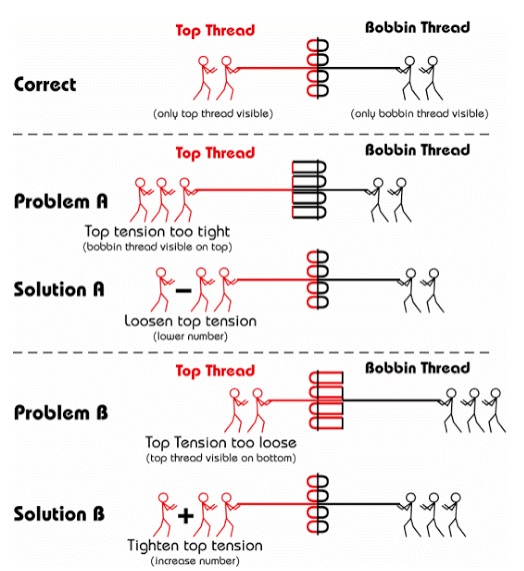
First that stich-per-inch looks a little tight for Size 27 needle and 346 thread. See if you can max out the stich-per-inch (I think it is like 5) then try it. Also sometimes the needle gets a little bent, you can't see it with the eye, so swap out the needle for a new one. If that does not help....then. Try a smaller needle like a 22- maybe some smaller thread like 277 and 207? Try the 277 on top and the 207 on the bottom again with the longer stich. Then test that out on the lighter material and see if that stops the skipping. I typically find skipping is a bad needle, or your pulling or pushing the material and the needle ever so slightly misses the hook.
Also send over a pic of how your threading the top town, and the head of the machine.
Its not that far off
-
Nice pictures!
-
The Servo motors have power settings - slow to fast 300-5000 stitch per inch just turn it up or down from the motor.
-
the 29k is very easy to use. small bobbin on some of them. I was always told to go with Post machine and roller foot foir this, plus it works for almost anything else, bags wallets ect. I think you would be happy with that in the long run.
-
haha you want to make a Necronomicon Ex-Mortis - very cool.
Ok well Yeah this would be hard but not impossible. You will need really thin veg tan leather that. The veg tan leather can be wet molded. So to start you need a template you can mold from. So you can 3d print one or carve it, but it should be close to the design your looking for. Then all you will need to do is wet the leather and tack it down tight to the mold and let it setup for a while and - done!. If you can clamp it in a mold even better.
This would be the better of the other way to do this -The other way would be to build up 4-5 layers of leather and carve it it out. Then once carved, you can polish the rough areas smooth then dye it black. I suspect it would look cool but may be to thick for a book cover?
-
Nice test pattern. Is that the original needle your working with or a new one? What size thread\needles are you using on the top and bottom? I "borrowed" this chart that helps me.
-
Sorry I don't know of anyone in SD, - but if you put up a few pictures\questions I'm sure we could help fill you in.
-
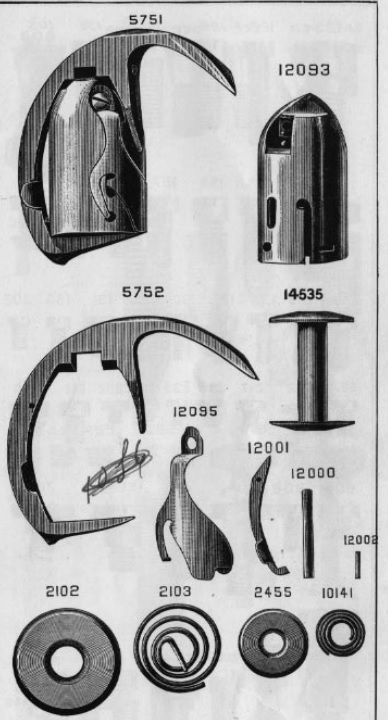
What Part/s are you looking for? I may have them.
-
I have not used "Coats" brand before. I use the bonded polyester from Superior Threads. They have size 277.
http://www.superiorthreads.com/shop/category/thread/?brand=Bonded+Polyester&thickness=%23277
-
SOLD - thanks for looking
-
I understand it the frustration - making a list is a good idea. With Singer Machines the model number starts with the machine class, then the factory, then the subclass. So a Singer 111w155 the class is 111 the "w" (typically refers to the Singer factory it was made in) and the subclass is the 155. The When you see "SV" in a Singer model number it refers to "special variant". So it is a special machine within the subclass. To get the complete history on the machine you also need the Singer Serial number. That will also denote the factory and year the machine was made in. I don't think one factory or model was better than the other. What makes an antique Singer Machine good or bad is how well it was maintained over the last 100 years. Below are some answers to your questions. The old machines are great fun.
What's a 15, 30, 201, 111, 211?
Singer Class 15-91 is home machine still a tank but not a walking foot. very common machine about $100-300
Singer 201-X bigger version of the 15-91 also tough but still a home machine also about $100-300
Singer class 111-XXX - great medium weight machine single needle walking foot $300-800
What's a 78-3? - Singer machine medium weight leather and canvas about $300-600 in working order
What's a 144WSV33? The 144-XXX is a heavy canvas and leather machine with long throat for easy turning projects
145W103? similar to the 144 but with 2 needle system
Which pfaff's? What are they? Pfaff, Duerkopp Adler are both German sewing machine companies
What else is out there in old iron that can be used for light-leather?
Singer 29k - shoe patch (but can do other stuff) great medium weight treadle machines. $400-800
Singer Class 7-XX machines - larger heavy leather machine $1000-2500
Singer 97-10 HUGE machine sews $3000-8000 don't see them that often
-
I like that converted 29K base. I think I will have to try that.
Nice Work!
Sewing Machine For Beginner
in Leather Sewing Machines
Posted
Good-Times, I love that video...lets get to the good stuff.
The portable aspect is the issue. Having moved around Singer machine heads by themselves that weigh 30-100 pounds, its hard to imagine any machine in a portable setting. I suspect you could get the 29-4 setup portable, but its still a tank. Plus since your new to this I would recommend getting use to sewing first before going "free-range" with it. Holster work requires more than just a good machine. Here is a great video, he makes it look so easy.