


ZIIK
-
Posts
10 -
Joined
-
Last visited
Recent Profile Visitors
1,012 profile views


ZIIK's Achievements
Member (2/4)
-
I tried regular low shank needle feed feet before trying the Pfaff 134 foot. The low shank needle feed feet I tried sit to far back, placing the presser foot pressure behind the feed dogs. It might be possible to find a foot that has the hinge far enough forward, but I have not found it yet.
-
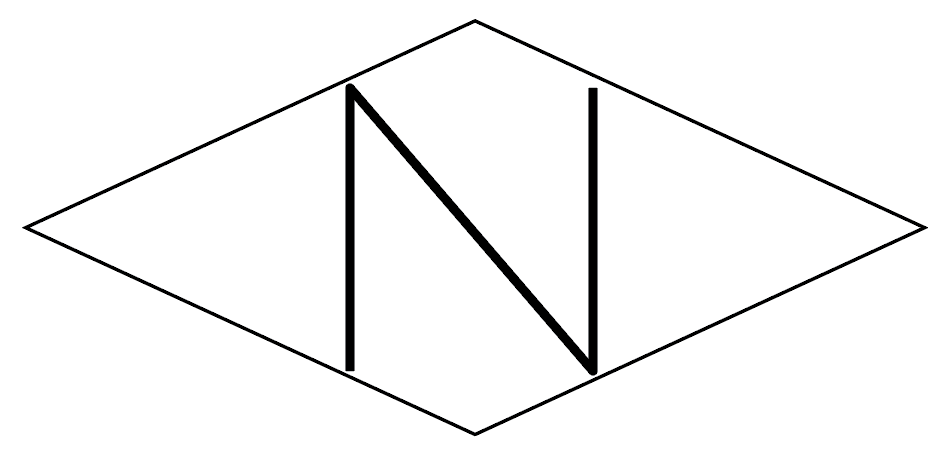
The logo in the link is not the same. It has the same outer shape but a different letter combo inside. If there was an exact match that I missed, please send me the link.
-
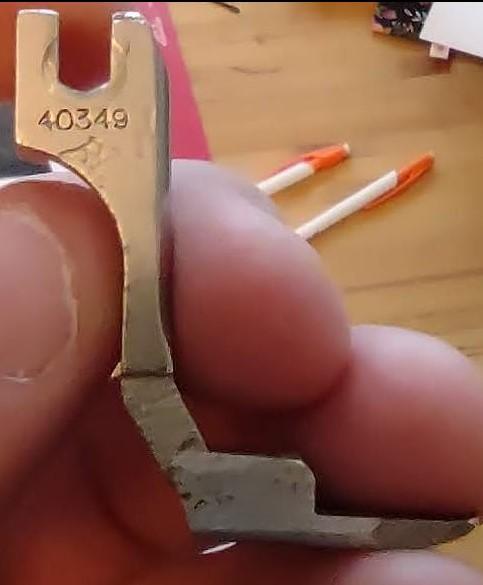
I realize that I slipped when posting last night. I meant to place this under the sewing machine forum. Thanks for getting back to me Constabulary. It is indeed a good idea to post the actual logo since my illustration is far from exact. The stamp is not perfectly clear either, so I could be missing some details in the center. It is a (modified) foot for a Pfaff 141, the part number is clearly visible in the photo. It is possible to buy the original item (NOS), but it is quite pricey. The foot costs more than the head is worth. There are reproduction options for the x34 and x38 machines from the usual suspects, but I have had a hard time finding reproduction feet for the 141. It is a well known fact that there are limited options when it comes to feet for old Pfaff machines but I hope to find something in order to keep these old beauties running another lifetime. The feet from Adler 67-62S works too, but they appear to be equally hard to come by. My next step would be to modify feet from 134 to have the correct offset between the presser bar and the foot. Simply cutting the shank, move lower part forward and braze it back. I just need to get a torch. Modifying the sole is the easy part. I am open to low shank options or adapters as well if anyone happens to know something that works. Another idea that crossed my mind is that some Pfaff 142 machines run Singer style presser feet. So it could be possible (have not checked diameters yet) to swap the presser bar for a Singer item and run their presser feet instead.
-
I have an old presser foot with this logo on it. Does anyone know a manufacturer that use this logo? In case someone cannot see the illustration it is a horisontal "diamond" shape with an N inside. This shape is used by multiple attachment makers with different letters inside. If anyone knows who use an N it would be awesome!
-
I know I'm a bit late to the party in this case. But I'll chime in in case anyone has use for it in the future. In my view, the easiest way to keep using a pneumatic presser foot lifter when switching to a basic servo is to remove the electro-mechanic components such as solenoids etcetera from the system and replace them with mechanically activated valves. You could connect the valve to the back stroke at the foot pedal or underneath the table top at the throttle controller where it is pushed upwards. The second option would be to have a pneumatic "foot button" that raises the presser foot. There are numerous ways to solve it in a low tech way. An automatic foot lifter could also be achieved through a pull activated valve on the pedal pull rod if that would be preferable. Some ideas to get people going.
-
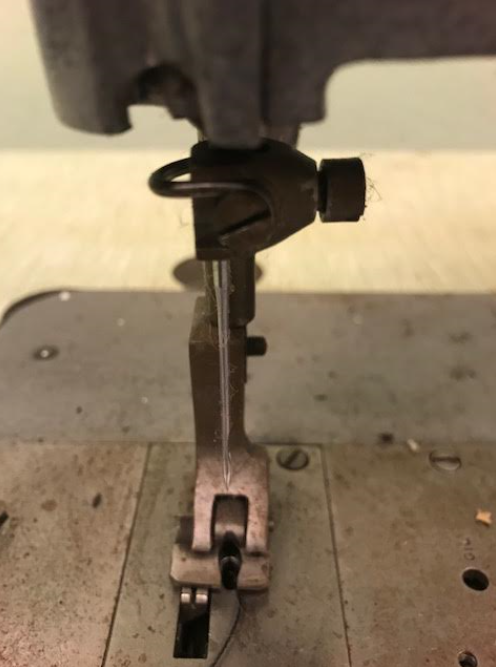
I found an old 132KSV18 and I am curious to know what it has been used for. I have never seen a presser foot of this style before and I have not found anything online since the SV machines are a bit of a mystery. Please share if you know what it was used for/why the foot has this particular design. //Joel
-
Great input Bob, I should have thought of that! I will try that and see if it helps. I have a new feed dog for a Singer 111 laying around that should fit this machine. I will try swapping it and see if I get the same results with a different feed dog.
-
I have continued troubleshooting this evening and come to a couple of conclusions. I checked the position of the Rocker arm, it is correct according to the Singer 211 manual, so i will assume that it is correct for this "stretched" Seiko version as well. I was to hard in my judgement on the thread timing around the hook and have achieved okay results with the latch opener and general timing of the machine so that the machine sews well in forward with normal thread movement around the hook. Reverse works okay on shorter stitch lengths, the ticking sound increases with increased stitch length. I have also located the reason for the "ticking sound" towards the end of the stitch formation. My previous assumption was incorrect. The thread seams to pass between the hook "finger" and the stitch plate okay after all. What does happen is that the upper thread gets caught between the lower thread and the underside of the feed dog as it is being pulled up, causing a small "pop" when it is released. Does anyone know how to remedy the issue? I am considering if it would help to chamfer the bottom edge of the feed dog, making it easier for the thread to slide "around". The edge is 90 degrees and rather sharp at this point.
-
I picked up a Seiko LLW8BL a while ago and are having some issues with it. The hook base was broken when I picked it up, so I have replaced that with a new Hirose hook. I have also found a bunch of settings to be out of specification and corrected that. The timing between upper and lower shaft is correct (matching marks, and the pick up lifts at the right time compared to the lower shaft). Despite this I am having some odd behavior when the thread is traveling around the bobbin, it is as if the tension is to high (despite normal thread tension). I have played around with the latch opener in case it was interfering and noticed that the thread is "out of sync" when forming the loop around the bobbin. It is as if the thread is to late to finish its cycle, getting to the latch opener later than what is normal. The only thing I have not checked is the position of the rocker arm compared to the rear foot. The movement of the feed dog is fairly well centered in the needle plate, so it looks okay from a visual inspection. Though I have suspected that this could have some impact on my issue since it affects the angle of attack from thread to hook base/needle plate. On other machines, the thread slips right passed the finger early in the cycle, on this one the thread is dragged passed the finger at the stitch plate right at the end with no help from the latch opener. I have noticed that the vertical space between the stitch plate and the hook "finger" is tighter than I would like it. I have not found a way to adjust this since the hook sits on a bushing pressed into the machine chassis. I have checked if it is possible to change the position of the bushing but did not manage to move it on the first try. Would be great if someone could give some input on how to do this vertical setting of the hook in relation to the stitch plate. I can get it to a point where it sews good in forward but makes a little noise in reverse when the thread is pulled through the tight space. Any help would be much appreciated. I don't have any documentation for the machine, but it is essentially a stretched Singer 211. So much of the settings are similar.
-
Adler 067 GK-373 tension problem (advanced)
ZIIK replied to HardenGoods's topic in Leather Sewing Machines
Hey Wellington, I believe it would be possible to make your machine release tension when you push/pull the release "button". I believe something is either broken, missing or out of adjustment or specification in this case. The button likely pushes on a plate that in turn push a thin rod through the tension unit. The rod push on a washer with a thin "bridge" across the center hole. Putting pressure from the backside on this washer (the thin centerpiece) is what makes the spring back off to release the thread. The length of the rod is important, and you can make your own if needed. Remove your tension unit again and look at how the button linkage works. Try removing it and the rod. Then try pushing the spring with a thin piece of metal to make sure it moves (a scrap needle works in a pinch). Then you can probably figure out which part that is out of place or if the rod is to short. I'm sure you can make it work. It is just more or less work. Let me know if you require further assistance.