


RabbyTat
-
Posts
10 -
Joined
-
Last visited
RabbyTat's Achievements
Member (2/4)
-
Actually, I think those hats were made of felt with leather visors. Lil Griz Hatmaker I have seen this guy make those hats.
-
1T Arbor Press - simple punch and stitching chisel mod
RabbyTat replied to Ingenero's topic in Leather Machinery
I also drilled and tapped a hole from the side of the ram to insert a small bolt to hold other tools which are of 3/8s diameter. Have not needed it yet, but it is there. -
Leather Holsters and Striker Fired Pistols
RabbyTat replied to Gosut's topic in Gun Holsters, Rifle Slings and Knife Sheathes
I see this is an old thread, but wanted to add a few thoughts for any holster projects out there. Good questions. As you see, the cheap Jakslide holster involved in that photo is infamous for causing unintended discharges. Its thin leather flexes badly at the critical top of the holster and is dangerous for single action or "safe action" firearms during the re-holster process. I owned and discarded a Jakslide decades ago because I saw this dangerous tendency on my own. There are ways to safely counter this issue through better holster design. For instance. one of my favorite makers, Milt Sparks uses a metal band at the top of the holster to stiffen and prevent sagging for re-holstering. They are outstanding holster makers. Others have used thick or laminated layers for stiffening this area. I used a very stiff contrasting leather in the photo of one of my IWB carry holsters for that purpose. Glued and stitched. The entire trigger should be covered while holstered. But be aware that items such as jacket draw string toggles can follow your gun into the holster as you lean forward to replace your gun and activate a trigger. This can happen with any gun, but is particularly a concern with single action or striker (safe action) guns due to the lesser trigger pull needed to cause them to fire. Even greater concern exists from the trend to appendix carry which orients the gun toward the lower extremities. I suggest that people remove the holster and place the gun in it and then put the holster back on the belt rather than putting it straight back in the holster while mounted and oriented toward critical body parts. You might consider this when designing a holster which might be used in this condition.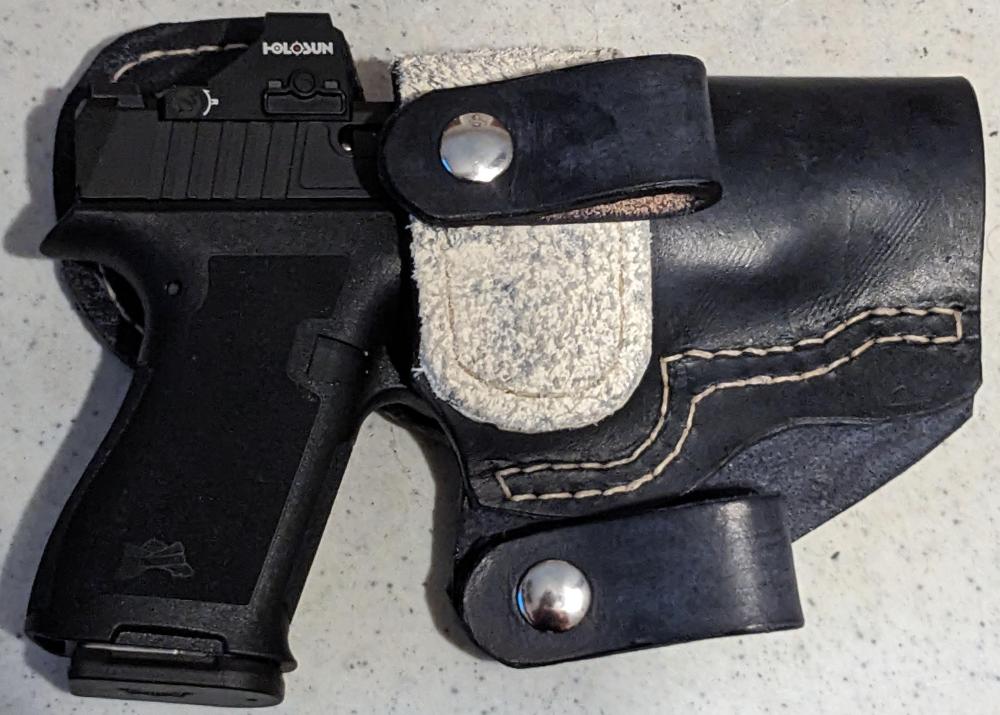
-
Looking for 6 in trucker/ biker wallet pattern
RabbyTat replied to DaveP's topic in Patterns and Templates
Gee, thanks - once I figured out how to get the links to work, I spent a day and a half wading through old PDFs... Seriously, thanks for sharing that resource. What a gold mine of leather information! -
1T Arbor Press - simple punch and stitching chisel mod
RabbyTat replied to Ingenero's topic in Leather Machinery
I did something similar, but used a 3/8s hole on one end. This allows me to use sections of plastic plumbing tubing (like from your kitchen faucet sprayer) on several stamping tools for a friction fit. Many tools fit right inside this tubing and they are snug, but can be twisted as desired. I have been stamping with such a set-up. I am also looking to do snaps, rivets and grommets. I might go with your half inch hole on the other side for other uses. (Anyone know of a good source for good simple letters which might work in such a press?) I have also used a cutting board under the ram, but made a plywood platform with a metal bolster. Am rigging an alignment guide to keep long repetitive runs lined up for stamping tasks. Sort of like a table saw fence. -
Shoulder Holster
RabbyTat replied to Vpetrell's topic in Gun Holsters, Rifle Slings and Knife Sheathes
A couple of videos which might help: https://www.youtube.com/watch?v=bA3ULgpGzqU https://www.youtube.com/watch?v=5Q939p3i97o -
I got into finishing knives from old blades or blades ordered from Condor. I then started making sheaths for them. This was done about a week ago, but is still not stained on the rough. The bat wing is partly decorative, but also covers another pair of straps which will hold a firestarter or sharpening rod. Here is an earlier knife which was made from a butcher knife and has a darker and completed sheath: This view shows the back which includes the firestarter. As a counterpoint to the modern items, here is a helmet from the 2nd South Carolina Light Infantry Rgt (Rev War) Yes, the front of the liner was bulging out a bit and the stitching was not yet finished, but that was drawn into place once worn. RT
-
Greetings All, I bounce around between South Carolina, Mississippi and Louisiana. Have done a bit of leather work for years and found this site while looking for a finer spaced stitching wheel. (Pricker?) Started out simply repairing horse tack, belts and other assorted items as needed. Tried to repair old car upholstery with mixed results... From there, started making my own rough items - developed an interest in doing (American) Revolutionary War reenacting and hunting with flintlocks. This forced me to get more serious about making correct items and better quality. Cartridge boxes, gun slings, bayonet slings, light infantry helmets, flint wallets, shooting bags, back packs... More recently, I have tried some motorcycle related items. Roll bags, fork bags, pouches... Then gun holsters and knife/tomahawk sheaths. Pistol belts are a special thing for me. So many of them are poorly made and of poor leather. I like to base the new one from a pattern taken of an existing belt that the wearer has used for some time so that it naturally fits without needing a year to break in. Cut the new leather to follow this shape and make a belt out of it. You will likely see me participate in the holster area since this is what I am trying to learn. Most of my work is hand stitching and I tend to use natural fibers and veg tanned leather - except for EDC holsters. The nice thing here is that there are others doing the same things that I like to do and see so I can learn to push my hobby to a higher standard. Thanks for what I learned just while lurking for a couple of days. RT
-
My First Holster
RabbyTat replied to GaryCs's topic in Gun Holsters, Rifle Slings and Knife Sheathes
Aside from the comments above, why not wet it and bone it (after wrapping your gun in plastic wrap) and then work the edges for a nicer finish. I would then consider how well the mags are held. Mine are secured by a strap with a snap for greater security. You may have the tension set perfectly, but leather changes over time. You want those magazines there when you need them. You might look at bolstering your thumb break with a metal stiffener. (Look at images of Galco rigs for illustrations. They just have better images on the internet than most others.) My thinking might be considered odd for some gun guys, but I carry 1 mag and 1 flashlight in my pouches so my top pouch would have a slightly different shape. (Never needed the spare mags, but the light has been of great value in bad times.) RT -
Shoulder Holster
RabbyTat replied to Vpetrell's topic in Gun Holsters, Rifle Slings and Knife Sheathes
I would study the Galco Miami Classic or MC II as it is the best shoulder rig I have ever worn. Then check out the Classic Lite. The designs are good and there are a lot of great ideas in them. You can get some replacement parts from Galco which you could use for your project. Depending upon where you are, you might even find one at a gun shop or or police supplier to photo and/or examine. The use of the screw with the small section of rubber hose as a tensioner is pretty helpful in adjusting to fit. On the other hand, you are stepping into an advanced project here. Shoulder rigs are a lot harder to correctly make when compared to other holsters. That thumb break needs to be about perfect as does the area just in front of it. The shooter needs to be able to properly grasp the weapon while the holster properly secures it. Tough balance for a laterally carried firearm. Last comment - buy the best quality holster snap. That is not the item to be cheap about. I would try Galco or Bianchi. Good luck with your project! RT
