


Shelly
-
Posts
328 -
Joined
-
Last visited
Content Type
Profiles
Forums
Events
Blogs
Gallery
Everything posted by Shelly
-
Hi, Actually, mane hair ropes are not 'braided' - they are twisted - the process is pretty involved, and I do not do them myself. I know what goes into making them, and I'm sure I could do these, with the right tools, etc. I'm personally not interested in making them, as long as I can get them from rope makers that do an excellent job. Most of the work I do has been because I couldn't afford to purchase the work of the very best artists available, such as Ortega's work, when I was younger. I was 18 when I realized there was no one else at the time that compared to him - just one or two braiders that I knew of that could do above ordinary work, and I couldn't afford to purchase from Ortega, or the others, for that matter (at that point in my life, he had already semi-retired, and was only doing collectable work) This is why I started to do it myself, for my own use, on my own horses...my business eventually grew out of those needs/wants, to where I am now... thank you for your compliments! The best hair ropes I have had have been from Blind Bob, (his wife separated the colors, and prepped them for him to make ropes), Doug Krause (he owns some of the equipment BB used until his death), and a gal that also does excellent work - Toni Schutte. There are a few others as well, that not only twist up the ropes, but also will hitch hair - yet another thing that I have tried, done, and decided not to do. I've also been asked why I don't engrave silver, but, that is still another area that I would rather let someone else become a master of. I feel I will spend the rest of my life now, just trying to be the best I can be at what I do now, rather than trying to become a 'Jack of All Trades, Master of None', if you understand what I mean. So, to truly answer the rest of your question - Mane hair is used in the best mecate's, or hair ropes - they can be any thickness, but usually 1/4" diam. for Fiadors, and I always liked the same diameter rope on the bosal as the diameter of the bosal body - 5/8" or 3/4" was/is the norm. I think many of the old time trainers liked the ropes made of tail hair, as the ends of the hairs would be pricklier and thus would encourage a horse to move away from it more readily. The softer mane hair was made up, usually, with an inner, twisted core of hair, and overlaid with 6 strands of twisted hair that would all come together to make the final rope. A popper added to one end, and the other a knot. I always changed the popper up, braiding it to match my bosal, and also the knot was covered with a final braided button to match as well. I'm sure I could go on with much more detail, but I think this covers the gist of it! Shelly
-
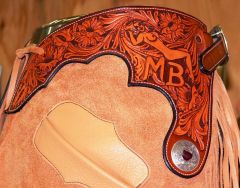
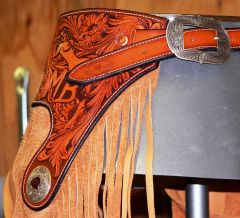
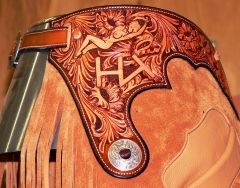
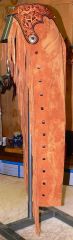
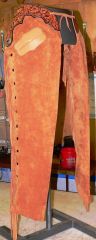
From the album: Matt Budge Floral Cutting Chaps
-
Matt Budge Floral Cutting Chaps
Images added to a gallery album owned by Shelly in Our Leatherwork Galleries
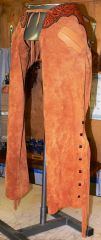
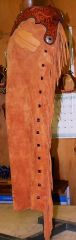
This is a pair of leggings I just finished for Matt Budge - he's one of NCHA's top Open Aged Event Riders. The tops are floral, dyed background, natural stitching, dyed edges. These are step-ins, with the zipper starting just below the conchos. Mincer Silversmith custom silver, engraved/antiqued. They feature Matt's initials, and his brand, as well as a few 'special' requests! -
-
From the album: Matt Budge Floral Cutting Chaps
-
From the album: Matt Budge Floral Cutting Chaps
-
From the album: Matt Budge Floral Cutting Chaps
-
From the album: Matt Budge Floral Cutting Chaps
-
From the album: Matt Budge Floral Cutting Chaps
-
From the album: Matt Budge Floral Cutting Chaps
-
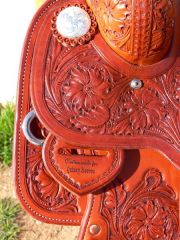
Wheat Border with Oak Corners.JPG
Shelly commented on Shelly's gallery image in Our Leatherwork Galleries
 Thanks for the compliment - I feel I'm a 'work in progress'!
 -
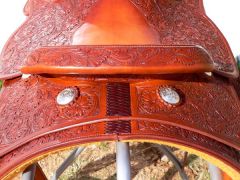
Some saddlemakers don't put a screw or a concho there - I think they possibly feel it allows more forward freedom for the fenders, but I'd defer to the others here that may have another explanation. I personally put a screw and washer there, to keep the seat nice and tight around the swell, and sometimes will put a silver concho there if the customer wants to pay for it, especially if they've decided to put lots of silver on the saddle, it makes a nice touch.
-
A good 'working set' of romal reins was usually 8 plait on the rein body, and 12 plait on the romal, a 'show set' - something to go horse show in, or a set that was just nicer than the basic - 12 plait on the rein body, and 16 plait on the romal...a collectable set usually never saw use on a horse - these would be 16 plait rein body, and sometimes up to 24 plait, and you would see some really fancy stuff done. If you've never seen any of the body of work done by the braiders that are members of the Traditional Cowboy Arts Assn - I highly recommend visiting their website at www.tcowboyarts.org...
-
you also mentioned something about 'braided chains' - I don't think I've ever seen chains that were braided - I've seen many different styles of romal chains, all were of metal, of various design and variety. The only thing you will see at the end of the longer romals will be braided bit connectors - as the chains are supposed to connect directly to the spade - the shorter romals then are connected directly to the chains, without the braided connectors that are used in the longer reins. Of course, I've seen everything under the sun when it comes to the trainers, etc, that want to use romals on their horses - much of it not very 'traditional'...but, these days, no one wants to take the number of years on a horse to make a true bridle horse in the ways that it was done even 25 years ago...the pressure of three year old futurities for reining horses is tough. Even the Cowhorse Futurity, in which they show 3 events in a snaffle bit - is a little misleading - many of these 'snaffle-bit' horses will be seen again in OKC in a bridle, and many are extremely competitive. I think the horses are so well bred, highly trainable, and pure athletes (the good ones - we have more 'well-bred pukes' as well) - it's really amazing what these colts can do in the Fall of their 3 yr old year. Now, with the addition of added aged events, where the horses can earn big money beyond their 6 yr old year, (we now have added money for the 7+ aged horses), it will be interesting to see if we can maintain longevity in their careers. I think it was Al Dunning that told me once that there was a time when, if a 'California Bridle Horse' was ever sold, this horse usually was sold with the saddle, bridle, reins, headstall, etc, etc - a 'complete set' if you will, as, by the time that horse was a bigtime winner as an aged bridle horse, he was always shown in a specific bridle, reins, saddle, etc - if you wanted him to continue to ride as he did, you bought him and everything that was on him! I'm sure that happened at times, but probably not all the time...
-
Hi, The romal also provides balance to the reins - as well as a dog whacker! My husband used to cowboy with some of the old-timers up North - many times in the evenings, they would add knots to the reins on a horse they were fine-tuning in the bridle - they would spend hours braiding knots on the reins to add the weight, then, they'd be out working, and he'd also see them cut one off, if the 'feel' wasn't quite to their liking...they'd fuss like this until they felt it was 'perfect' - Shelly
-
From the album: MJ Liggett Saddlery - Personal Items
-
From the album: MJ Liggett Saddlery - Personal Items
-
From the album: MJ Liggett Saddlery - Personal Items
-
From the album: MJ Liggett Saddlery - Personal Items
-
Best advice I can give any braider of rawhide, etc - trim the string on the end to a tapered point - make sure it has no fuzzy stuff on the edges - pull the string thru Feibings White Saddle Soap - BRAID...if it gets a little messed up, retrim and soap again - I usually don't have to retrim on buttons - sometimes on nose buttons on a bosal or heel knot. Benefits - don't have to buy so many of those darn needles, and don't have to go looking for them before you can braid something...this is not to say that I don't have any needles - I don't buy permalok needles - only the type that splits open, and has the two backwards pointing hooks, as these proved out long ago to be the better choice and hold a string much better - I have had the same set of needles for the past 20 years - so I rarely use them. That said, the string must still be tapered before inserting into any of these needles...just try tapering the string, as above, and braid without fussing with the needle. One other thing - use a good awl - in order to not use the needle, you will open the space you are sending the string thru with your awl - please use a braiding awl that has a long, tapered tip - not the type that looks like a spade on the end. You want to open a channel for the string, but not a chasm - should be not much bigger than the string. Side benefit of learning to use your awl before sending a tapered string thru, is that you have a chance to use this awl to help straighten up your foundation before and as you finish the knot with your interweave string - the foundation part of the knot ends up over/under one - the interweave string, whether the same string or a different color builds/splits pairs, whether you are making a herringbone style or gaucho style weave, etc, etc. After you have braided the knot - use your awl to carefully go thru the knot and make sure it is pulled evenly, take out any slack as you carefully tighten it. Then bury the ends, preferably under 3 strings, so the ends don't back out over time - pull the ends slightly as you trim off with your pointed exacto blade...the end will retract slightly as it drys and will be unseen after you finish the knot. Use a rub stick or whatever you like to use to finish the knot - especially on rawhide, before it drys completely, to set and smooth the braiding and take out any 'rough' look. When it's dry, add whatever finish you like on your work. If you practice this, you will have far less 'GRRRR' moments!
-
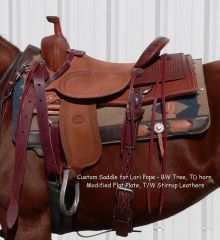
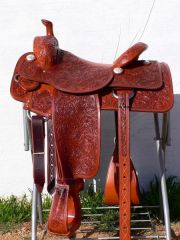
From the album: MJ Liggett Saddlery - Roping and Misc Saddles
-
From the album: MJ Liggett Saddlery - Roping and Misc Saddles
-

From the album: MJ Liggett Saddlery - Roping and Misc Saddles
-
From the album: MJ Liggett Saddlery - Roping and Misc Saddles
-
From the album: MJ Liggett Saddlery - Roping and Misc Saddles
-
From the album: MJ Liggett Saddlery - Roping and Misc Saddles
