DeuceTrinal
-
Content Count
22 -
Joined
-
Last visited
Everything posted by DeuceTrinal
-
I am still making the burnishers, I am using cocobolo now which is abeautiful dense oily wood which works very well for burnishing. Standardburnishers come with 4 coves (7/16",11/32", 1/4", 5/32"), I can varythe widths to whatever you require. I can also make the larger coveswith flat bottoms for stacked and sanded edges with flat areas. I canadd additional coves for $4 each. Check out my "About Me" page on leatherworker.net for more info and to see photos (http://leatherworker.net/forum/index.php?showuser=7360)
-
I can make a burnisher with a 1/2" shaft, and you can use a shaft coupler to attach it to the buffer. I've not had any feedback on attaching it this way, so I'm not sure how concentric (wobble-free) the tip is, but it's probably pretty good with a quality coupler, as I'm using machined drill rod for the shaft. I've also had guys get a drill chuck that threads onto the motor shaft, which then lets them just chuck up the burnisher. Check the speed on your motor before buying for this application, higher speeds (especially 3450 rpm motors) risk burning the leather, I've had most people report success with slower speeds.
-
Ahh, that's my problem then. Thanks!
-
When I send a PM, it doesn't end up in my "sent" box. I've sent dozens of PMs, but none are saved. Is this an option I need to enable somewhere? Or is it a bug of some sort? My inbox works fine, but it would be really nice to have all the messages I've sent too. Can anyone help? Scott
-
The stubby burnisher is sold pending payment! Current orders are in production now, you'll get a confirmation email when your burnisher(s) ship. Thanks to everyone for the interest, I'm glad I can provide a good tool for other craftsmen!
-
Paid orders to date are completed and shipped, if you have an outstanding order expect a confirmation email tonight with your tracking number. These orders were delayed a few days when I found some of the shafts I had prepared to use were not quite perfectly round and/or straight, which meant they didn't always chuck up true. To remedy this, I have switched to using 3/8" drill rod, which is machined perfectly straight and round, and is better steel. Unfortunately, it is slightly more costly and takes a longer process to prepare each shaft. I'm not making these with a profit margin built in, so I have to add the increased cost to the price of the burnishers. The new price is $40 shipped within the US. I feel the increased quality and precision more than makes up for the difference, as I am now getting repeatable runout measurements of 15 thousandths of an inch or less (usually less) at the base of the small point. All of the orders that shipped today have the new shafts in them, and they work very well.
-
It's just epoxied in. A good epoxy joint is stronger than the wood itself, and should work just fine for loose tool handles as well. If the pieces can come apart, rough up the joining surfaces to increase the mechanical bond.
-
Peter - that *just might* be the same one I made for you =D I'm glad it's working well for you! I appreciate the feedback on speeds, it's very useful to have that info. It's interesting how diameter affects speed of the burnisher, I could easily produce a burnisher that would work on a higher speed grinder by reducing the diameter of the tool. A 3/8" tool at 3450 rpm would have the same edge speed as a 3/4" tool at 1725. Using the smaller areas of my current burnisher might work on faster motors, or you could request smaller sizes and steps out near the end.
-
Johnny, got your payment, I should have it sent out to you by the end of the week. Marie, I'm not exactly sure which burnisher you're referring to, but I can probably make whatever it is. I'll send you a PM to discuss it further.
-
The shaft extends 4" into the burnisher - almost all the way to the shoulder of the small point.
-
I did finally get some burnishers made and tested, and they work great. I make them from Indian Rosewood, which is nice and dense and oily, like most rosewoods. I have a thread up in the marketplace where you can buy them: http://leatherworker.net/forum/index.php?showtopic=15051 I also have some rosewood hand burnisher/folder/creaser/rub sticks there as well that Peter K suggested. I love custom work, so if you have other ideas just let me know!
-
Oops! I had a small mishap today while turning, I dropped a burnisher while buffing and manged to break off the tip. I re-turned the tip, but instead of a long point for slots it now has a short tip for holes and slot edges. I tested it and it worked just fine on belt hole edges, it just won't do the inside of a slot or deep hole the way a long tip would. It also has a slightly shorter flat spot after the step from the re-turning, which shouldn't affect much at all. If it will still work for what you make, you can save some cash! $5 off, so $33 shipped for the stubby burnisher.
-
That's what I've heard, though I haven't tried high speed myself. You definitely risk burning the leather if it's spinning fast and/or you are pushing hard, but I imagine it will vary depending on the leather and what compound you are using to slick the edges as well. The diameter of the burnisher affects it as well, a larger burnisher will have a faster edge speed than a smaller burnisher for any given RPM.
-
Got your payment twosons, I'll get on it today! Thanks!
-
Sorry for not making it clear, my paypal address is indeed scottconners (at.) gmail.com. To order you can just send the amount directly, or you can email/PM me your email address and I'll send you an invoice. If you need my mailing address to send a Check/M.O., just PM or email me and I'll send it to you. Bearman - those are cool! I really like the curved ones, they are beautiful. Scott
-
Thanks James, I should have it made tomorrow and in the mail wednesday. For those who want to just order through paypal, I'll assume you want the standard 3/8" shaft for chucking into a drill chuck. If you need something different please contact me beforehand.
-
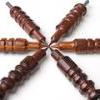
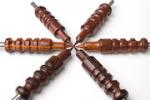
A couple of month ago one of my good leather worker friends sent me a link to a discussion on here about wooden rotary burnishers, asking if I could make one for him. I did, and also jumped into the discussion offering to make more for others once I figured out a good design and wood source etc. Well, that time has come! I've made a few of these now and they seem to work very well. I don't take credit for the design, it's mostly inspired by a burnisher made by forum member gtwister09. I'm not trying to make a business doing this, I've just had a number of people express that they'd like similar tools, and I happen to be a woodturner who can produce them for a reasonable price and I enjoy making useful things. Here's the deal: The burnishers are made from Indian rosewood, which is very dense (doesn't float) and oily, which means it polishes up to a high shine with no coatings to come off onto your leather. Some people also say the oils help the edge burnishing process as well. Typically I make them with a 3/8" steel shaft for chucking into drill presses or hand drills, though I can make other mounting options to match your tools. The shaft runs the complete length of the tool, making it very rigid. I can make custom cove widths for the projects you tend to make, or just give you a standard design with a useful range of cove widths (typically about 7/16", 3/8", 1/4" & 3/16"). The flat with one rounded side at the first step down works well for any larger materials like holsters with a flat center, and you can use it for pretty much any edge by doing each side. I've also started making the pin on the end slightly smaller so it can burnish belt buckle holes and slots easier. I've also included a picture of a new flat burnishing and folding tool I'm also making, it has nice soft rounded edges and a pointed tip for use as a folder/creaser and hand burnisher. They are hand turned by me on a lathe so are very straight and can be custom in whatever way you need. All are polished to a very smooth soft finish, letting you use whatever edge treatment compounds you prefer. I also seal the grain on the tip of the flat burnishers so they slide smoothly when folding or creasing. The rotary burnishers are $40 shipped inside the USA and the flat burnishers are $30 shipped. I can accept Paypal or Check/Money order/Wells Fargo transfer. I'd love to talk about other shapes of burnishers or other tool mounting options, just let me know. You can reach me on here via PM or by email at scottconners (at) gmail.com.
-
Ed, you might try chucking those mandrels into a drill press or hand drill in a vise and making them round with sandpaper(36-80 grit) or a rasp. You can use a rat tail file or a screwdriver shaft wrapped in sandpaper to make a groove. The more stable the drill the better. Turn at low-mid speed (500-800rpm). Use a sanding block and don't hold the paper still. I'd stick to the 1/2" size at first, until you see how well the dremel can handle the weight, and if your dremel is variable speed, use low. Hold the dremel inside a coffee can and wear eye protection the first time you turn it on with these in it in case they are out of balance and the shaft lets go.
-
Ahh, that makes a bit more sense, I can understand where that comes from, I hadn't realized he was an employee as well. I made a first draft of a burnisher today, I'll be having Schno give it a test drive to see how it works. I used some 1" rosewood, and somewhat copied gtwister09's burnisher, because he was on generation 3 of his design, which should make a good starting point. I made a few coves of varying widths, ranging from about 1/16" to just under 1/4." I have a vague feeling the long point might be just a bit thick at the base, but we'll have to test. It is just over 7/8" in diameter at the largest, and has a 3/8" shaft (machine bolt). It is sanded and buffed, and the only finish is a little bit of hard carnuba wax in the pores from the final stage of buffing. I think it'll work pretty well, I just want to test and look for refinements. I'll be able to make these pretty much any size/shape you want, and I can make different shafts or attachments if needed. Here's a pic:
-
Dunno what he's smoking, what's the point of turning if you can't use what you make? I'm a woodturner in Los Angeles CA, and a friend asked me to make one of these for him. It should be straightforward and quick and easy, if the cold I'm coming down with doesn't catch up with me then I may get one or two made today. If they work out I'll put a few more together. I'm using a hardened steel 3/16" lag (timberlok) as the drive shaft, so it can be chucked up in a jacobs chuck, but I can make them with almost any thread/shaft you need. If anyone has any design ideas (cove widths, shapes, depths, points, flats etc) let me know and I'll see what I can do. Here are some pics of what I intend to do, courtesy of gtwister09 The top one in the photo with 2 is a commercially available Weaver edge slicker. I intend to make one similar to the single pic. I have some blackwood on hand, I'll try that first, and pick up some cocobolo or something if I feel it's nessecary.
-
A handle is a very good idea, often a requirement in many shops. I was just covering the bases for anyone who might read this and not know. For a simple small round part like this, the file can be held tang-away on the bottom of the work, preventing a catch or grab throwing the file towards the user. It isn't the only way, but it is safer if you don't know how to approach a lathe with a tool not supported by a rest. For quick and dirty handles for less used tools, I've used copper or brass pipe or pipe couplers too.
-
I've had nice results using brass compression nuts from the hardware store. The compression end lets you get a really nice rolled front edge that has a overhung lip, which gives a really clean look. You can use normal HSS tools (I use scrapers and a 3/8 fingernail gouge) to knock the corners off. You can also use a file (I do final flattening with a file), but do this carefully as holding the file improperly can end with the tang jammed deep into your wrist (tang away, file on the bottom of the work). Then sandpaper grits until you're happy with the finish - you can go all the way to a fine polish if you want, I stay at a nice soft brushed look with 4X steel wool. You have to turn the tenon to an accurate length, I usually turn it so I can just thread the nut onto the wood, then secure with epoxy in final assembly.