yober
-
Posts
32 -
Joined
-
Last visited
Content Type
Profiles
Forums
Events
Blogs
Gallery
Store
Everything posted by yober
-
Thanks for the in-depth write-up. My process is a little different but the gist is you’re pre-punching holes and handstitching, if I read that correctly. I ended up using a “jerk needle,” switching to harness needles with a saddle stitch using the same length of thread, with excellent results. The issue is always not enough room to either run the harness needle, or stitching with my Artisan. It got done.
-
Ah, didn’t know it was called that. Learned something new.
-
What’s a jerk needle? Is that like a stitching awl (Awl for All)?
-
Agreed. I think I may try the stitching awl in my application “for research purposes.”
-
How do you propose pushing the needle through the backside without punching the inner side of the fold over? That welt is too think for a curved needle.
-
I’m not sure what this illustrates.
-
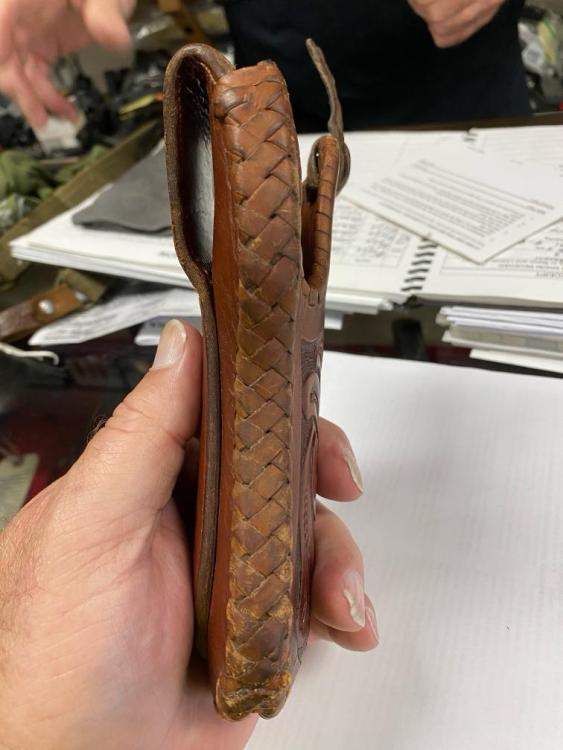
I think the holster pictured is a very early one and it was a custom-made one-off for a specific competitor, which would probably explain it’s relative state. Still, I’d be very interested in how the stitching and order of operations were done in this example as there are many other like applications. I am contemplating using an Awl for All.
-
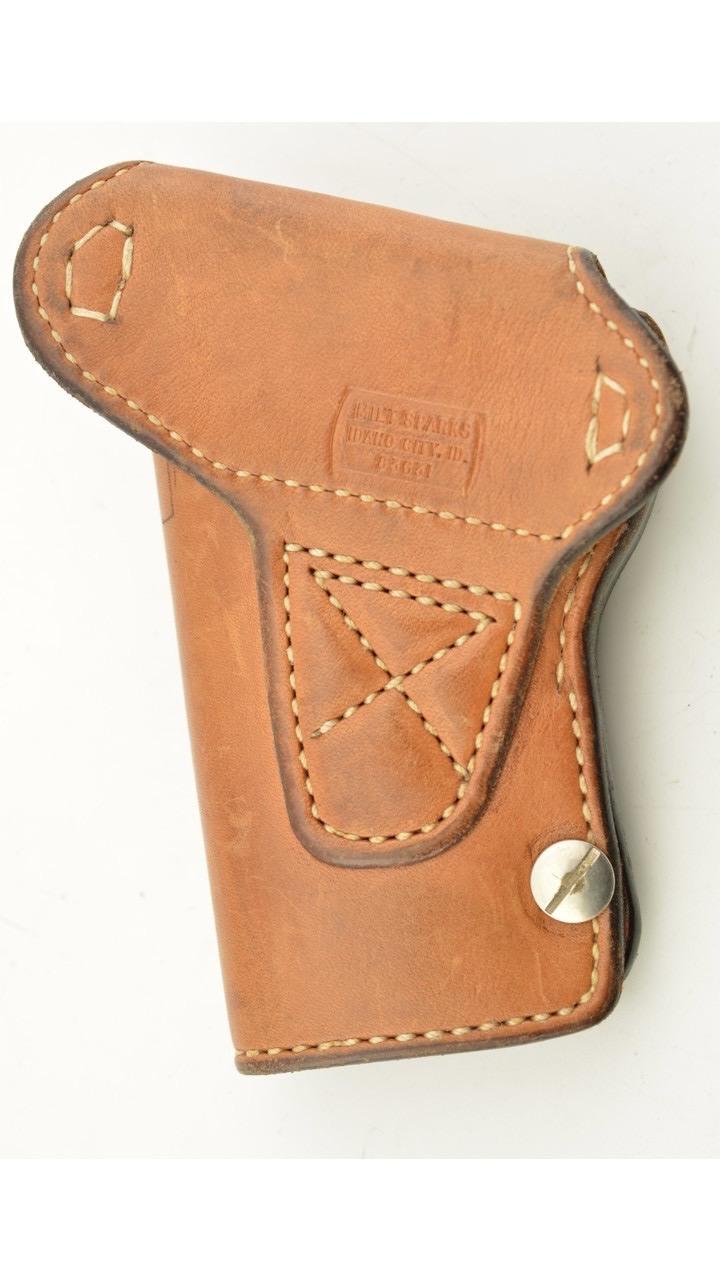
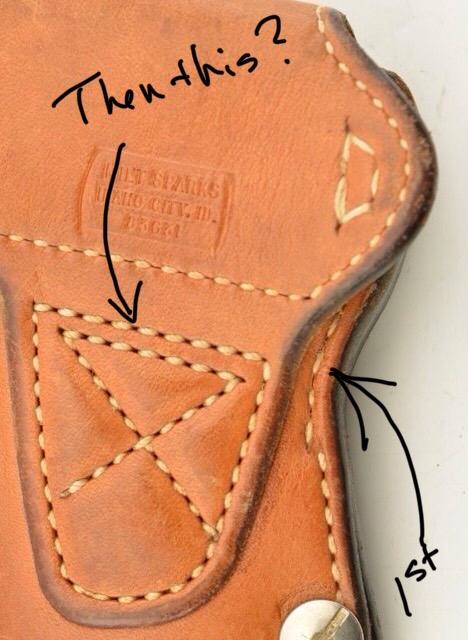
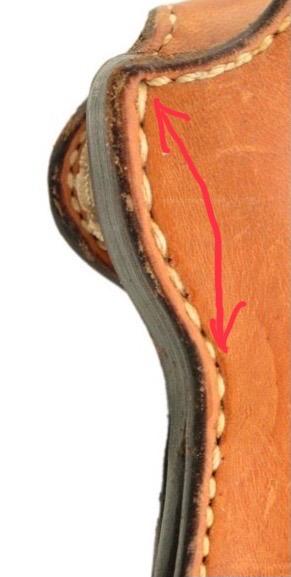
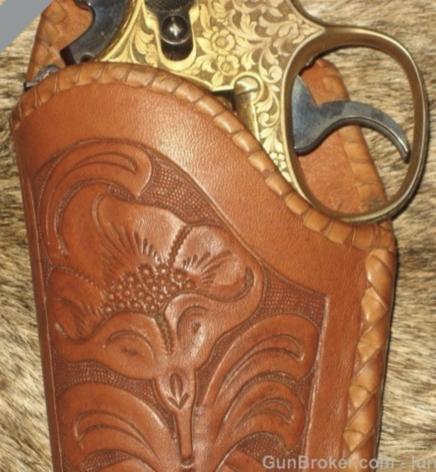
Um, no. If the loop is stitched first, the stitching machine is prevented from stitching the edge seam as the flap now covers the stitchline. If the edge seam is stitched first, the holster is now folded and the loop cannot be sewn through the single thickness. Milt Sparks holsters are some of the most exclusive and desired holsters in the world. An 18 month wait is not uncommon.
-
That is probably how I’ll do it for an upcoming sheath (similar design). I see so many of these with this folded-over design, I was wondering how anyone accomplished this in volume. Seems like you’d need a curved needle at minimum.
-


-
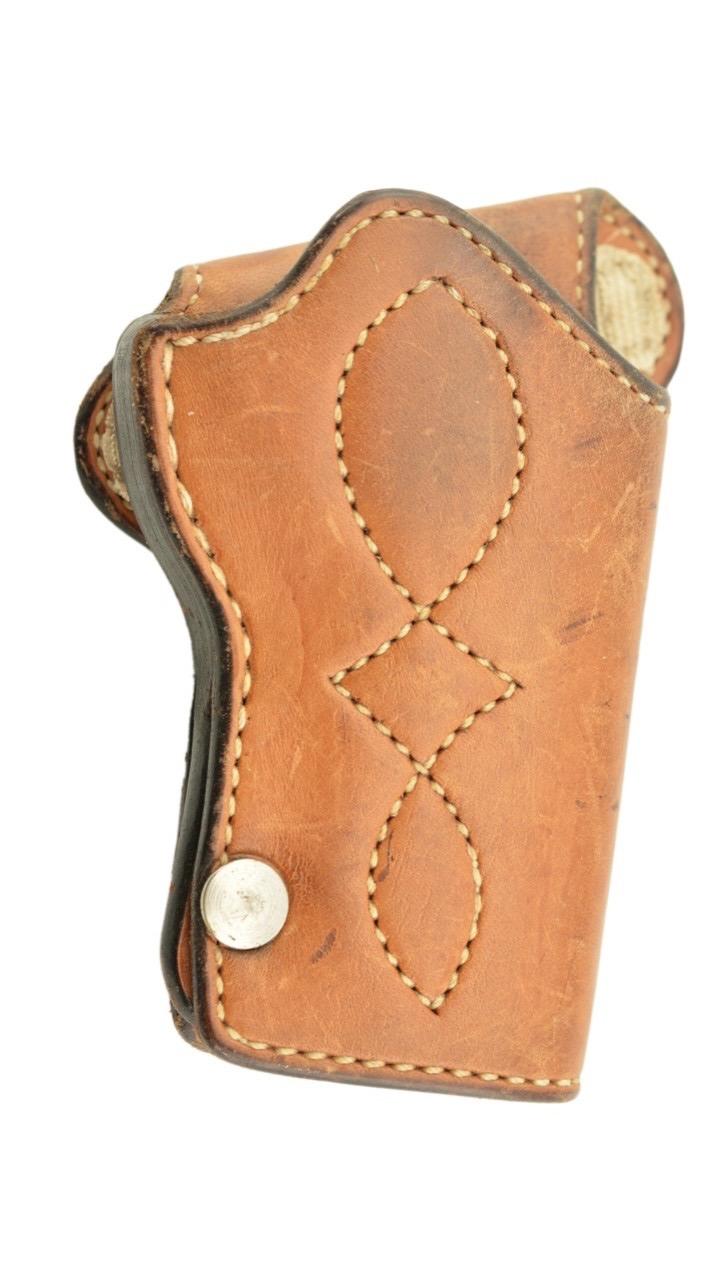
These pics happen to be from online sources; some of the “ears” on versions I’ve held in person are much wider than this, so I don’t think they get pulled back. One doesn’t take apart their $400+ milt sparks holster. :-) The different stitching is because on the upper portion of the edge is a full welt, whereas there’s a movable welt in the lower half so the stitching really only goes through the front (and back on the back half), leaving the movable portion of the welt to move in and out to adjust tension. The only solution I can think of is handstitching. I’m willing to be educated though.…. 8^)
-
Thanks. Yeah, that is some nice stitch work, but the awl coming from the top on a Randall still can’t clear the foldover and go underneath it. Unless somehow the welted edge is sewn first and then somehow the loop is folded over and sewn from inside the holster.
-
I’ve come across a couple examples of this technique, and I’m trying to get my mind around what exactly the order of operations was. Usually the loop is sewn first and then the edge containing the welt is sewn afterwards on a standard juki-type stitcher. However, in the included pictures it seems that the highlighted stitch line is soon before the loop is stitched in. How is this possible — handstitching? There’s obviously no room to get that stitch tucked underneath the overhanging loop. Apparently somebody has this licked. Something I missed? Would love to know the answer to this. Thanks.
-

Any idea where to find this vintage lace?
yober replied to yober's topic in Gun Holsters, Rifle Slings and Knife Sheathes
I’ll look into it, thanks. -
Any idea where to find this vintage lace?
yober replied to yober's topic in Gun Holsters, Rifle Slings and Knife Sheathes
Did that. I don’t see 1/2” in these options.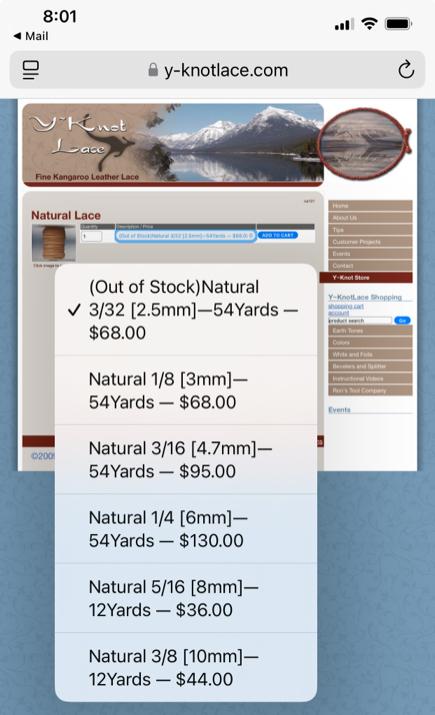
-
Any idea where to find this vintage lace?
yober replied to yober's topic in Gun Holsters, Rifle Slings and Knife Sheathes
If there was 1/2” lace, I couldn’t find it. Have a link? -
Any idea where to find this vintage lace?
yober replied to yober's topic in Gun Holsters, Rifle Slings and Knife Sheathes
It looks at least that wide, maybe more. Looked at Y-not. They only have one size and it’s skinny. -
I’ve been asked to reproduce this vintage A.L. Clay holster and I’d like to reproduce this lacing in the pics as closely as possible. I’m at a loss to identify the type — it doesn’t feel like rawhide as it’s softer. I can’t seem to find anybody that makes this width, the maximum being 1/4” kangaroo so far from the usual suppliers. Anybody have any thoughts? Do I have to resort to making my own lace, or is there some source I’m not finding? Thanks in advance.
-
Burnishing with black (or brown) tokonole vs. clear
yober replied to yober's topic in How Do I Do That?
I don’t really look to it for fleshy sides, but I’ll keep it around for that should I need it. I was hoping to combine burnishing and dying, but looks like dye and then clear tokonole it is. Thanks for your help. Egads, that’s just nasty.… -
Burnishing with black (or brown) tokonole vs. clear
yober replied to yober's topic in How Do I Do That?
Looks like I tossed my test piece, but the issue was if I burnished with the wooden burnisher while the tokonole was still moist, it spread black to parts off the edge and made it look like a sloppy application (which I guess it was). I wanted the smoothing and gloss, but it really acts like edge paint at this stage. Letting it dry doesn’t give me the advantage of rounding and smoothing. -
I have used clear Tokonole for a long time as a substitute for gum trag or saddle soap, applying in much the same manner with my finger and using a wooden burnisher while the Tokonole is still wet but absorbed into the edged/sanded leather edge. I get an awesome rounded glossy edge. I was thinking that the black and brown versions would apply in match the same way, but burnishing after it’s absorbed into the edge, yields a mess. Is this more of an inch paint, where I have to wait until it dries before burnishing with the stick, or is there a whole separate process for this? I have use it and cooked before but on holsters it doesn’t last. Searching the forum, doesn’t give any specific answers on colored Tokonole, only that it’s applied and then burnished, with no indication of how long to wait or what state the leather is in. Thanks in advance.
-
Since it’s water soluble, are you applying the gel after you wet-mold, or have you wet-molded after working it in and giving it a Resolene too coat? I tool leather holsters and would like to antique before I wet mold but so far haven’t had the best luck. I hate applying after molding. Thanks.
-
Thanks, I checked their website. Guess I might have to call ‘em.
-
Long posts I have already. I’ll post piccies as soon as I get back from my trip today.
-
If you look inside most line 24 studs or the studs supplied with Pull the Dot assemblies, the inside shelf where the hole is is approximately halfway up the total height. On low shelf varieties (something I learned about on this forum), this shelf is flush with the bottom and thus an easier reach for eyelets to get through and be expanded. Two thicknesses of leather with a steel reinforcement tab are too thick to let even an extra-length post rise through the shelf and leave anything to be expanded when the die strikes it (it just pulls even, not through and thus not securely). I have the longest posts available and can’t get them past, and I’ve relieved a hole on the inside where the stud goes (so it’s really more like one thickness and the steel thumb break tab). I was hoping somebody had found an outlet that simply sends them USPS, not UPS Ground like DOT does.