.jpg.2e6365e784dd7e789906ec8a3615d7df.jpg)
AndrewWR
-
Posts
83 -
Joined
-
Last visited
Content Type
Profiles
Forums
Events
Blogs
Gallery
Store
Everything posted by AndrewWR
-
.thumb.jpg.4ed1dbae8dada980d06392d599329b6e.jpg)
Clever but easy
AndrewWR replied to AndrewWR's topic in Purses, Wallets, Belts and Miscellaneous Pocket Items
That's a lovely combo. I haven't tried any contrast stitching yet because I'm so new to leatherwork (2 bags and 2 pencil cases is it so far) and my stitching is not (IMHO) consistent enough for contrast. I'll get there one day. "Easy" is a subjective term. it's a single piece of flat leather (2 pieces if we count the lining), a zipper and one line of edge stitching so not exactly complex. I will concede that positioning a zipper on a curve is fiddly, but patience and pins worked for me. -
Clever but easy
AndrewWR replied to AndrewWR's topic in Purses, Wallets, Belts and Miscellaneous Pocket Items
I said it was easy. Thanks for proving me right, V. Machine stitching probably speeds the manufacture up enough to make them worthwhile offering commercially. Anyone who makes college bags (satchels, briefcases, book bags, etc.) could offer a matching pencil case as an optional extra. From the reactions mine get (& V can probably confirm this) it's an instant hit with anyone who handles it. The shape makes people want to fidget with it. Andrew WR -
Clever but easy
AndrewWR replied to AndrewWR's topic in Purses, Wallets, Belts and Miscellaneous Pocket Items
It's easier than you think. When the zipper is closed, its pretty much at right angles to the curve and zippers flex like that quite naturally. (N.B. This was the first zipper I ever sewed and I made it up as I went along but it worked fine. There may be a 'proper' way, or a 'better' way but this is 'my' way.) My approach to it was: 1) Cut out the leather using my template 2) Apply contact adhesive to the back of the leather, leaving a half inch, adhesive-free border all around the edge. 3) Press the leather onto some pig skin (or lining of your choice), stick a heavy book on it and leave glue to dry. 4) Cut around the leather to trim the lining. 5) Any edge treatment. 6) Score a line around the edge of the leather 4mm in from finished edge. 7) Punch stitching holes right through leather and lining with a 4mm punch. 8) Fit the fabric tail of the fully opened zipper between the leather and the lining so that the metal crimp where the two sides of the zipper meet is centered in one of the 10mm circles on the template. 9) Start saddle stitching from the hole nearest the middle of that tight curve. A few stitches will get you level with that metal crimp. 10) Use spare needles to pin the zipper in place a few holes ahead of where you're stitching. I lined up my zipper and pinned it 3 holes ahead of the last stitch, did two more stitches then check the alignment and re-pinned 3 holes ahead, and so on... 11) Be careful not to pucker the zipper fabric between stitches. Puckering behind the stitches, between the leather and the lining, is fine and won't show. 12) Make sure there is enough clearance between the zipper teeth and the leather, for the zipper pull to move without scraping your finished edge. I aimed to get my Zipper to be 10mm wide when closed: The same as the diameter of those little circles. 13) When you've finished sewing one side, start from the same stitching hole and sew the other side. 14) Finish your stitching as normal but be careful not to hammer your zipper and damage it. -
Whatever bonds the layers of carbon is epoxy resin. The issues with bonding it onto leather only start with the epoxy. Wax and oils in leather make it the exact opposite of the "clean, dry, grease-free surface" adhesives generally require. I'm experimenting with a variety of solvents (including Toluene, Acetone, Isopropyl Alcohol and Methyl-ethyl-ketone) to deglaze the back of bridle leather enough to get good adhesion without detriment to the hide. I don't want it delaminating around stress points such as strap attachments. There is also the issue that I will have to use a cold curing epoxy and wet-lay the carbon sheet because the leather won't withstand an autoclave. There is no feasible way to vacuum bag the carbon: One of the most common techniques for applying pressure to the material during the curing process. I'm currently considering holding the leather bag within a rigid box while applying pressure to the composite by inflating bladder made of vacuum bagging material inside my project. A decent surface finish for the composite can probably only be achieved by masking up all the leather and applying gelcoat with a spray gun. Edge finishing is an issue. Always a consideration with leather but I'll also have to deal with the cut edges of carbon fabric. Currently, I'm expecting to pre-punch the leather for stitching a rolled over edge, then pass a 1.5mm drill through each stitching hole after applying and curing the carbon in order to stitch right through the hard shell. Finally, there is the issue of sealing any seams prior to applying epoxy, which has lower viscosity than water, to avoid leakage through to the outside of the bag which would ruin the surface finish of the leather outer. Bridle butts aren't cheap but the carbon fabric is even more expensive so I have to be very sure I've worked out all the technical issues first. Proper Prior Planning Prevents Piss-Poor Performance.
-
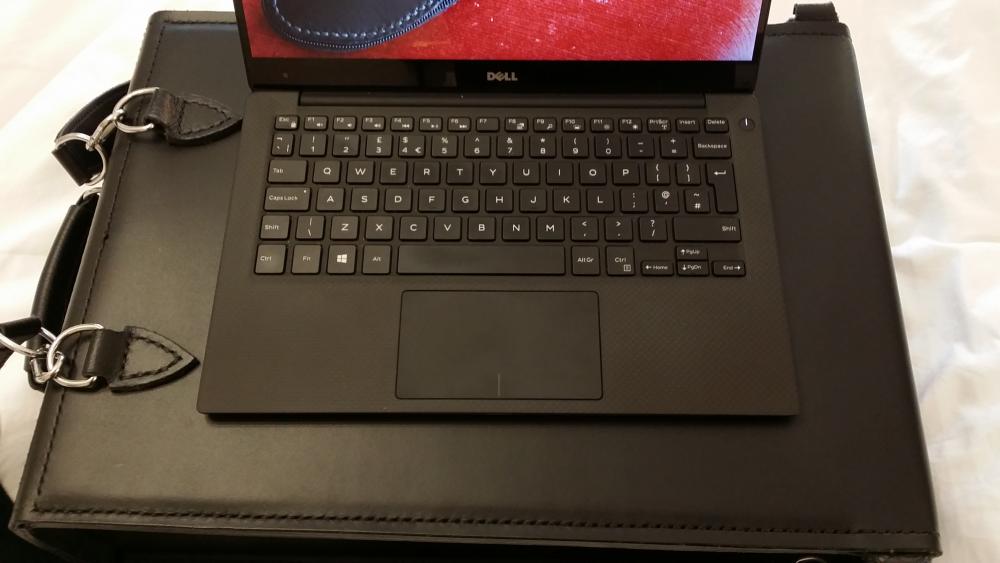
I'm curious: Why $1000? I actually live within walking distance of Llanfair P.G. (we only use the full name to promote tourism). Sorry the photos were dark. They were taken with a phone and I only include them to illustrate the point of quoting Daniel Burnham. Also, that wasn't just my first attempt at a bag. It was my first attempt at anything in leather. The features that make the bag special (What I couldn't get in a shop) are two separate, NFC shielded laptop compartments and an integrated rigid carbon composite back board that the D rings are actually attached to, which takes all the stress under load. That rigidity also allows it to serve as a lap desk. I find that my actual lap is too low for comfortable use of a laptop. A table is usually about 5" above my lap. This bag raises the computer 5", provides solid surface to work on, allows better ventilation to the computer and doesn't slowly cook my thighs. You should be able to see where the carbon sheet extends to within a few millimetres of the stitching (its a 2mm thick A3 panel).
-
My name is Andrew W-R and I'm new to working with leather. That said, I've often quoted architect, Daniel Burnham: "Make no little plans". With those wise words in mind, I came to leatherworking because I wanted a bag that just wasn't available. So I made it myself. I made mistakes along the way but I got there in the end. (These pictures are of a work in progress: I hadn't considered my edge finishing options.) I joined your on-line community because I wanted to share a pencil case design I was quite pleased with. The feedback on it has been positive and I'm looking forward to seeing what other leatherworkers make of the design. My new project involves finding a way to directly bond carbon fibre to leather. I'm planning to make a traditional looking leather suitcase with a composite shell inside. I'll let you know how it works out. Andrew W-R
.thumb.jpg.b1124eaea2d43224aabd98eeea71c814.jpg)
.thumb.jpg.8864ae6f1ecbe778181265a8a90f3032.jpg)
-
Clever but easy
AndrewWR replied to AndrewWR's topic in Purses, Wallets, Belts and Miscellaneous Pocket Items
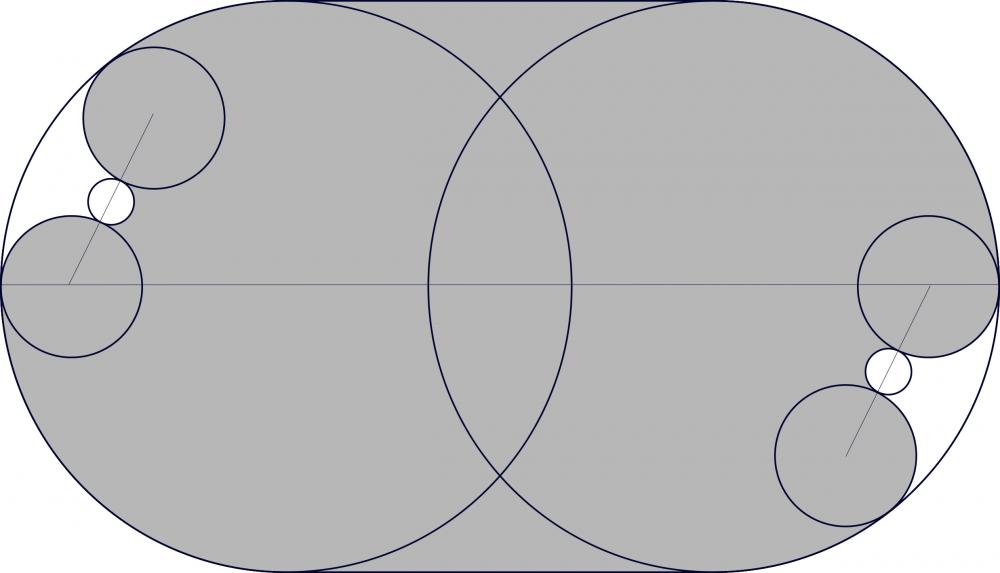
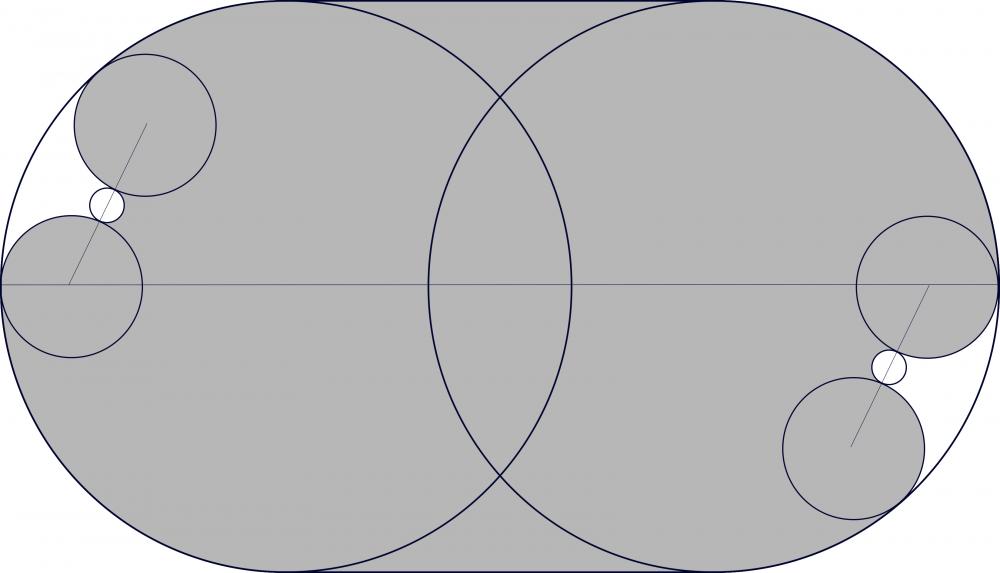
OK. To avoid further confusion... The grey area is the template. The rest is just the construction lines for the shape. I left them in for the benefit of anyone who wanted to scale up the template beyond home printer size. If anyone's still confused, I'll write step by step instructions. -
This is based on the Twist pencil case by Japanese company Foca. It's an entirely flat, single piece of leather that nevertheless forms a solid enclosed space. the leather this one is made of is 2.8mm thick (from a split butt) and lined with pig skin but you could go a little thicker and stamp or carve it to your heart's content. Opened, it tends to stay curled and acts as a pen tray on whatever coffee shop table I'm hot-desking at. Closed, it has such a tactile form that people don't want to put it down. The two versions of the template are for small and large cases. Small (pictured) is 210mm x 120mm & uses a 12" YKK bag zipper (or equivalent). The stitches are 4mm pitch and 4mm from the edge. Large is 280mm x 160mm and uses & uses a 16" zipper. It's a simple thing to make and gets a great reaction from people.
.jpg.40e339306c23e7d1bd9b7620eddef6bf.jpg)
.jpg.3b0fb45a1649c68b8cf9fc6ed9168dfd.jpg)
.jpg.09ee521e6ecc18b5962b9ba9e6967d0c.jpg)

.jpg.5b0285eb7b0397dd24ea97edaeba7192.jpg)
.jpg.fd1edbc3ef0ad22b35197f5f208bf3d8.jpg)