-
Posts
83 -
Joined
-
Last visited
Content Type
Profiles
Forums
Events
Blogs
Gallery
Everything posted by AndrewWR
-
.thumb.jpg.4ed1dbae8dada980d06392d599329b6e.jpg)
Cowboy Holster
AndrewWR replied to YPenguins37's topic in Gun Holsters, Rifle Slings and Knife Sheathes
Penny'd be 90 now, not 70. Sadly, Gloria Winters passed away in 2010. -
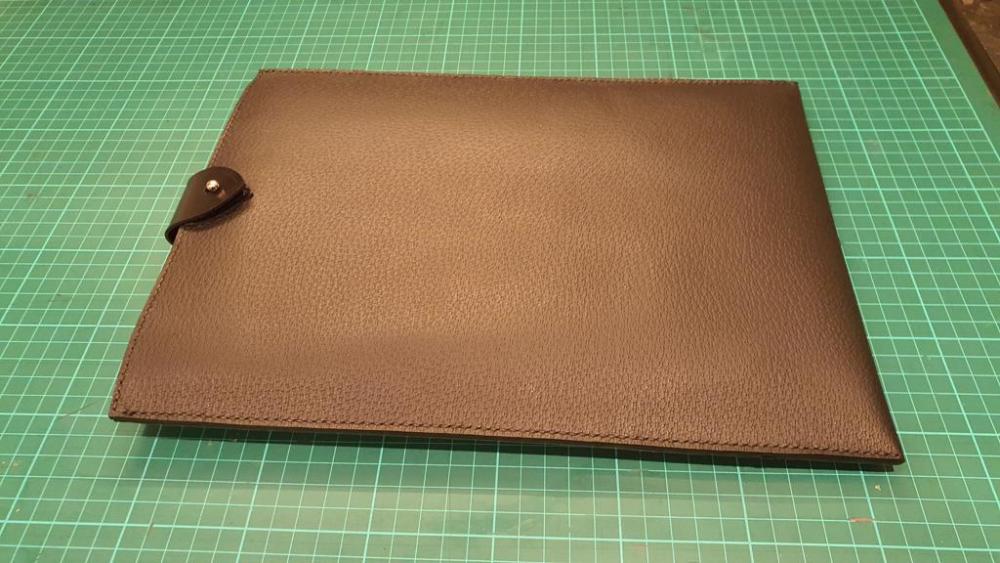
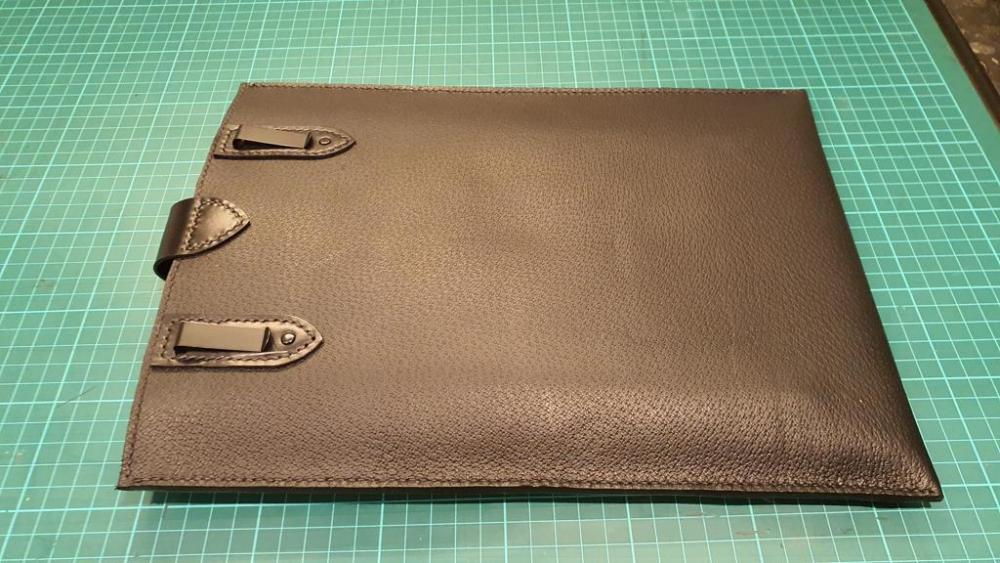
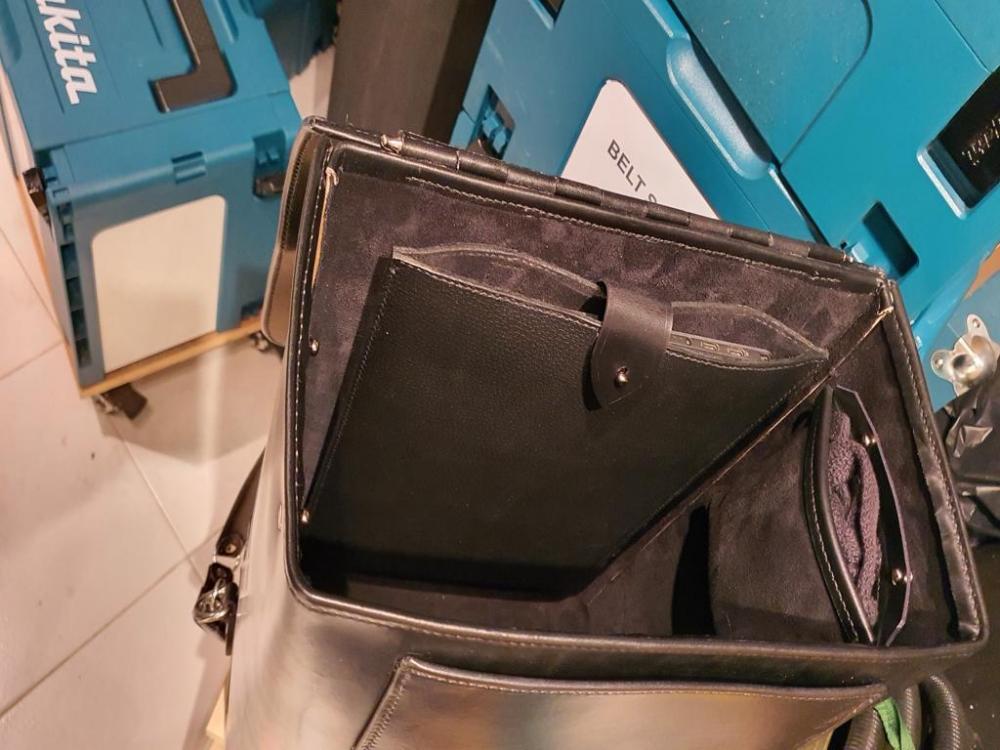
The lighting and camera are doing it a lot of favours but the entire butt was delivered inconsistently dyed and with way more wrinkles than was acceptable. If I'd been charging myself for the time I spent getting enough of it looking good enough for this project, I'd have doubled the cost of the hide. As it was, the supplier agreed when I complained (with pictures) and replaced it with a decent quality one. Take it as an indicator of just how bad it was, that the supplier didn't want the crap one back. In bright daylight, the leather still doesn't look so good, even after hours of TLC. Fortunately, I live in North Wales where bright daylight is something old men tell tall tales about seeing once, when they were lads. Meanwhile... Back at the bench... I've been adding on bits. A pigskin laptop sleave and a little removable pocket for a spare shopping bag because there are some groceries I just won't trust in a suede lined bag.
-
One way I can think of to get a good fit is to make the bottom half a bit longer than you need, Cut off the extra and use it as a spacer on the form, molding the top half over it. There are probably other ways, even a 'correct' way, but trial and error works for me. I think the whole full lid thing, instead of a flap and snap, is about air flow. Cigars need to be kept so they won't dry out, which is why humidors are a thing. While a leather case is never going to be air tight, its really about reducing the chances of air flow.
-
The brass top reinforcement is my favourite detail. It always looks a bit odd when people try to hide the metal bar but making it a feature instead is so much more elegant. Stay Safe.
-
You could try Hillside Composites in California. They can supply it as small as 6 inches square up to 4x8 feet. The really thin stuff (0.5mm) makes a nice inlay for a sheath (like the ray skin inlays) for a knife with carbon handle, which is becoming more popular. Etsy also has small volume suppliers and some very exotic carbon 'blend' handle materials for knife makers.
-
.thumb.jpg.4ed1dbae8dada980d06392d599329b6e.jpg)
New Holster for my Ruger SR-22
AndrewWR replied to Bert03241's topic in Gun Holsters, Rifle Slings and Knife Sheathes
Seems a shame to hide it. That's pretty leatherwork. :-) -
.thumb.jpg.4ed1dbae8dada980d06392d599329b6e.jpg)
New Holster for my Ruger SR-22
AndrewWR replied to Bert03241's topic in Gun Holsters, Rifle Slings and Knife Sheathes
Ok, as a Brit I don't really understand gun culture but I'm gonna guess that's not classed as concealed carry. More like 'If you've got it, flaunt it.' Stay safe. -
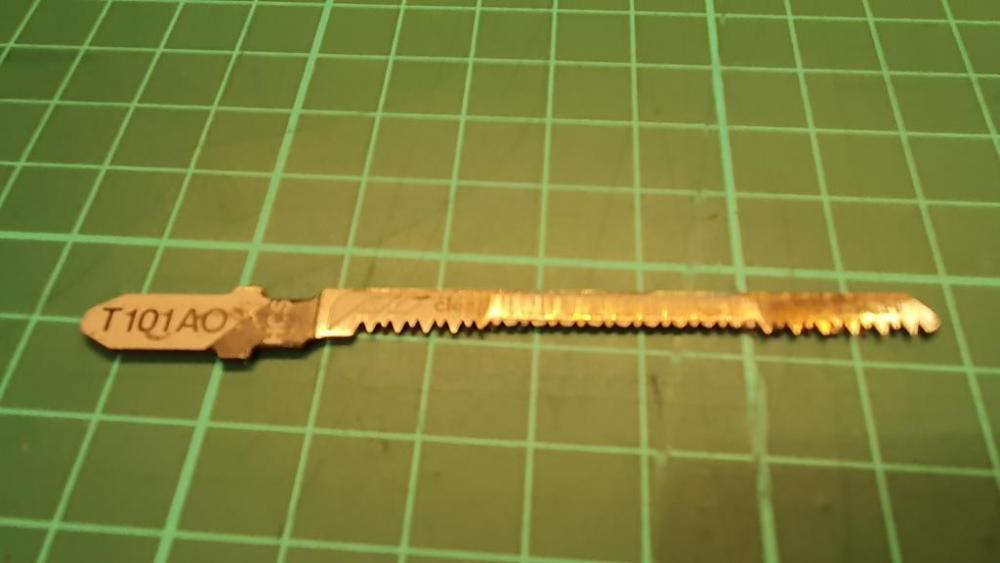
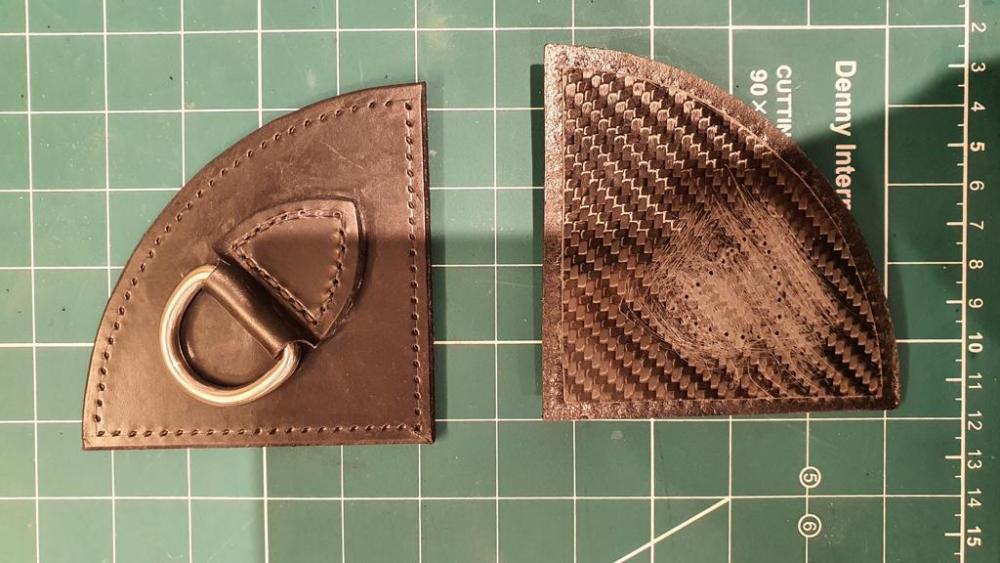
at 1.2mm thick, it cuts pretty easily with a jigsaw. I normally use grit blades for thicker stuff but I was all out of them so I actually used a thin wood cutting blade. In total I had to cut four feet of edges and you can see what that did to the teeth. Sewing through it is the time consuming bit. I punch the top leather before laminating it to the carbon then dremel through the punched holes with a 1mm drill bit to preserve the diamond profile of the punching and get that nice saddle stitched look. Then, from the back I dremel through only the carbon with a 1.5mm drill so my needle will get through. Finally debur with a blunt 2mm drill so as not to cut my thread. Then sew, then laminate on the suede lining. An alternative is to skip the deburring, line the inside then pass a 'sharp needle through each stich hole to pierce the lining, then sew through. The lining protects the thread from any sharp edges pretty well. Either way, I've had no issues with cut threads. The contact glue for the lining gets into the thread and the holes in the carbon and pretty effectively prevents any movement. No movement equals no chafing. For this project, one line of the hinge stitching (the outer line) is through the carbon but the inner line is through the rolled edge. The d rings are all attached through carbon. The quadrants on the bottom corners look like this. The intent (and effect) is to create rigid corners for the bottom/back of the bag. If it all sounds fiddly, it is. But I have been using a hold all with a carbon base board for five years and there is no hint of any wear and tear issues. It's as flat and rigid as the day I made it. Given what good bridle leather costs and what a hand-made bridle leather bag retails for, the carbon isn't a huge extra and it is light, thin and super rigid. Also, if you talk to your carbon supplier about what you're going to do with it, they may have damaged pieces at reduced prices, since they usually can't sell scratched or scuffed or, slightly off dimension pieces, but for an invisible stiffener, none of that's an issue. Stay Safe. Andrew W-R
-
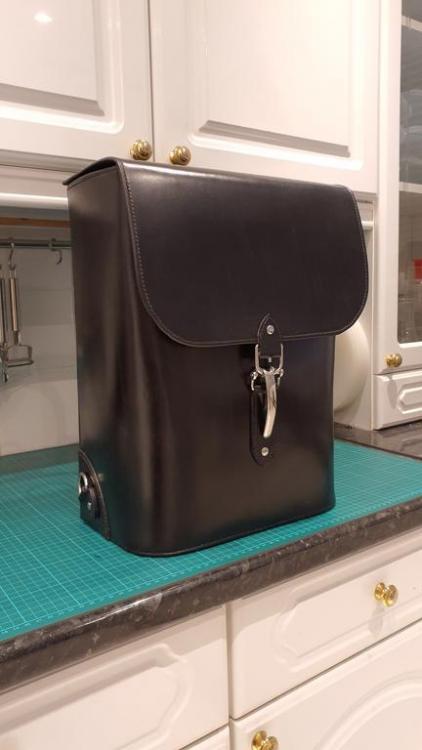
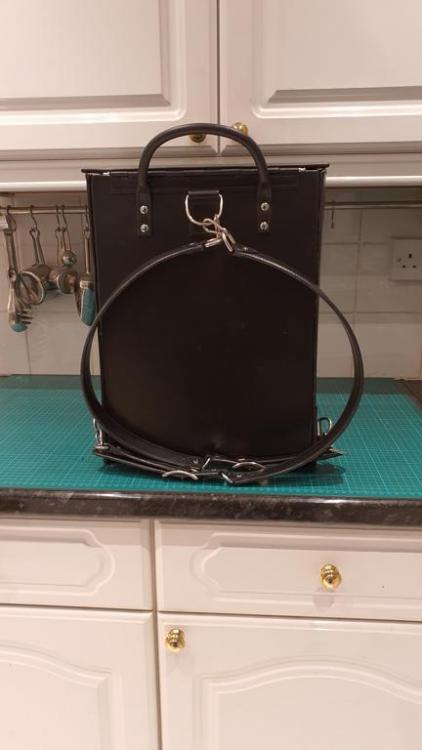
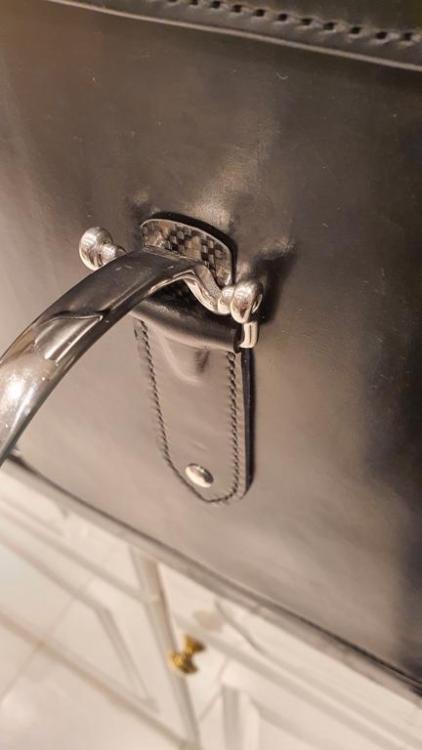
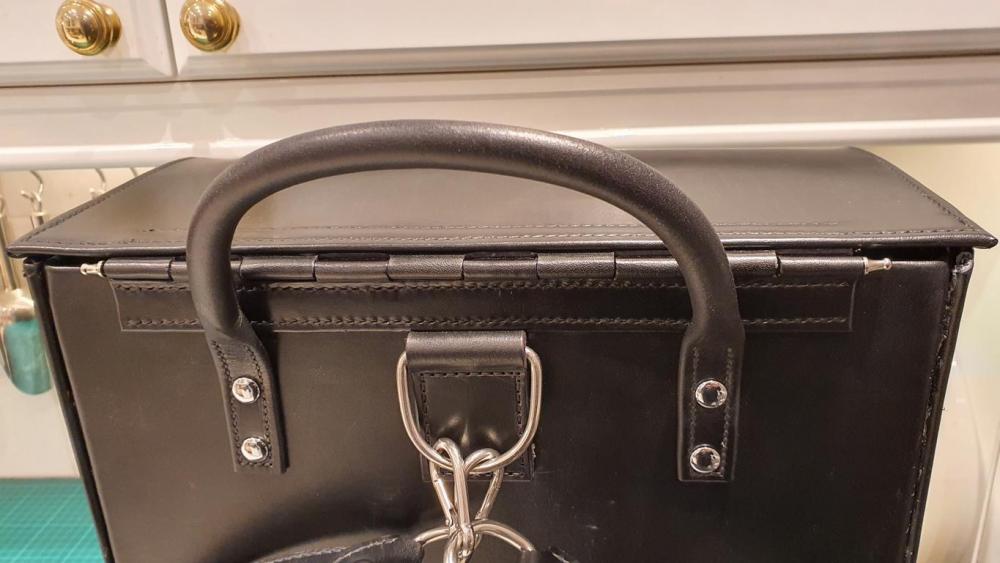
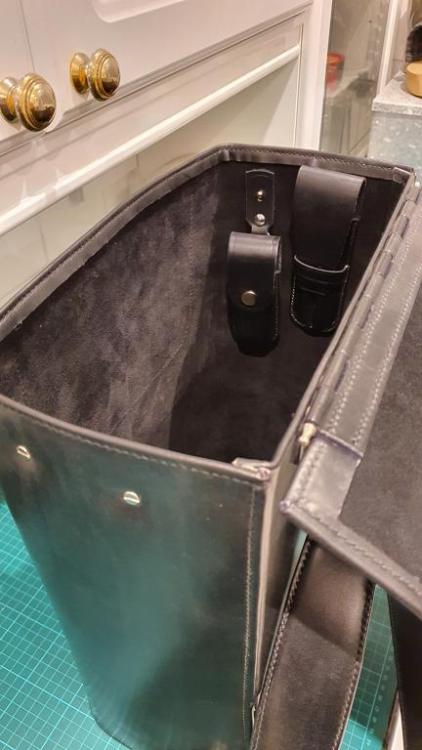
Well, guys, what a long strange trip its been. Three years ago a friend brought a couple of horse collar fasteners back from San Francisco, which never found a home. Two years ago I got a hide with 'unusable' surface defects. Last year China supplied a carbon fibre sheet that was all scratched up. This year I thought, hey! Maybe if I put this junk all together... The carbon sheet was 1.2mm thick. I laminated it between this 2mm leather and 1.5mm calf suede as a lining. The front and sides are soft but the back is carbon reinforced and so is the base and those little quadrants the D-rings ate mounted on. It makes for a rigid structure for the harness to anchor to. The reason those horse collar fasteners never found a home is that they're not very secure as bag closures. I've seen Marchellino in New Your use them for years but he generally has a tie-down to secure them. Tip the bag and gravity will open those little suckers. Ok, so I could do that - Tie the hasp down - But how fiddly is that? Might as well just have a buckle and strap. But wait! I've got offcuts of Carbon fibre! It's really springy. What if... Look Ma! it ain't gone floppy like before! Better than them little blue pills! A one inch (its actually 25mm) strip of carbon in the 'pocket' made by the leatherwork gives just enough springiness to act as a retainer. These fasteners have a cam on the back. The 'spring' act as an over-centre detente, holding it open like the picture but also holding it closed so tipping the bag face down won't cause the latch to spontaneously open. And no extra fastening to do (like with a tie-down.) It has the bonus value of stopping the cams on the casting from wearing dents in the hide. The 'pull' on that 'trigger' is under two pounds. Not one with carbon yet: The really observant among you gentlefolk will have potted the hinge on the flap. I posted back in 2020 about my idea to make bridle leather butt hinges. After two years using a couple of them daily without any adverse wear and tear, this bag has a ten inch butt hinge with a 2mm carbon rod as a pin, capped decoratively with the smallest Sam Browns I could find in my buckle box. Caveat: These hinges have their limitations but the flap/lid is not under any kind of load and the hinge is kept straight by that carbon back plate. The benefit is that the flap lays really flat on top of the bag body and stays the heck out of the way when opened. There's a closer look at the hinge. The grab handle has sat in my scrap box since I built the Gladstone hold-all back in 2020. I changed my mind about how to attach the handles to that bag so this was never used. More write-off material. There are a couple more sam browns on either side panel because I have them in my briefcase and I wanted all my add-ons to be interchangeable. In there you can see my Leatherman case and pen case but I have a spectacles case, a bushcraft knife sheath and a blood sugar testing kit that all attach the same way. On my to do list is a small pouch for a charger and a detachable back board pocket for a laptop. There's also plenty of room on the sides for external pockets just as soon as I have some appropriate scrap. All in all, as a 'for me' bag, I'm very happy with getting all this bag for not a single penny spent Even all the hardware was surplus from old projects. Overall dimensions (in metric) are 30cm internal width by 40cm internal height by17cm depth at the bottom tapering to 15 cm at the top, giving it a volume of about 18 litres. Stay safe, all of you.
-
.thumb.jpg.4ed1dbae8dada980d06392d599329b6e.jpg)
What do I need to start? New and looking to make some bags and wallets.
AndrewWR replied to Gui's topic in Getting Started
Recommended viewing on the subject: https://www.ianatkinson.net/leather/videos.htm He has excellent how-to videos including a couple that talk you through the basic tools. https://www.youtube.com/c/HahnsAtelier/videos Also excellent, but with less explaining and more emphasis on just watching him work. Check out his guide to 10 essential tools. https://www.youtube.com/c/NigelArmitage/videos Lots of tool reviews plus excellent tutorials on stitching technique. Spend a few hours learning how various craftsmen do it then think about what tools you want (need). Its also as well to remember that a lot of the specialist tools of leatherwork are designed to speed up operations that can be accomplished more laboriously, but satisfactorily, with tools most people already have and can repurpose. For example, I haven't bought a cobbler's hammer because I already had a panel beating hammer which has worked out just fine so far. My first skiving knife was a well honed 1" butt chisel. My scratch awl was a metalworking scribe. For cutting I still favour a Stanley knife. I have 2 Stanley knives: a standard blade and a hooked blade which is great for curves (I use it wherever a pro would reach for a clicker knife). I've had a lifetime of practice being accurate with a Stanley knife and it's generally not a bad idea to stick with tools you're comfortable with. Wheel knives, sold for cutting fabric, are excellent too, and cheaper than a decent quality head knife. Unless you're already skilled at sharpening and honing blades, my advice is to stick to disposable sharps until you know you're going to stick with this hobby, then think about investing in 'proper' tools. Good luck with your new hobby. -
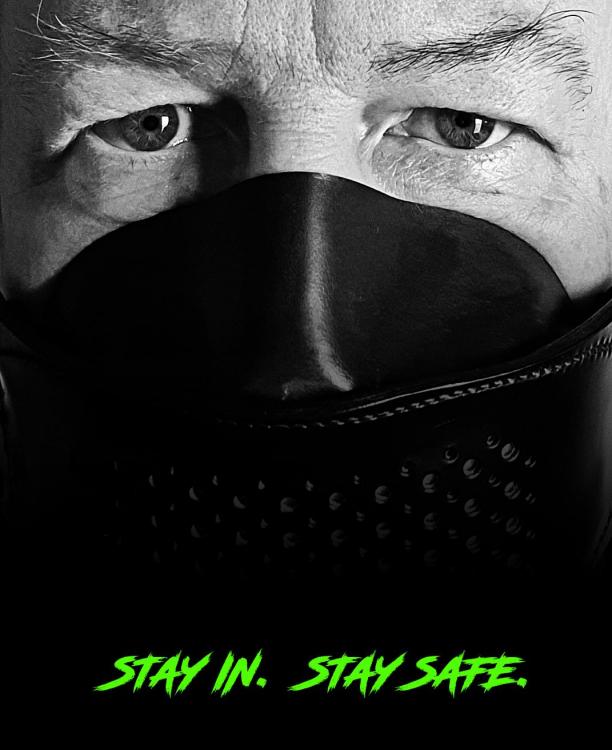
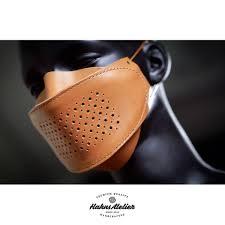
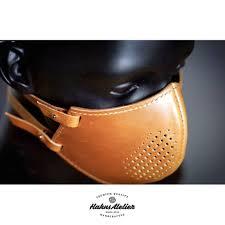
Not just for halloween. This serial killer mask with interchangeable filters is great for enforcing social distancing. Nobody wants to be within 2 metres of this. A shout out to Hahn's Atelier for the free pattern. https://www.youtube.com/watch?v=WNrrAuy8QOc
-
Yes, Maxdaddy, four rubber feet of the type used on flight cases. 25mm x 10mm, secured with brass Chicago screws (again). Having a carbon fibre base means it won't sag in the middle either. I tested it with my railway track anvil (about 22lb) and the base didn't visibly flex.
- 9 replies
-
- gladstone
- bridle leather
-
(and 1 more)
Tagged with:
-
Hello again from North Wales. We're in lock-down again and nobody can travel so I decided to make a travel bag. Obvious really. And it's not just any travel bag. Because I'm half salmon on my mother's side, I have to find a way to swim upstream so I decided to make a bag I couldn't buy hardware for: A Gladstone bag. Yes, yes, I know you can buy Gladstone frames commercially but they looked flimsy and cheap with that 'antique brass' finish that looks nothing at all like antique brass. I made the frame first, sourcing some 1/16th" x 1" brass angle and some 1/8" x 1/2" brass strip. The hinges were ready made 'desk hinges' from a restoration company and measured 1/2" x 3" when opened. They're also 1/8" thick (or 1/4" when closed.) The hinges and frame are rivetted with traditional cold rivets that you hammer the heck out of. Hard work but strong in the ridiculously over-engineered way I happen to like. The catches for the bag are modified 1" roller buckles: The rollers were removed, along with the sides of the buckles the tongues were attached to. The shafts the rollers were around were then wrapped in pig skin to make them a tight fit under the brass straps, giving them enough friction to only move when pushed./ The straps are fitted with Chicago screws with the screw component replaced wit M3 brass countersunk screws that fit flush on the under side pf the frame. The bag itself is English Bridle Hide. 2mm for the main panel and 1.5mm for the end panels because of the need to fold. The compartment is stiffened with 1.5mm carbon fibre plates on 5 sides (including the bottom) and lined with 1mm calf suede. The edges of the main panel (originally 52cm x 110cm) were rolled and the end panels' edges were folded in and sewn through the rolled edge. This was the fiddliest sewing job I've had to date. Working inside the bag half the time, trying to find a needle sized hole in black suede in the dark... I don't recommend it as a pastime. Frame and bag are joined with glue and 13 more Chicago screws on each side. Where the handles are also screwed onto the frame, there is a 1/8" x 1/2" carbon fibre strip on the inside to provide more rigidity. The handles are 1.5mm leather stitched around a 9.5mm cowhide core. The 9.5mm cowhide is sold here for the drive belts of very old lathes and industrial sewing machines. It makes a stiff, firm filler for wrapped handles. There are four rubber feet under the bag, designed for flight cases and fixed through the carbon and leather of the base with Chicago screws again. Mistakes / lessons learned. The frame is the same width as the end panels but should have been about 3/8" wider to account for the fact it's outside of the side panels and the end panels are inside them. The result is that when the hinges lock out, the folding gussets haven't fully opened and still lean into the opening a little. The tabs on the ends of the handles are too long. I feel it would be better aesthetically if they were about 3/4" shorter. I'm considering taking them off, cutting them down just above the rivet holes and reattaching them. Where the hinges are attached, there was only 8mm of brass under them to secure the bag to, hence the two small Chicago screws either end (and either side) of the main frame. These turned out to be inadequate to hold the leather to the frame at the ends. I had to make 1.5mm x 10mm x40mm carbon reinforcing plates, cut away the lining suede and glue and screw those plates in directly under the hinges to securely trap the bag leather. I hope that as the bag gets used the leather will soften and stretch a little with bending and the stress on the screws will diminish. Stay safe. Andrew W-R
- 9 replies
-
- gladstone
- bridle leather
-
(and 1 more)
Tagged with:
-
Actually BD, I'm thinking of them for a pilot's case so the hinge will be at the top. It's a good point though. If one of these hinges were on ,say, an attache case, the feet would need to be high enough to keep the hinge off the ground. That said, this particular hinge is 6mm thick (2mm leather wrapped around a 2mm CF rod).
-
I use Sedgwick's own preparation for maintaining bridle leather. It's the same stuff they originally curried the hide with so there probably is nothing better for this leather. I'm still puzzled why I couldn't find more than a couple of (very chunky) examples of this sort of hinge on Google. It was easy enough to make them and the decorative possibilities would surely appeal to the toolers out there. There doesn't appear to be a wear issue and I don't expect one because the leather isn't being flexed like a strap hinge.
-
Three experiments in one piece of work: Leather hinges, my new brogue punches and a first attempt at box stitching. I figured this would test the practicality and durability of leather butt hinges before I attempt to put them on something bigger (and more expensive). The box is made from scrap Sedgwick Bridle leather about 4mm thick. The feet are 8mm Sam Brownes and the closure is a German made Loxx fastener (just like a Tenex). The hinge and hasp are made of 1.5-2mm bridle hide, wet formed around a 2mm carbon fibre rod. The dimensions are 17cm x 12cm x 12cm. It's going to be used for my shoeshine gear so it'll be used almost every day and any wear issues on those hinges should be apparent pretty soon. That said, my prototype (see above) has been on my desk for a month and fiddled with a lot (it's like a fidget spinner in that respect) and it's showing no adverse signs.
-
.thumb.jpg.4ed1dbae8dada980d06392d599329b6e.jpg)
FACE MASKS 101
AndrewWR replied to Ferg's topic in Purses, Wallets, Belts and Miscellaneous Pocket Items
Hahn's Atelier has free PDF patterns for leather 'proper' face masks, designed to take replaceable filters . there's a youtube how-to video here with downloadable pattern. I made one in black bridle leather but tan ones look a lot less like fetish gear. -
The lock is riveted on. It was supplied with plated rivets and solid backing plates for both lock and hasp. The wrench shaped thing is the tool for setting the combination.
-
The lock is Italian, palladium plated CNC machined brass (not a casting), manufactured by MMC (https://www.mmcolombo.it/en/catalogue/patented-articles.html), but I bought it from Rocky Mountain Leather in Utah and had them ship it to Wales (an expensive way to buy it - paying import duty and all). MMC don't retail their products and have a high minimum order value. They're beautifully made and feel very precise and solid in their operation. The dials are hours and minutes so the combination is a time of your choosing (such as the birth of a baby). I'm planning an attaché case on a carbon fibre frame and I want to use MMC locks on that. They'll only sell me a minimum of 10 pairs of locks so I'll have nine spare pairs to shift on Etsy to recover the costs. They're likely to be about 68 Euros per pair in palladium or gold plate and they'll work for wooden boxes too, being only about 6mm deep (shallower than key locks). If I get enough interest in these locks, I'll talk to MMC about stocking more styles so hobbyists like me can have access to them.
-
Thanks Fredk. However, that raises the question of why I couldn't find more than a couple of 'curiosity' examples of leather hinges (with a pin). I assumed, because nobody appeared to be doing it, there was a good reason not to. It's too obvious an idea to have not been had by many before me and it was too easy to be abandoned on technical grounds. I actually used the same clamping arrangement I recently set up to mould tabs around buckles and D-rings for a briefcase: two lengths of 50mm x 50mm x 4mm aluminium angle and a shedload of joinery clamps. I spent some time last night fiddling with my prototype and tidying it up a bit. A bit of breaking in was all it needed to give that full 270 degree ROM and it looks quite elegant considering it was a piece of scrap a couple of days ago. I think I'll have to make a little leather box to test it in the context before risking it on a bigger (and more expensive) project.
-
I'm looking for options for a bridle leather pilot case. The top has to stay open and not get in the way. Just out of curiosity, I wondered if I could make an actual hinge out of the same leather as the bag, so I got a bit of scrap bridle leather (1.5-2mm thick) and wet moulded it around a 2mm carbon rod. When it was dry, I halved it and cut alternating notches then assembled this hinge (100mm * 25mm). It won't quite fold flat but probably would if folded around a 3mm rod. It does fold perfectly to 90 degrees in the other direction so a proper one should have a full 270 degree range of movement. Two lines of stitching should be more than enough to secure it. Since it's basically just a variation on a rolled edge, I'm wondering if I can make the hinge integral to the edge of the leather panels. The beauty of CF rods as pins is their flexibility: essential on a bag that's only semi-rigid. It can't be any more prone to wear and tear than bending a strip of leather back and forth and the tallow based treatment for bridle leather should provide effective lubrication. Can anyone think of reasons this won't work?
-
Part 2. I wasn't planning to put a slip pocket on the back but there was a natural blemish in the leather and I didn't have the luxury of cutting around it so I covered it with another piece. A big shout out to the lovely people at Rocky Mountain Leather who supplied the lock. It's made by MMC in Italy but RMLeather are pretty much the only retailers of these palladium plated beauties. You may recognise them from Marcellino's bags. This one has travelled far to end up on my bag: Italy to Utah to North Wales. The large Sam Browns under the buckles are just an alternative to loops. I find loops a bit fiddly but the studs work fine. 8mm studs and 8mm holes so there is no stress on the leather to push it over the stud our pull it off, hence no wear & tear. The holes were punched a little high so the strap naturally pulls up behind the ball of the stud, retaining it but easily releasing it. The silver screw on the end of the case is the back of another Sam Brown. This one allows the attachment of my pen case to the gusset. I never liked pen loos on the dividers of briefcases: Why make a narrow space half an inch narrower when there so much more length than width? I find it's far less intrusive at the end of the bag and, being removable, it can still go in a pocket if I choose. There's no shoulder strap because I never use one. It's a fraction over A£ size internally (not by accident) with three compartments (1",2",1"). Now they've extended the lockdown I'm planning a laptop case to match / fit inside. Stay Safe.
-
OK. So the UK is on lockdown and a month ago I got a couple of shoulders of Bridle Leather (2.5-3mm & 1.5-2mm thick)... The plan: to make myself a new briefcase. Three weeks of lockdown should be enough. Cut, glue, sew, burnish... repeat as necessary. To be continued...
-
.thumb.jpg.4ed1dbae8dada980d06392d599329b6e.jpg)
Clever but easy
AndrewWR replied to AndrewWR's topic in Purses, Wallets, Belts and Miscellaneous Pocket Items
I just remembered posting the pattern for this case. It's gratifying that a few of you guys liked it enough to try it. I've been using mine for over two years now and it's wearing very well. It still gets me into conversations in coffee shops whenever I leave it on the table.- 24 replies
-
- pencil case
- great for carvers
-
(and 1 more)
Tagged with:
-
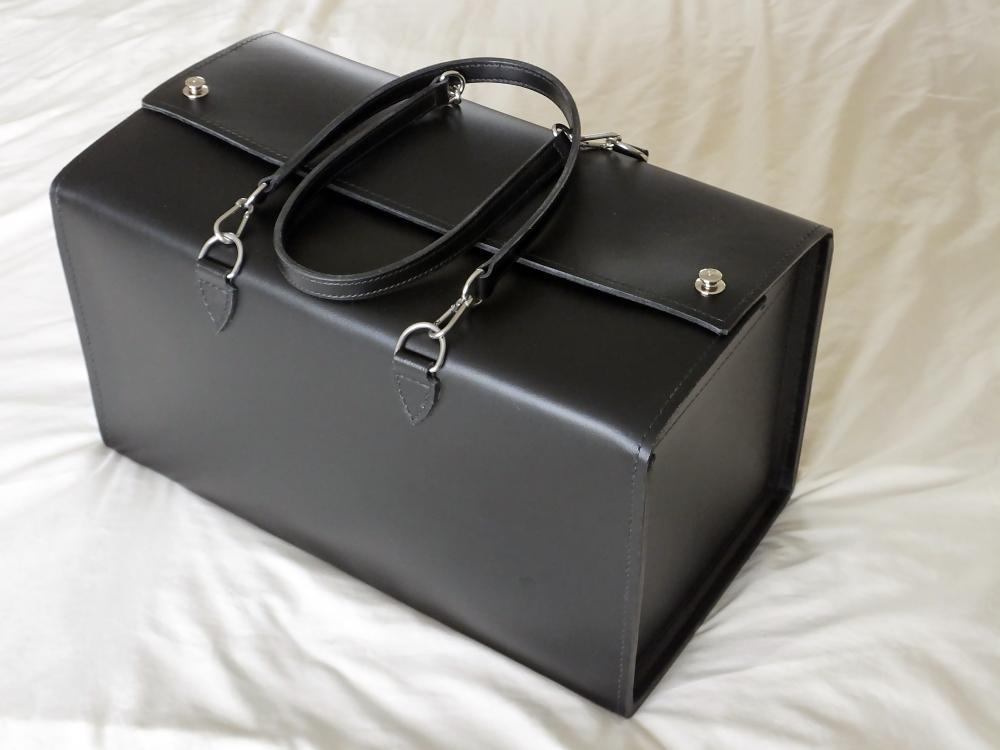
Bag Number 2. Specifically styled to match my first bag. This weekender or holdall is 10"x10"x20", suede lined, has a 2mm carbon fibre base board and replaceable rubber feet. All the fittings are marine grade stainless steel ('cept the Loxx fasteners, which are chromed brass but sold for marine use). The decision to not have a shoulder strap is deliberate. I've never liked using them.


.thumb.jpg.c0c84eb57342eb7ed056f7bb545d5471.jpg)
.thumb.jpg.41eefdaaa4455de7a40670b4c44b17c1.jpg)
.thumb.jpg.6e6efa376f6d7569c6a1bbab4fa12b34.jpg)
.thumb.jpg.1b02189853edd1a7a04aeded5141bba2.jpg)
.thumb.jpg.1d4f3662bd5e2cf7d560b3410bfad0aa.jpg)
.thumb.jpg.7c85d5fd18d5f0f871adf8f3bfa17944.jpg)
.thumb.jpg.dbe3d92c7e8f435bd2230c1f5148292b.jpg)
.thumb.jpg.fbc57c3fa462deb307b1b4e7bd29bb31.jpg)
.thumb.jpg.f25bf0e3e11aa5cfafb780b32f773f91.jpg)
.thumb.jpg.6e149190b907c1c4e313e8a72d3016b3.jpg)
.thumb.jpg.04b3b9cd8e2377f4b8a6ea8422cec0e1.jpg)
.thumb.jpg.9f8f7ead0cdec2bd211bd6b1c5614821.jpg)
.thumb.jpg.84da52d87c365840d66738cb54a07bee.jpg)
.thumb.jpg.bb2bf70bbb54b54040ecfcaadf5a685a.jpg)
.thumb.jpg.749e3cad5231bf8c77ec676eb8c870bf.jpg)
.thumb.jpg.d76eb21d4af0c51066ffd435f327fa46.jpg)
.thumb.jpg.620a0a116da645e01748399a70e5f7a0.jpg)
.thumb.jpg.6a190c0b3e0bfe3373dd8cbd5d5bcdf4.jpg)
.thumb.jpg.3aed0d074ac54070e46ae678594e52c3.jpg)
.thumb.jpg.39ea08afa8d63e8cf9dd2e1dc8b1d803.jpg)
.thumb.jpg.df5bb03e3520874f28250edb3ce86f24.jpg)
.jpg.6b5e0e315f00cf21d6ac936ee8c5ec65.jpg)
.thumb.jpg.5d86592e866c3e128c9062e2fdc02dea.jpg)
.thumb.jpg.71799a10827c0d546a12b38b83035409.jpg)
.thumb.jpg.00fe44ffa0162d501446565f5949b21d.jpg)
