-
Posts
14 -
Joined
-
Last visited
About Deemer
- Birthday 12/08/1980
Profile Information
-
Gender
Male
-
Location
Palau
-
Interests
Photography, cooking, diving, learning about people's experiences from around the world.
LW Info
-
Leatherwork Specialty
Messing up (a bunch) and living with the results. This is my mantra for life, not just leatherwork.
-
Interested in learning about
How to make my work not look like crap.
Recent Profile Visitors
The recent visitors block is disabled and is not being shown to other users.
Deemer's Achievements

Member (2/4)
-

Leather Pouch Restoration
Deemer replied to Handstitched's topic in Purses, Wallets, Belts and Miscellaneous Pocket Items
I never would have thought of it myself, but you can be sure I'm going to steal that idea. I know I've paid astronomically more to have something repaired than just buying new because the original just meant so much to me. Good to know you made your client happy, probably much happier than they let on. -
Gary: I've stitched the strap since those pictures were taken - the rivets are nice and mushrooms now too. I've been sick for nearly a week, but I've been going stir crazy so I thought I'd post the pics from a month ago right before I left. Bikermutt: I have to admit, I intentionally did something a bit flashy to serve as a distraction from the inevitable mistake or two I was going to make. Unfortunately, flashy doesn't distract me, we are our own worst critics after all. Side note - this was the project I thought I'd try to use your bushing idea for an articulated rivet. Somehow, I found what must have been the last piece of 1/4" brass stock on island and got to work pounding out a couple of d rings. I'll be keeping the bushing idea in mind though, should be useful someday. Retswerb: I was hoping the inward pull of the strap would help the bag keep it's shape, but it's not and one side is bowing out more than I'd like after some use. The side with the plastic camera holster keeps that side nice and right, so I may have to do something similar on the other side. Doing the wet molded sides would work well on a smaller bag, but trying to locate stitch holes by feel when you're nearly elbow deep into a bag is maddening, even when you use an awl from the outside to locate the hole. And of course I set out to do two rows of stitches from the get-go. What was I thinking???
-
This here is my second project, and as usual, I bit off more than I could (easily) chew, but I think it turned out OK in the end. I needed a travel camera bag. I wanted it to fit my camera and 2 additional lenses, filters, extra batteries, along with regular city necessities, all in bag that didn't just scream "camera bag". As far as my design choices, I wanted something to push my abilities, (or in this case push my patience). I met wet forming in my first project with success, so I wanted to incorporate that into my bag somewhere. I also wondered why all the bags I saw were either stitched and turned inside out so thread doesn't show, or the leather was sewn back to back. I wanted to make something in between, and find out why it's not all that common. I found out I also wanted some sort of pattern to keep things from being so blah. Stamp work isn't really my thing, so I was looking around at various leatherwork I have around me for inspiration. I noticed the broguing on my boots; that line of holes and stitching has a fantastic ability to dress up a normal pair of work boots to the point of being nice enough to go out on the town in, but it will prevent a pair of dress shoes from being "fancy" enough to be worn to formal occasions. I have hole punches, calipers and time. Man, stitching this took FOREVER!!!! It went fairly well while everything was out in the open, but once it was wrapped up, I was making every half of every stitch completely blind. I easily have 15-20 hours in stitching alone. I really like how it turned out, but holy cow did it take a long time to make this bag! On to the pics, 'cause that's what clicked on my oh-so-clever title for, right? Wet forming one of the sides So. Many. Holes. We lost power one night so I ended up stitching by candlelight for a few hours. The the casual viewer may notice that the handle attachment points aren't level. The keen observer would point out that the cuts on the flap aren't perfectly symmetrical. Ehh... Oops? This was before I cut the excessive strap and stitched it. I wanted this usable before my 3 week, 16000 mile trip, which I completed the bag for with a comfortable 5 hours to spare. The difference between the leather colors is due to the fact that I worked on the main flap outside in the sun. I liked the slight contrast so I brought the leather for the strap attachment outside to tan too. I wanted to peen those rivets better before I left, but my friend totally flaked out on letting me borrow her ball peen hammer, so I peened them out using my father-in-laws (after these pictures were taken). I'm also chapped because I ended up marking the leather because all I had was a claw hammer - now I know not to depend on her for anything. Also, I I had to make those D-Rings by hand - we just don't have brass hardware on island. Those splotches are sweat stains. I used a towel to try to protect the piece while I was working on it, but when it's 85F and 85% humidity, sweat just pours off of me, errant drips are inevitable. On the inside I put a button stud at each strap attachment point. I have a plastic mock up for a camera and lens hanger so the camera is always held at the top so it's easy to reach, and so the lens isn't at the bottom of the bag, making room for another lens or just general stuff when I don't need 2 additional lenses. I want to make this out of leather eventually, my plastic version worked for my trip, but isn't going to last forever. I thought I had some pics of the inside, but I can't find them, and I'm recovering from the flu, so mustering the energy to take some pics is asking alot . Comments, critiques, and any helpful pointers are welcome. My stitching is better this go around, but still needs practice (at least the visible stitches look decent!) I'm going to reburnish the strap and the flap when I get the energy up; I came down with influenza the day after I got home, so there's work I still want to do, I'm just too exhausted to do it.
-

NewWork Belt
Deemer replied to Tim Schroeder's topic in Purses, Wallets, Belts and Miscellaneous Pocket Items
Mods, can we move this out of the "Show Off!" forum and into the "Make Everybody Jealous" forum? That belt is just too much. -

First holster for 2018
Deemer replied to Peter Darby's topic in Gun Holsters, Rifle Slings and Knife Sheathes
That looks awesome with the grip and the stainless. I'm intrigued by the exposed trigger: I love the look, but in that edgy/dangerous sort of way. Not sure it would be for me. -
I'm in Palau, and I generally order from China (AliExpress, Rakuten, etc.). When compared to ordering from the States, quality is hit or miss with huge swings in each direction, but it usually gets here, the shipping charge is reasonable and and it arrives slightly quicker, despite typically going to the US first . A screw type rivet would solve my problems, but I haven't found any of those in brass here. I'm a sucker for matching metal hardware, and I already have brass button studs and brass rivets (I fully expect these to be a bear to work with) Bikermutt, that's brilliant. Off to find some sort of tubing! This solution isn't the longest lasting, but it should last as long as a belt buckle hole, right? I bet I can stitch another piece of leather to the strap end to increase the longevity. Sledzep - I thought of making my own, but there's no suitable diameter brass to be had. I found 3/8" brass stock or 1/8" brazing rod, and copper has been nixed based on aesthetics - see paragraph 2 :). Also, I spent quite a bit of time looking for copper wire when I made a spot welder from a microwave oven a couple of years back and I don't recall seeing solid copper wiring large enough to be structural here. 10ga, at the most.
-
I feel like that would just push the burr down further? I've over-peened rivets on metal before and ended up with wrinkles because it just kept tightening the rivet. Maybe I'm peening incorrectly. I'd really love to use D-rings but I don't have any, and getting things shipped here is a ridiculously long wait - sometimes as long as 3 months. Many times things never arrive at all or I just get an empty envelope/box at the end of said quarter year long wait. Any other ideas are welcome. I can get regular brass rings locally, though only in 3/4" and 2" sizes. I've played around with the 2" size, but I just can't make it look right. I don't see how to make 3/4" work at all. To alleviate some wear, I plan on having a sandwiched design, where the shoulder strap has the bag itself on one side and then a "strap" on the other side of that is sewn onto the bag so that linear force keeps the rivet perpendicular to the force instead of angling. Imagine how you would usually sew a D-ring to a bag, only instead of length of leather going around the D-ring, you have a rivet going through that length of leather, through the strap, and then through the bag itself. It's not perfect, I know, but I'm trying to make lemonade here.
-
I'm working on a pattern for a camera bag, and I need an articulated method to affix a shoulder strap to the sides of it. I think that a rivet that is just a bit too loose to act like a swivel would do the trick. How does one go about reliably doing this?
-

Pocket Organizer (My first thing!)
Deemer replied to Deemer's topic in Purses, Wallets, Belts and Miscellaneous Pocket Items
Motocouture, I end up using banana leaves for everything - backdrops, coasters, gift wrap, plate liners, aluminum foil substitute for baking - one man's daily grind is another's novelty Thank you all for the kind words and encouragement and I'm flattered it's something that some of you want to copy. Hopefully you'll share your versions. I'd love to see what changes you make, and what a more skilled set of hands can do with my base idea. Big thanks for all of the suggestions and pointers. Bikermutt07, I think I will try to make a screwdriver beveller. If I could make it work worth a damn, it would be a pretty awesome tool to have in my collection. If that doesn't work out (getting someone to part with any tool is a tall order here) I'll probably pull the iron out of the hand plane and give garypl's idea a shot, though I think it's limited to straight edges. Mistakes. The only reason I don't completely suck at any of the things that I don't completely suck at is because I've messed up those very things so many times I've just ran out of ways to screw them up. I am, however, always on the prowl for a new way to fail, or at least give a time tested method another go. It's nice to hear that my shortcomings aren't atypical and will likely be overcome with a steady hand and some invested time. Practice, practice, practice practice... I want to make a neck strap for my camera, and I have a request from a friend for the same, I think I'll add some aesthetic stitching to those just to work on thread tension and working with chisels. After reading more about stitching, I think I need to work up some sort of stitching horse, and maybe scour the island again for needles with eyes big enough for heavy thread, but not so large I need something to pull them through the stitch holes. I don't recall a single stitching article mentioning heavy reliance upon vice grips -
Man, I'd be thrilled to death if my kids thought my hobbies weren't super lame! This purse is adorable. It manages to be cute and grown up all at once.
-
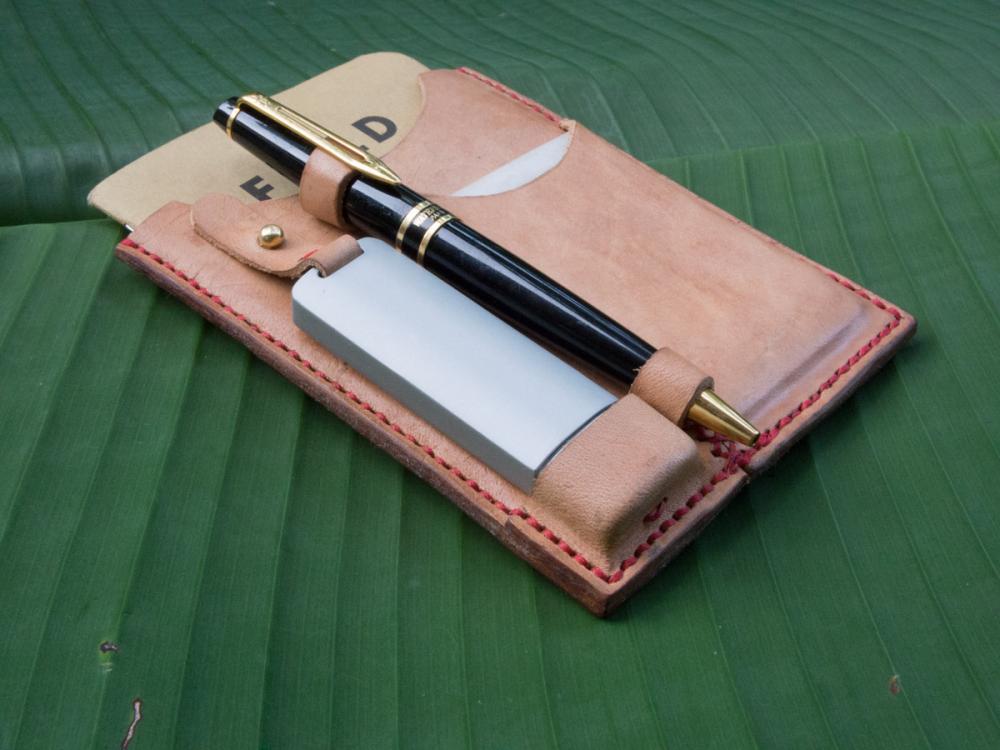
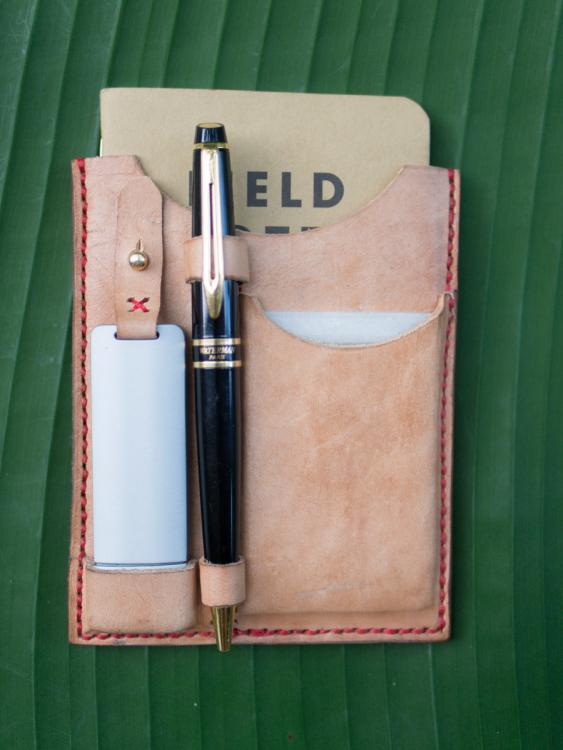
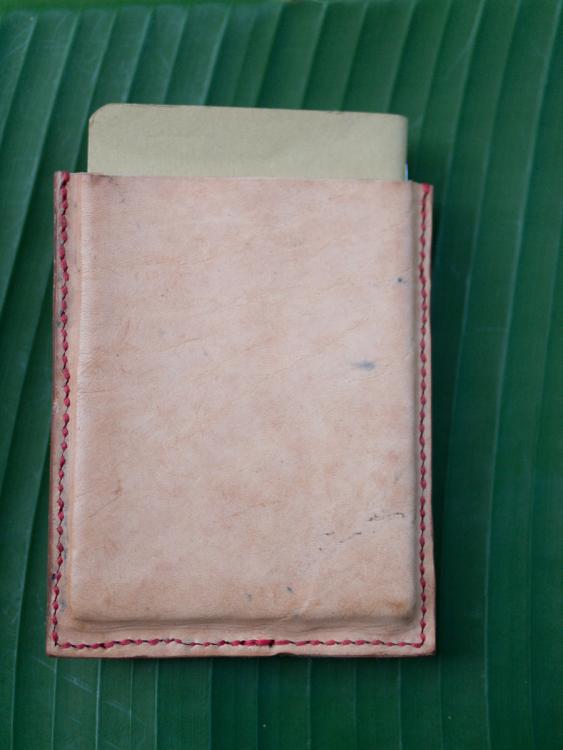
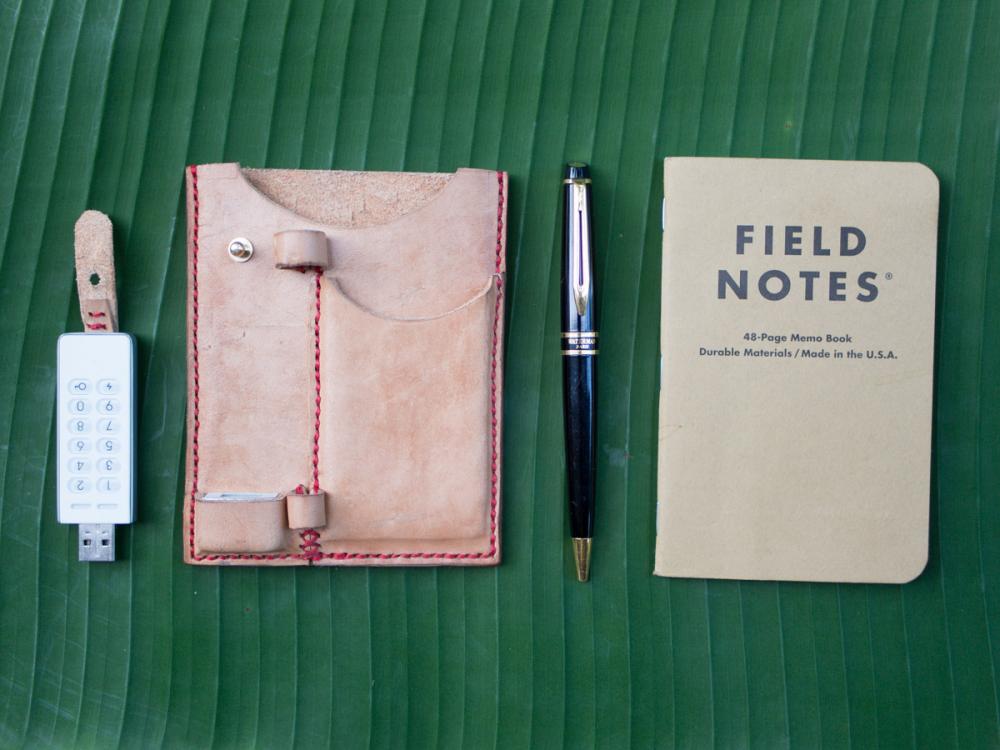
I finally finished my first thing. The concept was for a pocket information exchange caddy. I wanted a way to give analog information out (calling/business cards), taking down information (Field Notes journal). I also wanted to make this modern, and have a way to take and give digital information, as well as a way to store critical copies of sensitive data (hence the PIN secured USB drive). I feel like I learned a ton making this as I made it mostly without the "right" tools or materials. The leather I started with was ordered for a heavy bag, therefore is thicker than what I'd want for something pocketable, and what I received was heavier than I intended to order. In addition, I ordered quite a bit of other stuff that never arrived (shipments take months to arrive and many things get lost in transit, that's life here) What did come, I was happy for: stitching chisels, hole punches, heavy waxed thread and a boat load of various sized button studs (that's the extend of leather specific tools I had access to) Thankfully, on a tiny island, you've got time on your hands. I've found that patience, man-hours and ingenuity can make up for (some of) a lack of proper equipment. My biggest time suck so was thinning 1mm off of my entire double shoulder with a hand plane (the plane iron alone took a couple of hours to make it serviceable - ocean air is hell on steel) then thinning another .5 mm off just the leather for this project (I started out with leather that was 3.5 mm thick in parts) Comments, critiques and (especially) suggestions are encouraged! Anyway, some pictures. This is the "glamour shot" - the parts that really suck are either hidden or out of focus. This does have a couple weeks use on it, so it's got some scuffs rubs and dirt already. The wet forming for the USB cap was part of the original design, and I'm pleased with it, though it's slowly shrinking away from the flush edge. I underestimated how much "play" I would need to have for the cards and journal, so once it was all stitched up (and I realized everything was a very tight fit) I made some plastic forms and slowly wet the back piece of leather, being careful to not get any other leather wet, and then slid the form in and worked it down with a metal chopstick, which you can see some black smudges from, especially in other shots. Repeat for the card slot. The edges look terrible in this photo. In person they are much darker and shinier, but still not great. I need to sand with some finer paper I guess, and then really go to town with the denim. Maybe a proper edging compound too - I used glycerin shave soap. My beveller envelope arrived empty, so I tried to bevel by sanding, but that didn't seem to work. Does anybody have any makeshift bevelling techniques that work decently? I suppose I could try to learn to do it freehand. I've got the time and maybe enough leather. Man that stitching on the right side kinda sucks, but it's passable for me for now. Just don't look at the back side. I'm not sure why it spreads out at the top. Probably has something to do with wetforming after it was stitched Oh, come on! I asked you not to look back there. I thought we had something - I trusted you! Yeah, it's pretty bad. I think I didn't have the chisel perfectly vertical - the top side stitching isn't *that* bad. I think the wet forming post stitch-up also made those stitches look worse, if that's possible. Exploded view. I did the stitches under the pen first because I knew they would be mostly hidden so I could mess them up and they wouldn't be seen unless the pen was out. Little did I know... Overall, I'm OK with it because I learned so much. I ended up with a working piece that while it isn't beautiful, I think it will look a bit better with some wear and tear. Thanks for your time!
-

newbie What did I do wrong? (leather weight question)
Deemer replied to Deemer's topic in Leatherwork Conversation
Hrmmm. I was hoping I did something wrong - it's much easier to learn from a mistake than to deal with industry wide issues. Oh well, I'm sure there will be many lessons learned via mistake working with this chunk of too-thick leather - fortunately they sent me 2sq ft more than I ordered! -

newbie What did I do wrong? (leather weight question)
Deemer posted a topic in Leatherwork Conversation
I'm a novice in leather working. I've made a few simple items out of veg tan scrap here and there and always just picked pieces from my bag that were the right thickness and size. I find myself with some time on my hands these days and wanted to recreate a simple messenger bag (only a little bit larger than the original) I had made for me a few years ago and think I have the skills to do so now. The bag I have measures 2.6mm to 2.8mm thick (measured with digital calipers) at all available edges which plants me well into the 6/7oz range, right? So I order some 6/7 oz leather. I received the leather, and opened the box and my heart sank a little. It seemed so thick! Remembering that I always think new leather looks thick because it's usually stiff and the edges haven't been beveled yet, I grab my trusty calipers. I found one spot along the edges that measures 2.8mm, but it's 3.0mm to 3.3mm everywhere else, with a couple of spots hitting 3.5mm. This plants it firmly in 7-8oz territory, right? Did I measure wrong? I'm quite confident in my ability to measure with calipers, so is there something specific to measuring leather that I missed out on? Did I use the wrong mm to leather thickness scale? Thanks for any insight!


