-
Posts
104 -
Joined
-
Last visited
Content Type
Profiles
Forums
Events
Blogs
Gallery
Store
Everything posted by Silky
-
Excellent info ! Thanks very, VERY much.
-
Organ 23 is what is in it now. The thread was a fuzzy type, I guess typical for book binding. Later, I'd like to get samples of the various threads and needles to match. Much to do till then though, working on the feeding soon. Thanks again Wiz,
-
This works well for smaller parts when practical, especially with something like a spoked wheel. Submerging the part in a tub of dry wood ashes is also an excellent medium to slow the cooling.
-
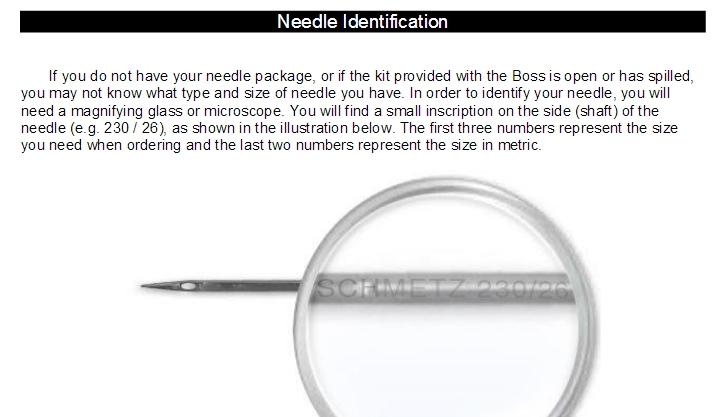
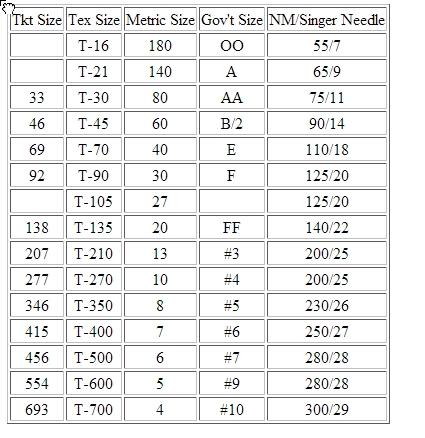
One more then I gotta go. This is confusing .... I thought the 230 was 2.3mm and the 26 was the "size". 7x3 is a round needle for fabric ? 794 is a leather "cutting" needle ? http://www.tippmannindustrial.com/content/Needle-and-Thread-Guide.pdf
-
Is the Size 7 the Gov't designation ? And is the "Tkt" the thread size ? If so, then what is a 7 X 3 and a 7 X 4 ? Surely the 3 and 4 aren't the length ..... are they ?
-
I read through much of the above sticky Needles And Threads but did not see a direct ref to 7x3 or 7x4 needles specified for the 7-33 machine. How does the 7x 3 needle cross to the more modern designation ? What is the max thread and needle combo a typical 7 class will handle ? What does the 7 and 3 (or4) represent ?
-
Well it turns out that the machine wasn't cracked, it was just a scratch in the paint. Thanks for the info on welding/brazing, much appreciated. I have welded (and brazed) many cast Iron pieces over the years and have been quite successful at it. The preheating is a good idea .. where practical. For my best results on delicate, as well as larger items that are impracticable to preheat , I never let the base part get very (relatively) hot. Stick weld with machinable nickel rod one small puddle at a time, quickly peening with a small radiussed pointed chipping hammer until the heat dissipates into the neighboring casting while cooling to where you can just barely keep your bare hand on it briefly without getting burned. Then repeat until the ground out prep area is filled. This stress relieves the filler material as you go and tends to relieve the stress in the parent material as well It takes MUCH patience but usually comes out quite well. Depending on the quality of the casting, and inclusions, the Ni rod will not flow well with the base material. In this case, I run a light pass of Ferroweld which acts sort of like a primer and improves the fusion of the Ni to the casting, then finish filling with the Ni. The main attribute of the NI is that it is malleable and machinable, where the Ferroweld is too hard to machine and does not stress relieve by peening like the NI and it is more prone to cracking as it cools and contracts. The other main problem is that whatever you do, if the piece you're welding has a precision bearing journal at each end, or other critical feature, there will be some deformation affecting the alignment. Sometimes a little bit is OK, other times align boring/honing or re-machining is necessary to restore functionality. Thanks folks.
-
There is plenty of clearance between the shuttle and the race on my 7-33. Is this by design ? or is there excessive wear ? How to determine the amount of wear ? I assume it should run freely but how free ? Thanks
-
Ha ..... I did make an inquiry earlier with a major supplier for ALL of the lift and feed related parts. No response yet .... as I assume they have not stopped laughing yet. Just as well though as I'm really not expecting one. No problem ...... thanks again. A related question: Considering this 7-33 for canvas, webbing, heavy fabric and maybe leather. If you were to choose 1 stitch length (if possible) to cover all bases, what would your choice be ? I might incorporate a feed mechanism of my own design but it will be of a single fixed stitch length. Possibly modified later to reverse and vary the length but fixed to one length to start with. Thanks
-
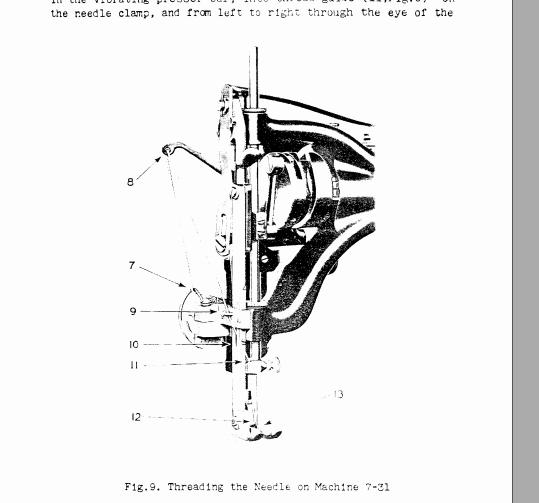
As far as the feeding goes, it seems to be missing more than what remains, lol. Thanks. Just as I was about ask for any exploded views, as the Singer 7- ## parts documents are so hard to visualize, the Consew, Seiko and Highlead pdf's of similar models illustrate the mechanisms (and what I am missing) quite clearly. Thanks for the hint ! Not likely I'll find any of these parts at a reasonable enough price to even consider fixing up this ol' rig. I bought the entire machine at scrap price mainly for the other components anyway. This Singer part was sort of along for the ride. I'll set it aside for now. Ya never know, I might stumble across some parts someday. Would really be nice to see it running though. Thanks to all for your advice and assistance. "I'll be back"
-
So its a book binding rig, cool. I have all I need to fix the top end but nothing for the feed below. If no parts are available, I can make them if I can find good examples with a few dimensions. Fixed stitch length will be fine. Thanks for any info.
-
You might be right Wiz, thanks for your attention. I've got the top figured out .... it would be minimal to restore. The bottom end, however, is another story. It will need everything feed related. From the dog to the stitch length regulator knob. Whats the chance of finding all of that stuff ..... at a reasonable price ? And, am I correct on the walking foot description ?
-
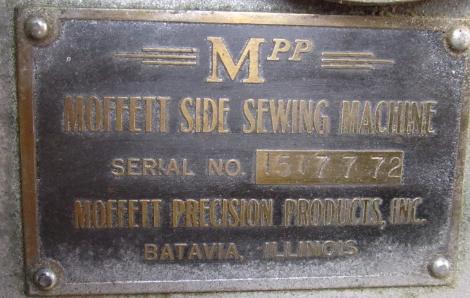
Found a mfg plate on it. Was built by Moffett. The feed chain indexes 1" per stitch. Variable speed DC motor. Custom needle foot. ALL of the original feed is missing. The drop parts and the pressor bar, foot and linkage. It also has a drill spindle that cycles with, and is offset 1" from the needle. Very well built machine, but has quite a bit of wear. Question: does the upper walking foot and bar just pinch the material while the lower dogs do all of the feeding ? or does the foot also feed by a linkage ? this one pic is big so you can zoom in, more pics in next post. thanks
-
Hi folks. I have a highly modified 7-33 that is missing some parts. I have all of the manuals/parts lists that I could find here and elsewhere and have seen some videos of running machines. I'd like to have a few very clear photos of the parts shown in the attached pic. Views straight in, angle front and to the rear if possible. Or any other nice clear references would be great. This machine I have has a custom feeding arrangement and appears to have been gutted of the original feed parts. I'm considering getting it back to normal for canvas/fabric work. I love the throat clearance. It runs well the way it is but is fed via an intermittent gearbox driven conveyor arrangement. I will get a few pics later today. Might not be worth fooling with, just curious. Thanks
-
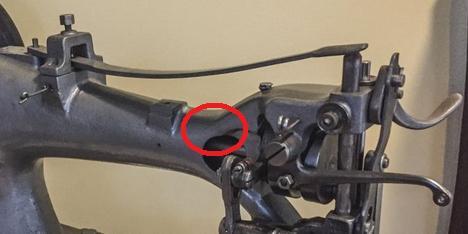
Hi Gregg. Is the "beak" area break you mention referring to the circled place on my attached pic ? Never heard beak before. I guess that end of the machine does somewhat resemble a birds head with a beak down towards the needle. Thanks for the tips.
-
Thanks ! It does look pretty tough. A relative tells me of an old machine in a building. It has Singer 7-(something) on the plate ... not sure what the # is. She says It is big and has what looks like a a vertical spindle with a toothed pulley on the head alongside the needle. I searched for class 7's with a drill or awl but came up blank. Until I can get some pics, does this type of machine sound familiar to anyone here ? Thank You.
-
Is the Singer 7 class prone to cracking in the area circled in this pic ? Anyone see one cracked here ? Looks like a weak area. Thanks
-
That is a nice read, well done ! Thanks Wiz.
-
I saw this Pfaff 1471 machine today and was wondering if anyone here is familiar with this IDT system and if this machine would sew light to medium weight leather and or canvas very well. Sort of like a walking foot but doesn't look to be very robust. Thanks for looking. https://www.bing.com/videos/search?q=Pfaff+IDT&ru=%2fsearch%3fq%3dPfaff%2bIDT%26FORM%3dHDRSC1&view=detail&mmscn=vwrc&mid=2CE18BDE63AAAE50F5FD2CE18BDE63AAAE50F5FD&FORM=WRVORC
-
Thank you ! I did notice on the un-badged machine I looked at and posted about in another thread that the pan was soaked with oil. The fellow said he usually kept a small piece of carpet in there to absorb it as he lubed it religiously. I will check that out when I go look at this one ...... thanks. Realizing that these machines have no odometer, and some are from heavy commercial use as well as light, with varying degrees of preventive maintenance, is there any area in particular that will typically exhibit the earliest signs of wear ? Like a specific shaft/bushing, linkage or pivot point ? In other words .... what typically goes first ? The paint and pedal wear is a rough indicator I guess but means less if properly maintained IME. Thanks again to all for the guidance.
-
That will, I'm hoping, come in very handy ! Thanks again Wiz !
-
Thanks to all so far. Going to look at the 206RB-1 over the weekend. No one there that knows anything about it as it is part of an estate auction. It will have access to be powered up, but that's it. Does anyone here have a pdf of an operator manual, or other instructions for this model that they could share ? I guess a bobbin case and bobbins would be the only "loose" items to look for, provided the basic machine assembly is all there and intact ? I understand the clutch motor as I have one on a small production lathe here. I also understand that the motor voltages may vary depending on it's application. Single phase 110v or 220v and 3 phase ... like my lathe. Thanks for any docs or further highlights if available.
-
That is a good point Wiz, thanks for bringing that up. Just so happens that I saw extensive mention of this aspect while searching the web. BTW, it is a clutch motor. I am a machinist/automation machine builder by trade and have a well fortified shop at home. I have urethane round and v-belting and the necessary tools to weld any length needed. I also have many shafts, bearings and pulleys in stock as well as the materials to make whatever is needed. Brackets, mounting and such. I also have several Allen Bradley industrial servo motors and drives that would work a treat. They are surplus, about $3500.00 new, but that doesn't matter, they're just lying around collecting dust. Might also use a DC motor with a speed controller. I have several of those from 1/4 hp up to 1 HP. They are VERY controllable from 0 to 1800 rpm. I tentatively planned on affixing a jack-shaft arrangement to slow it to a manageable speed using the original clutch motor. I did a 5:1 reduction on a Singer 99 with the original little motor. Slowed to where I wanted it and provided MUCH more slow speed power to the business end. Worked great for small canvas and webbing projects. (surprisingly tough little machine) Either way. I've got the power plant covered .... the sewing machine is what is new to me. Thanks again ... very much ! EDIT: Meant to mention, I also have quite an assortment of the toothed timing belts and pulleys if the urethane type would tend to stretch too much.
-
Thanks for the info, great ! The 206 is coming up at a local auction. I was considering going up to 4 or 5 hundred if in good clean cond. Does that seem "ballpark". (I realize condition is key)
-
Thanks JJN. Were these 2 models manufactured along side each other in the same time frame ... or did one evolve from the other ? Just curious, thanks again


