Abelc
-
Posts
22 -
Joined
-
Last visited
Content Type
Profiles
Forums
Events
Blogs
Gallery
Store
Everything posted by Abelc
-
Great work. I love it. I hope one day to be able to make myself a pair of boots. But little by little, I've been working with leather for a year and 2 months only XD.
-
I bought cork (well a cork board or something like that), to put behind the ruler and square, to see if it doesn't move. I've been reading how to cut in a straight line XD.
I am doing a bifold wallet (well, i have dyed the hide, and oiled, nothing more yet), i hope this time, cuts are a bit more precise, and sewing a bit better XD -
 I have applied oxalic acid (1 teaspoon, in a pint of water) in a colored, tannery pre-dyed veg tan (is a 85 x 28 cm scrap they had in the store, they usually have some scraps, and i sometimes get them, usually natural, not colored one) I let it dry like 1h 30 min, then dyed (all the scrap, not cut yet) with fiebings light tan 50/50, a few coats, without letting the dye dry between coats. Now it has like brown / darker dots in some areas of the leather. Looks like if were used some brown antique, in this case, i like it, but i would preffer to choose when i have that effect XD. (While writting this i have gone to where i let the leather dry and now I just noticed that now it looks much better, i dont find dark dots, it looks like lines like a spider web. or some bee panel form, but not dots as such) I applied the dye, with a slightly unloaded rag -folded in half with some cotton balls inside- applying the dye in circles. I dipped the rag in the dye again, unloaded and so, applying coats, until I had the color I wanted. As the color was getting darker, there were areas where there were dark spots (as if it was an antique), and some dark lines in an area that seems to have some damage. It was more noticiable when wet than after drying some minutes. Seems that some pores absorbed more dye? Could it be that I have let the oxalic acid dry too little? Could the fact that the leather was previously dyed (colored / pre-dyed veg tan) have affected the dyeing, or the use of the acid, over a colored veg tan, to clean? I don't realize that I saw those dark spots before dyeing. Those of you who use a sponge for dyeing, do you wrap it in a cloth? I have tried on a piece of leather, to dye it with a sponge, unloading it a little, and I did not like how it turned out. I've been searching and haven't found much regarding this on the forum, that's why I ask. How long should let the oxalic acid dry? The dye has been drying for about 2 hours, I have buffed with a rag and no dye comes out. I will do some tests in some 5 x 10 cm natural veg tan and see what happens, if i let it dry more XD I tryed to make a photo, but the ceiling light makes quite difficult to see the darker spider lines/ web. And macro of the phone does not help XD
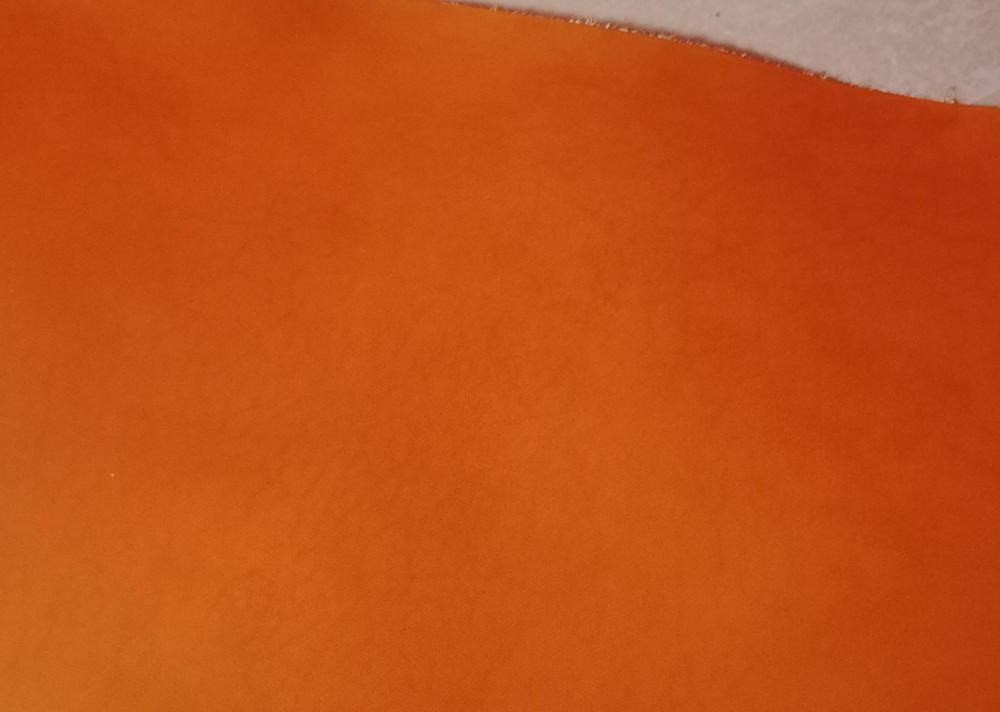
-
Waiting for the oxalic acid preparation to cool a little, to apply it on some leather scraps, to make a sample tomorrow with the dyes I have, and some dye mixture tests, for one of the projects I'm doing.
-
Make stiching holes with a chisel for a collar
Abelc replied to Abelc's topic in Collars, Cuffs, Leashes and Leads
Yeah, could be. I did understood, to make the inner strap longer, glue them permanently, while in curve and then cut it to have the same lenght for both while are in curve. But would be the same to temporaly tape the external strap, cut to measure, to a long strap, in curve as you say, mark in the internal, and cut it. Burninsh and later line all the edges, etc and then glue both permanently. For the external strap length should account the thickness of the straps, i think, but as i have a old collar, and being able to take measures of it, makes it easier, as I would not need to account for thickness, just measure from buckle to the hole used, and add some amount to be sure, and that would be the length of the external layer. Thanks. -
Make stiching holes with a chisel for a collar
Abelc replied to Abelc's topic in Collars, Cuffs, Leashes and Leads
yes, is a bdsm collar, but anyway the same process & methods should work. -
Make stiching holes with a chisel for a collar
Abelc replied to Abelc's topic in Collars, Cuffs, Leashes and Leads
The lining is just for visual aesthetics and practice, they are 3mm, the 2mm is the buckle one, riveted to the external strap (as i have 2,5 cm 2mm strap and another 4 cm 3 mm one, and i preffer to not buy more XD) Perhaps wrinkles will not matter, but anyway is good to know ways to do it, and learn more. Thank you I will take a look. -
Make stiching holes with a chisel for a collar
Abelc replied to Abelc's topic in Collars, Cuffs, Leashes and Leads
Would be possible to do it the other way? Cut the inner strap, based on the dimensions of the neck, measured, to a length longer than the circumference of the neck, put the inner strap, in curve, over something round, on something of similar diameter, and place over it a long strap for the external, and mark the dimensions, where starts and finish the inner strap, then cut. That way i can sand, burinish a bit and line al the edges of the inner strap (like a rolled edge). And also sand edges & burnish (black tokonole) those of the external one, rivet the buckle strap (previously marking on curve perhaps), and then as you say, glue in curve the 2 straps, make the holes with chisel, in flat, and then sew it in curve. Thaks for the wood block idea. I know using bee wax is good, but not the wood trick (i just have seen it in a video, also) -
I want to make a collar for my next project. I have been reading, but I have still doubts. I have some straps around that are 2 mm (5 oz) and 3 mm (~ 8 oz). I was thinking of putting two 3 mm straps, glued, and a 2,5 cm 5 oz. strap for the buckle riveted to one of the layers. So the base of the rivet (9 mm single cap rivets) is hidden between the two layers of straps. I have also a big scrap of 1 mm leather, to use as lining that I would glue to the second strap, and fold over the edges, to the flesh side (then gluing and stitching the straps). I have also 7 mm rivets (and i think both "height" is 7 & 9 mm), but i could make some 9 mm round piece of leather and put it behind the 2,5 cm strap if the two straps (5 mm) are not of enough weigh to rivet with 9 mm rivets. I was thinking in, before that, use double-sided tape, to sand the edges, make a line with a wind divider (curving the straps) and use my Japanese chisel to make holes for stitching (in flat). At least, if not all the way through, enough to open then latter with the awl. But now come my doubts. I have read that anything like a collar, cuffs etc., you have to glue and sew them in curve, and not flat, because otherwise there will be wrinkles. The more weigh of the leather, the more wrinkles it seems, but I am quite bad at skiving (I have a sort of curved knife, like a half moon one, but smaller, and I am not sure how to sharpen it, and if I haven't eaten the edge when I tried to sharpen it XD), and I don't want to buy new straps XD But of course, if I lay it flat, provisionally glued with tape, and use the chisel, would the holes match when gluing permanently on curve and stitching ? Because the inside layer, if I understood, something I have read, will contract and the outside layer will expand, in curve, and would not match. Is that correct? It would be better to use the divider, to not only trace the line of the stitching, but also the space between stitches, to make it as uniform as possible (doing all that by putting the collar curved on a pipe, or something of similar diameter). And make all holes with an awl ? I should trace the stitching lines once burnished the edges (the outside one just slightly) and lined the outside strap and glued to the other (i mean all almost finished but stitching), so the edge to stitching distance accounts the edge already finished, and the 1mm more of the lining for the inside strap? I was thinking to have the stitches at 3,5 mm from final edge. The holes for the rivets to rivet the buckle strap to the outside strap, is not problem to make them and rivet in flat, I suppose, I can always mark and make the punch holes once finished all.
-
2nd Wallet
Abelc replied to Selvune's topic in Purses, Wallets, Belts and Miscellaneous Pocket Items
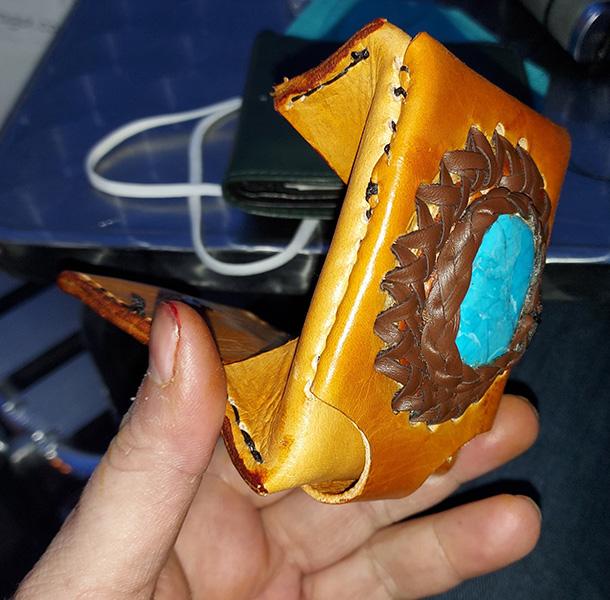
I like it. Love the edges (are painted, like with edge kote or just dyed?), and the stiching.Good Job!!. What you can do with the chisels, is, using a Wing Divider / compass or a Groover to mark the lines in each part, and make the holes individually. Also i have seen that the the pockets can be staggered, but also in the shape of a trapezoid (if i remember) to sew them 2 by 2, but I don't know exactly the process.There are a lot wallet youtube videos for inspiration or make a pattern (although easier to buy one). Or you can use leather of less leather weight, on the inside, in case the wallet is the usual folded type. My chisels, are one piece, and i think i don't have those problems, but last time i tried to punch like 5-6 mm of leather (see pic of crochet wallet behind), even using bees wax, it wasn't easier to do. All the layers, even with border skived with dremel (dangerous), were like 4-5 mm, plus the outside tooled part that i also skived. So i think anyway you have to look for ways to do it, if the total leather weight is too much.Perhaps try to find some chisel that is like mine. Mine are japanese, but i was lucky of having them in the local store i usually buy. I have a project in mind of a collar, with two 3 mm straps, and i think i will first do the holes in one 3 mm strap, then use an Awl, or use the divider to make two lines and make holes in each strap. -
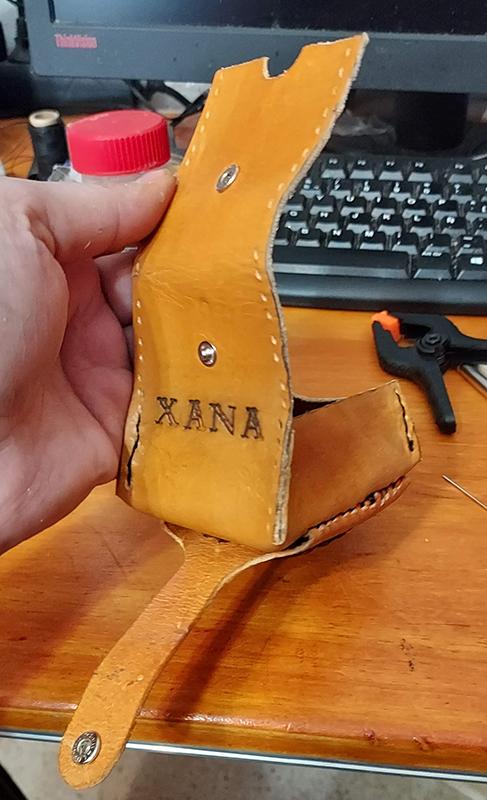
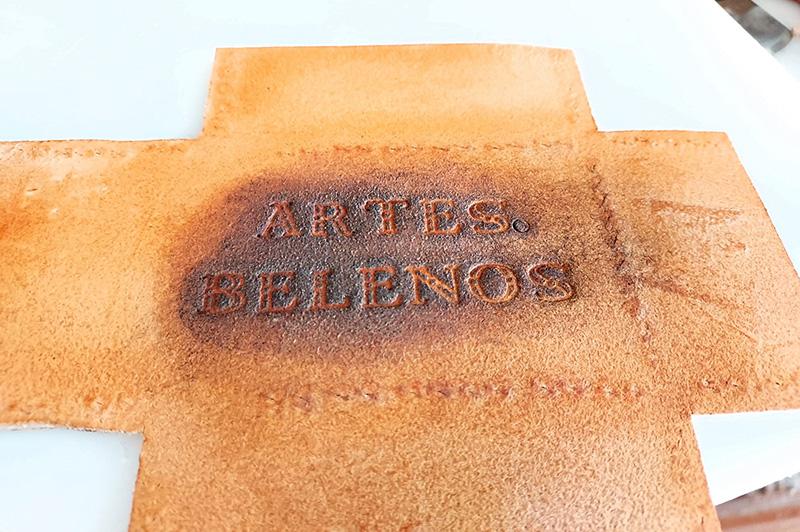
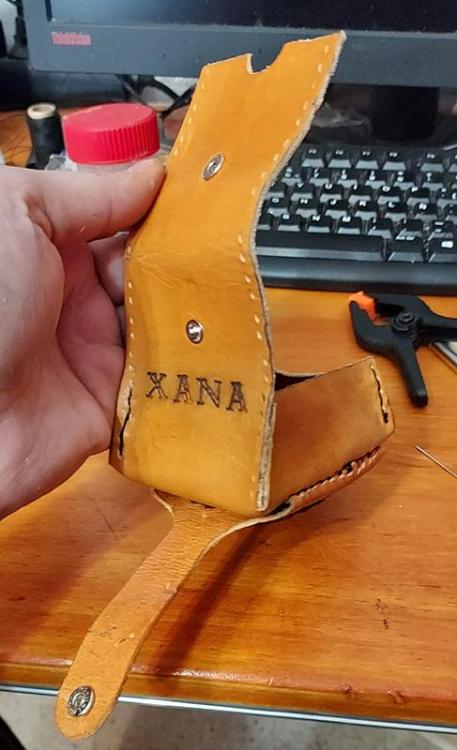
In may i did this, for a friend, for her birthday, From a pattern i bought. It was my second thing done in Leather. Dyed with Fiebing's Light tan (i think) (50/50 with denatured alcohol). Used Antique over the Artes. Belenos and Xana (Friends name). Finished with 3 coats of resolene 50/50, i think. Used tokonole, and quite a bit of edge sanding for edges. Also applied tokonole in the flesh, inside, after dyeing, doing letters, antique etc, i think. The stiching and edges could be better, but well, it is my second project , i think its great for a novice.


-
Thank you. I bough some sponges a few days ago, after reading that could be used, also of rags. Yeah, that hide would be better for a project, than wasting it. So now i have some alternatives, that already have at home
-
dyeing Thanks . I will try also the natural sponge. Not always i like a fully uniform dye. I have seen a Holster, dyed with a mix of fiebing Tan and Mahagony, but with imperfections and dark areas (like if was applied antique), and i liked it a lot. I have experimented with using a piece of wood, and lining it with a piece of cloth, dipping it in dye, discharging a lot of the dye and running it through the leather. I saw this in a video from The Leather Element (Weaver Leather Supply)
-
Anyone know if could be used rabbit skin with their hair instead of woolskin, to apply antique or dye (i think some use it to apply dye and resolene). I can get a 30 x 45 cm of rabbit skin with hair for about 6€ (6,5 $). I want it mostly to try with fiebing's antique. Last time for antique used a rag, i think, but i have read is not the best, for getting in depresed areas. Dye, I usually apply it with a small rag folded (from white cotton t-shirts) with cotton inside, or a small rag folded a few times and tight, or or a sponge (that never tried yet) I haven't found anything in the forum. Thanks.
-
Finally I will use another color of dye, but I will try cleaning before with oxalic acid (i will get it tomorrow), just to test, because anyway I want to have oxalic acid to prepare the leather before dyeing. And Anyway I prefer fiebings dyes (I use alcohol fiebing dye), to water based ones (i think water based ones are incompatible with resolene or tankote. That is what i have mostly used as finish)
-
I bought a Blue (Sky Blue) dye but, once applied, it looks emerald - green and not blue. Is a water based dye. The brand is Roapas Batic, is a japanese brand. In a piece of paper looks blue. It is perhaps because the leather not being white, changes how color is perceived? I used a scrap of leather i had around, and dyed it. I tried in another small scrap aplying fiebings dye-prep first, and happens the same. Has this ever happened to you? Would there be a solution? I am going to try fiebings. It has never given me problems, using green, and brown, reddish-orange or similar.

-
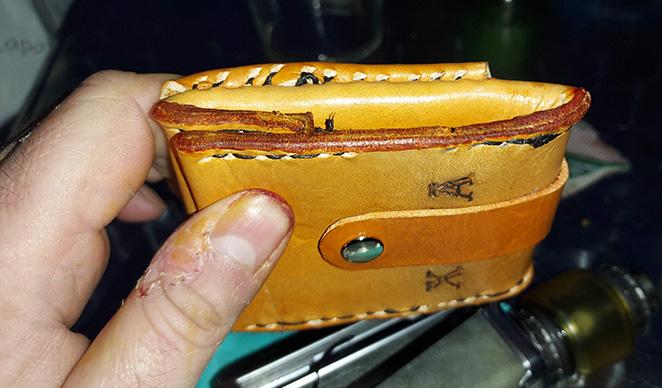
Crochet needle storage wallet
Abelc replied to Abelc's topic in Purses, Wallets, Belts and Miscellaneous Pocket Items
Thank you -
Crochet needle storage wallet
Abelc replied to Abelc's topic in Purses, Wallets, Belts and Miscellaneous Pocket Items
Thanks Thanks -
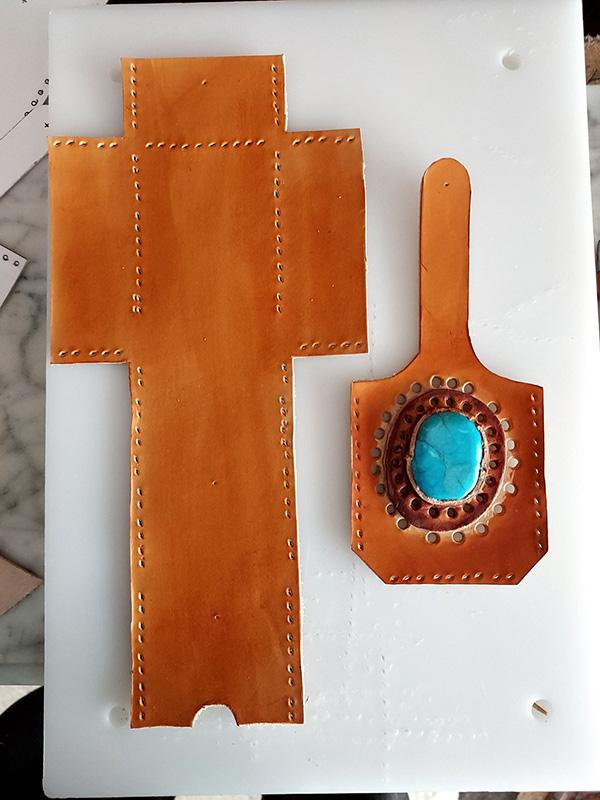
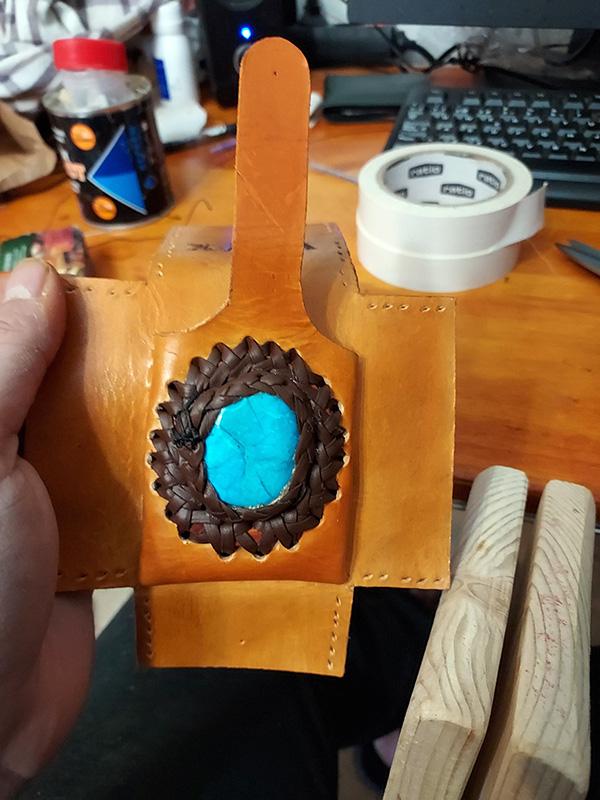
This is my first leather project, made a few months ago. It took me a few weeks to finish it, because sometimes I put it aside for a few days. Before starting and while doing it, I was doing a lot of research, reading the forum non-stop XD, and watching videos. It seems to me that there are some aspects that need to be improved like the stitching, but well, those are my first steps in leather, so not something to get too stressed out about. Overall, i love it, mostly the tooling. Bigger resolution Bigger resolution