


LiftPig
-
Content Count
93 -
Joined
-
Last visited
Posts posted by LiftPig
-
-
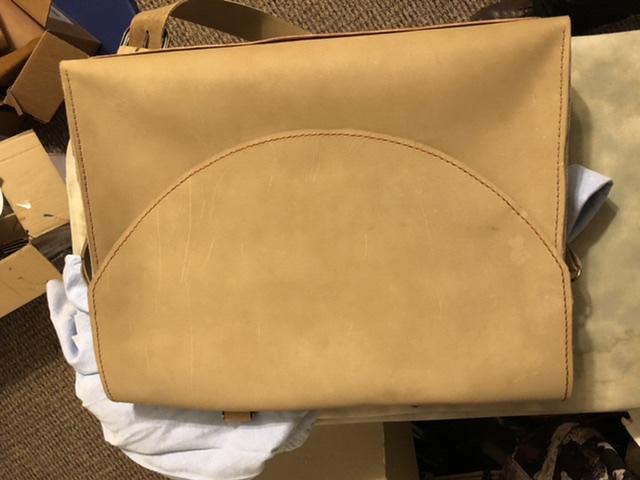
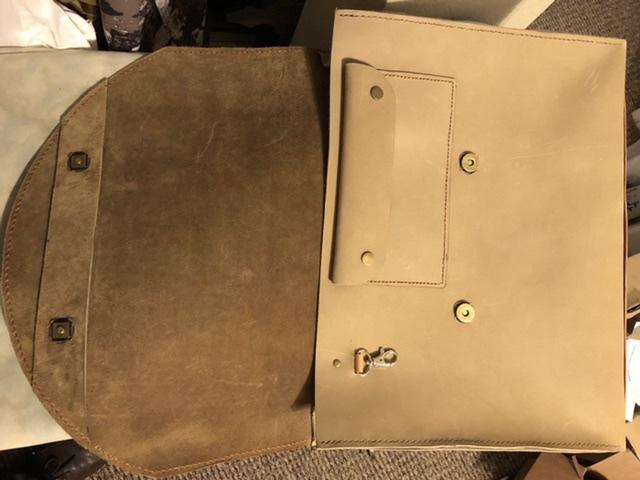
I made a briefcase for a client who wanted all closures to be completely hidden and no visible straps. She suggested magnetic closures since her purse has one. I argued that I didn’t think it would be strong enough but I ended up caving and did it. Guess what? It’s not strong enough. So now I am fixing my mistake.
I’m looking for ideas on what to do without having to rebuild the whole thing. I’m thinking side-release buckles. Put the male end of the buckle where the magnet is on the bag portion and the putting the female end on a liner inside the flap.
has anyone has any experience with this sort of thing?
-
This makes perfect sense. Thank you!
-
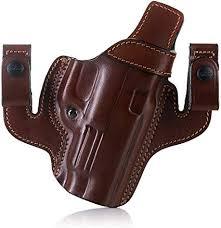 Why do many IWB holsters like this one have the loops on "rabbit ears" as opposed to a continuous piece of leather?
-
26 minutes ago, DaveP said:I want to slick the flesh side of the leather. I made a couple more sheaths (inprogress). One is saddle tan and other chocolate Fiebings oil dye. Will resolene work as a slicking agent for the flesh side? I have a bottle of it coming in the mail at some point.
I tried water on the belt loop after a little sanding. It's just ok but doesn't really look that great. Don't have a pic of that.
Mix the Resolene 50/50 with water, apply with a brush to the inside of the sheath, wait a couple minutes and then slick down with a bone folder or something similar. Then let it dry completely for about 24 hours and it should be pretty slick.
-
I wish you were getting an answer to this. I'm curious about it myself.
-
I second Resolene. Mix it 50/50 with water and brush it on gently. Brush a fair amount into the inside of the holster. It will absorb very quickly. Let that dry about 5 minutes and then do the outside. It won't take nearly as much to get even coating on the outside as on the inside. Try not to let it pool - you want as even of a coat as possible. It will leave a fairly glossy finish at first that will wear with a little time. It also stiffens the holster quite a bit which is good.
-
I'm trying to decide the most economical way to ship items to my customers. USPS flat rate boxes are convenient but not that economical. I shy away from USPS anyway, as they have a bad habit of losing things and/or destroying boxes. I just got over a very tense week where a box containing two holsters I made vanished for a week. Luckily it showed up yesterday and even though the box was crushed the holsters weren't damaged. They've also lost several boxes I've had incoming. So, I have little faith in them.
What does everyone use and have had good success with?
-
Beautiful work. Absolutely stunning.
-
Thanks for the replies. Guess I'll be investing in some blue guns. Now I"m off to go shopping - you know, for work.
-
Holster makers out there, how do you mold the leather to your guns? Do you buy a blue gun for each order you get? Do you charge the customer for this or do you eat that cost? Is there a good supplier for these that don't cost an arm and a leg or a place where they can be "rented"?
So far I've been lucky that the few holsters that I've been asked to make have been guns I own. But I just got an order for a holster for a Sig P365SAS and, not being a police officer in California, don't have one. I'm a bit stumped on what to do.
-
Generally speaking the groovers you get from amazon are dull. I had this same issue and never could get it to work, the leather just gummed up and my groove lines were terrible. I spent a little extra money and got a good groover from Weaver and haven't had a problem since.
If your groover is the kind I'm thinking of it has a replaceable blade. You might be able to get a better replacement blade for it and make it work better rather than have to purchase an entire tool.
-
A customer has asked me to make a wallet for her husband with a stamp of a Labrador on it. You wouldn't think such a popular dog would be so difficult to find a stamp of but here I am not finding one. Does anyone know of a manufacturer that might have one? I hate to have a custom stamp made that I might only use once but if that's what I have to do...
I'm in the US if that helps.
-
Springfield Leather Supply, Tandy, Rocky Mountain Leather Supply, Weaver Leather Supply, and The Leather Guy are all good resources that do online orders and are still operating in the shut-downs. The Leather Guy is kinda cool in that each piece of leather is listed individually so you get to see the very piece you'll be buying with exact dimensions, not "20-24sq ft, some imperfections".
I would advise not buying leather from Amazon. I've done that and I swear the cow that the leather came from was killed back before WW2.
-
The "gold" standard is Ritza Tiger Thread. It's expensive but it's wound tight and nicely waxed. The tighter wind means you have less chance of catching your thread with a needle while you're sewing and it looks nicer and more professional when it's done.
A nice second choice would be Mandala Crafts from Amazon. They have a 0.8mm in about every color. It's much cheaper than Tiger. It's not as well waxed which some people like and some don't. I personally run mine over a wax block when I use it and am happy. It's a little looser braided than Tiger though - but on a budget it's a good choice.
Makers Leather Supply also has their brand of thread which is nice but he's been moving his shop around and has run out of a few colors lately. I would put theirs on par with Tiger thread. It's a bit less expensive but lately a bit tougher to get. The only reason I put this in third place rather than second is availability.
Just my opinion, but for lighter leather like you're using I'd consider a 0.6mm thread. I don't know what you're making but for thin, light goods, heavy thread looks chunky and bad.
1 minute ago, TestTube said:Or could you tell me if this is an okay thread to use on leather even though it says polyester and not bonded nylon?: https://www.amazon.com/Mandala-Crafts-Leather-Sewing-Stitching/dp/B01N9QEIIS/ref=sr_1_2?dchild=1&keywords=0.8mm+thread&qid=1586194214&sr=8-2
^I know that it SAYS it can be used for leather, but everywhere I search when I ask the question "What type of thread should be used for leather?" I get the answer "Bonded Nylon", not polyester.
The nylon vs poly thread debate will go on forever. I personally don't have a preference.
-
First, I don't like "white" thread. It looks too bright and stark. I use a cream or very light beige thread. It looks white enough without being stark. That's opinion though.
You can use Resolene cut 50/50 with water applied and allowed to dry well. That should seal the dye in and keep it from leeching so much. Just apply it to the finish side and the water should get in from the flesh side for the wet form. I've also used Atom Wax on the finish side before sewing and that works well but it doesn't penetrate quite as deep as the resolene. Adams Leatherworks on Youtube has tutorials that are step by step on building and finishing holsters. They're great resources.
Good luck.
-
7 hours ago, XGrunt6 said:So first time poster and new to the forums. I'm wanting to make a pocket organizer for my personal edc items, flashlight, lighter, knife, pen etc. I'm wondering if there is a guide, method or general rule of thumb on measuring so as to provide enough material to cover the thicker items? Sorry if this is answered somewhere but I'm not familiar enough with this forum to make an educated search just yet. Thanks in advance for any help.
There's two ways to do this. One is practical, one is math.
Math way
Measure the width and height of the object you're making a sheath for. Add 1/4" to every dimension except the top where the object will leave the sheath, you can make that wherever you want. That's 1/4" stitch line on all sides. Write those dimensions down. This is the bottom piece of leather, the side that will touch your body.
Lie your object on something so it rests naturally. Measure the depth of your object and multiply by two. Measure the width of your object. Measure the depth of the leather you're using and multiply by two. Add your 1/4 stitch lines again. Add all that together. Add that to your previous figure. That's the top piece of leather. It's bigger than the bottom piece to accommodate the object. Again, don't stitch too tightly or you might not be able to get your object in - or worse can't get it out. If it's snug wet the leather well and snug the object down in there and leave it alone until it drys. The leather will stretch a little. This makes a sheath that's flat on one side and curved on the outside.
It's worth noting that this will not allow for any leather to extend above the object for a sweat guard or belt loop. You'll have to add that dimension yourself. The good news is you can do that however your artistic heart desires. If you're going to do a fold over belt loop just do the same thing you just did for the object with your belt. Width of the belt x2, plus depth of the belt, plus depth of leather x2. You don't need stitch line allowances on the side, obviously, but you will need one for the very end of that strap to sew it to the main sheath. 1/4" is my go-to but I stitch two stitch lines on loops for extra strength because I'm anal like that. Make sure you sew down the belt loop before you sew the two sides of the sheath together or you'll be unhappy....ask me how I know.
Practical way
Take a strip of the piece of leather you intend to use. It can be any width but needs to be long enough to go around whatever you're doing. I make holsters so in my case it would be a gun. Lie the strip down and center the object on it facing up. Again, in my case it would be the gun resting on the slide or sight guide with the magazine hole facing the ceiling. Make a mark on the leather in the center of the object. Now wrap the leather around the object and make a mark where the two pieces of leather meet. Don't make it too snug. This is your stitch line. If you have an irregularly shaped object, like a gun, make marks at each increment of increasing size. So for my gun it might be the barrel, the slide spring well, and then the trigger guard. These will be your stitch lines. This makes a "pancake" style sheath/holster that shares the same dimensions on either side of the object. Note, I didn't come up with this method, I learned it here.
-
2 hours ago, spurdude101 said:On Belts with Basket weave stamp there is usually a Camouflage border. Is it best to stamp the Basket first, Or the Border? How is it best to deal with the overlap?
You won't really see the overlap. Well...YOU will see the overlap because you know it's there, but nobody else will. Just make sure you're tilting the basket weave away from the border so it fades and then set the camouflage nice and deep. The edge of the basket will look like it just fades into your pretty camouflage border.
Here's a master at work.
-
38 minutes ago, Rchang said:Hey there,
Wondering if I could get some advice on a good beginner industrial sewing machine. I have a price range $1000.00.
You're going to have a hard time at that budget. I get it. I want a machine so bad it hurts - literally my fingers hurt. But you're likely not going to find one that will sew veg-tan on $1000. Closest you're going to get is (https://www.tolindsewmach.com/consew-p1206rb.html). Note it says it can sew 3/8" of "MEDIUM TEMPER" leather. That's a broad definition and sure leaves a lot to be interpreted. I'd hate to drop a grand and find out that what I routinely sewed wasn't considered "medium".
You could save up a little more and get a Cobra Class 17 (https://leathermachineco.com/product/cobra-class-17-walking-foot-machine/) or Consew 206RB-5 (https://www.tolindsewmach.com/consew-206rb.html). Keep in mind the RB-5 listed there needs to be upgraded to a servo motor. Clutch motors are for the birds. Both machines are pretty light. The Consew will take #207 thread which is the lightest I'd consider acceptable for veg-tan sewing. Here's a chart on thread sizes for you (https://www.tolindsewmach.com/thread-chart.html). Maybe a creative fella could shove #277 thread in there, I don't know. One of the "older" guys in the group might know.
What would I get if I had my way? Glad you asked.
https://www.tolindsewmach.com/cb3200.html
Things you should not skimp on to save a few bucks (according to me anyway):
1. Servo motor. More control, more power.
2. Reverse. You could flip your project around to back stitch....maybe.
3. Compound Triple Feed. One missed stitch because the feed dogs didn't adequately move your project and its probably ruined. Not worth it in my opinion.
4. Shipping. Make absolutely sure that whoever ships it will ship to a residential address or an address without a loading dock. Some less scrupulous sellers will ship, find out it's going to a residence, and then take the item back and refund your money minus their "restocking" fee. It's criminal I tell ya!
It might be worth it to give Toledo a call and see what they have in their used inventory. I haven't done it yet but my understanding is they're a class-act business and willing to help.
Good luck, keep us informed on what you find out. I can't wait to see the pictures of your new machine when you get it.
-
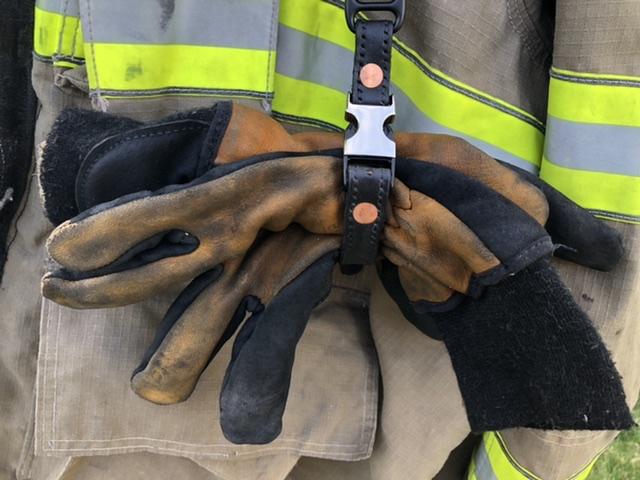
Glove Strap
in Art
2 hours ago, mikesc said:Have to wonder, why they don't just have a Spring Snap Carabiner Hook ( like on dog leads ) on each Glove ( on the outside ) so that they can clip them to their coats..or to their sleeves..A D ring on each side of the coat, or on each sleeve..clip the glove on and.. "job's done"..Or a D Ring on each glove..and spring clips ( like Carabiners ..or Spring Snap Carabiner Hooks ) on the coats / clothing ..and again "job's done"..seems to me to be far more simple..and way less chance of getting "hung up" on something..in a burning building or anywhere..
Your straps are well made
") ..nevertheless ..But the concept of "glove straps" seems like an overly complex ( and not efficient ..they can still fall out of the strap far easier than they could "un clip " ) solution to a very simple requirement*
..nevertheless ..But the concept of "glove straps" seems like an overly complex ( and not efficient ..they can still fall out of the strap far easier than they could "un clip " ) solution to a very simple requirement*
..*how not to mislay ones gloves.
Two reasons.
The gloves would have a catch point. Most structure firefighting is done crawling and snaps etc. could catch and tear or remove the glove while working.
Heat. If a snap hanging from the glove rested on something hot it could make the glove unwearable forcing the wearer to endure or remove their glove. The turnout jacket that glove straps hang from are much more heat resistant and made of multiple layers with dead-space heat shields between each layer. The gloves cant offer that feature and be usable.
Actually three reasons - and this one's kinda dumb.
Tradition. Fire departments (in the US anyways) are very steeped in tradition. Its why we wear helmets that are inferior to others that area available. Our grandfathers did it that way so....
-
Glove Strap
in Art
1 hour ago, Tugadude said:Looks great and surely it will last a long, long time. Is it designed to just hang?
Usually they just hang there but there have been reports of people using them as drag lines for fallen firefighters. I used pretty beefy hardware with that in mind. The thing is definitely over built just as a glove holder but you never know.
Our pockets are usually loaded with other various crap and hard to get into once our respirators are on (the belt traps the pockets closed). Most firefighters like having their gloves hanging from their coats (the loop on the coat is designed for that purpose). Nylon straps are available and generally pretty cheap but won't last long in the interior environment of a working fire where temperatures can be 2-400 degrees or more.
What gave me the idea to make one was a firefighter had a similar one and was lamenting that it was getting old and falling apart and the guy who made them wasn't doing it any more. So I sat down and drew up some designs and the rest is history.
-
Glove Strap
in Art
1 hour ago, dikman said:Very neat. Quite complex, just for holding gloves.
")
True. But firefighters can’t risk missing their gloves. And we like flashy stuff.
-
Glove Strap
in Art
A glove strap I made for a guy in my department. Pretty happy with how it turned out. Critique welcome.


-
On 2/5/2020 at 5:11 PM, Squid61 said:I've looked at machines, the REX on Amazon looks reasonable for the casual user at under $400 . Most of the "heavy duty" Singer and such are really not good for much more than garment leather from all I've read. So far everything I've sewn including a few clutches and a purse for the wife look better saddle stitched than they would lock stitched so a machine wouldn't have helped. I don't suffer any pain stitching and can go along pretty fast using a sharp awl, blunt needles and smooth jawed needle nose pliers, I have discovered that awl stabs bleed more than needles but needles hurt worse.
The "heavy duty" singer machines are good for denim and canvas but that's about it. If I have a sharp needle and give the motor a nudge with the hand wheel I can get it to sew 4-5 ounces of soft chrome tan. I wouldn't dream of trying to get it to do more.
I'm hoping to make enough money this year on bits and pieces I sell to get a Cowboy or a Cobra.
-
Found that user joshhartung has made just the thing I need:
"Cool link to that catalog, Double Daddy! I'm gonna check those guys out.
I've posted the tape holder clip here if any one is interested."
Thanks, Tugadude for the link to the previous thread.
Totally hidden closures
in How Do I Do That?
Posted · Report reply
I could do that. The question is what to attach the flap side of the closure to. Is my "liner" idea valid?
I thought about line 24 but I can see her complaining about having to push on the outside of the bag and not having a firm enough surface or something.
This bag is painful. I wish it would go away.