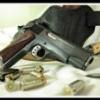
Members Shooter McGavin Posted July 19, 2011 Members Report Posted July 19, 2011 So I'm building a pancake holster for my buddy who is a big fan of "Swamp People" on some television station.. Anyway when he seen my Caimen Tail he just about flipped out wanting a holster done with featuring the tail. I've done a number of exotics but generally bond them to a thin veg-tan backer and stitch it on like any other trim panel. This Caimen tail, however, seems to lend itself better to somehow have the cut ends covered entirely. I came up with 2 different ideas on how to do this. Of course, the finished product will always look entirely different than a few pieces of cut leather laying on the table. Idea 1 is a 7-8 oz "frame" around the piece of tail. The inner stitch groove would attach the frame and the tail to the front piece of leather. The outer stitch groove would actually be the stitch lines for the firearm profile. Idea 2 is to cut a 3-4oz "cover" that is the same shape as the front piece of leather, but have a window cut in it to expose the tail thru. Anyone care to share their experiences with either of these ideas? I only have 1 piece of brown tail, so only 1 chance lol. Thanks a bunch! Quote Zlogonje Gunleathers
Members DCKNIVES Posted July 20, 2011 Members Report Posted July 20, 2011 I much prefer to do full inlays rather than an"add-on" piece, so I would go with your second idea.Feel free to look at my site, as I have quite a few inlays there, as well as a tutorial under"Knife Info".Dave Quote http://dcknivesandle...lademakers.com/
Members TexasJack Posted July 20, 2011 Members Report Posted July 20, 2011 Dave does beautiful work; take his advice. That is a beautiful hide for inlaying. Quote
Members katsass Posted July 20, 2011 Members Report Posted July 20, 2011 Nobody does inlay work any better than Dave does...I'd listen to his suggestion. Mike Quote NOTE TO SELF: Never try to hold a cat and an operating Dust buster at the same time!! At my age I find that I can live without sex..........but not without my glasses. Being old has an advantage.......nobody expects me to do anything in a hurry.
Members Shooter McGavin Posted July 20, 2011 Author Members Report Posted July 20, 2011 Dave, do you have a separate website for your holster work? Do you guys see anything I need to address before I put these pieces together with glue and thread? I'm figuring I should dye and burnish the "window" opening first. Any other advice? Thanks all ! Quote Zlogonje Gunleathers
Members DCKNIVES Posted July 20, 2011 Members Report Posted July 20, 2011 Thanks to TJ and Mike for thier kind comments.Yes, look under Knife Gallery for my leatherwork (sorry ,it's the way program for the site is).Yes, by all means dye and burnish the window prior to gluing and sewing.Dave Quote http://dcknivesandle...lademakers.com/
Members Shooter McGavin Posted July 21, 2011 Author Members Report Posted July 21, 2011 I ended up using the 7-8 for the front layer and the 3-4 for the inside layer. Hopefully I can stitch it tomorrow. Fella needs it by the 30th for a BBQ. I hope it turns out OK, I'm honestly a bit nervous on this one. Quote Zlogonje Gunleathers
JohnBarton Posted July 21, 2011 Report Posted July 21, 2011 If you haven't already stitched this up I recommend that you bevel (skive actually) the inside edges of the top piece and add a slightly smaller piece behind the gator in the same shape. This will push the inlay to be closer to flush with the top piece. I gleaned this technique reading Peter Main's posts and have used it ever since with much nicer results on my inlays. Here is an example: http://www.jbcases.com/gillian.html These pictures don't fully convey what I want to impart. But the center of the inlays is level with the top piece. This is due to the plugs we put in and the beveled edges in the cavity on the top piece. This makes it look much more like a true inlay rather than two pieces of leather on different levels. No matter what though it looks as if your holster is going to be sweet! Quote Support Quality. We are all humans. Buy the best no matter where it's made. That way everyone lives in harmony. Nature knows no flags.
Members kid terico Posted July 21, 2011 Members Report Posted July 21, 2011 Dave does outstanding inlays of all types. Here are 2 of my croc inlay rigs to give you some idea. One holster only and other holster and belt. KT Quote
Members mmirob Posted July 22, 2011 Members Report Posted July 22, 2011 You guys are simply amazing... I must try an inlay. This is what I have been doing but this technique looks so cool! Quote

.jpg.d60258221c476480a6e073a8805645bb.jpg)
Recommended Posts
Join the conversation
You can post now and register later. If you have an account, sign in now to post with your account.
Note: Your post will require moderator approval before it will be visible.