Ski Report post Posted August 16, 2013 Hi Chaps, Whenever I'm embossing a makers logo, or a pattern etc.. the indent is never darker than the skin of the leather. When I see examples of patterns the pattern is always two toned, with the indented part much darker. What am I doing wrong? not hitting hard enough? too much water on the leather? or wrong treatment? I usually case the leather by dunking under water and let it sit for 15 minutes. After I imprint my logo or pattern, let it dry and dye it with Fiebings oil dye dark brown and then treat with carnauba crème. Any help is greatly appreciated. Quote Share this post Link to post Share on other sites
Tree Reaper Report post Posted August 16, 2013 (edited) The thing with a makers mark is they are large and you might have better results if you can press it using pressure. I use a shop press and let it sit under pressure for a few minutes before removing the pressure. Small stamps indent easily where the large ones don't. dunking under water I'm not what you mean here but if you are placing the leather in the water like a bath then it's going to be too wet. Try wetting a sponge and applying the water in even amounts and wait for it to start to dry and change color prior to stamping. Edited August 16, 2013 by Tree Reaper Quote Share this post Link to post Share on other sites
Bob Blea Report post Posted August 16, 2013 Ski, Tree Reaper hit it on the head when he said your leather is too wet. Try reading through Bob Park's tutorial on casing: http://leatherworker.net/forum/index.php?showtopic=19121 You will want to let the leather dry a lot longer than 15 minutes. It needs to return to almost natural color which will take many hours after which the leather will burnish (get darker) when you stamp it.. Also, some of the darkening you might be seeing on projects could be coming from antiqing, which applies dark colors into the low lying areas on stamping or carving in leather. You will get much greater contrast when using an antique than you can just from burnishing alone. Bob Quote Share this post Link to post Share on other sites
Ski Report post Posted August 16, 2013 Is the antique applied only to the impressed parts with a fine brush or all over ? Quote Share this post Link to post Share on other sites
Ski Report post Posted August 16, 2013 Thank you for pointing me towards Bobby's article, I now see the error of my ways and will experiment with this Quote Share this post Link to post Share on other sites
Ski Report post Posted August 16, 2013 Ohh and one last thing. Which one would you chaps recommend? Fiebing Antique Dye Fiebing Antique Finish Fiebing Antique Leather Stain (taken from http://www.abbeyengland.com/Store/tabid/77/txtSearch/antiqu/Language/en-GB/Default.aspx) Quote Share this post Link to post Share on other sites
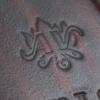
Bob Blea Report post Posted August 16, 2013 If you are looking for a dark impression over a lighter surface, you probably want to use Antique, not a dye. In most cases the dye will darken everything and you probably won't be able to see any of the burnishing you make on properly cased leather. With an antique, you (probably) want to add an additional step of applying a resist. Typically in Sheridan style floral carvings you first coat the item with something that is going to prevent or 'resist' allowing the antique to penetrate the leather and thus keep it lighter. It will also make the higher points in the carving come out lighter and have a greater contrast to the lower points (your stamp). I have an example of the difference this makes. This first picture is of a geometric stamp with Tandy Eco-Flow tan antique applied and then wiped off, but no resist was used. The antique darkened the leather overall, and the stamp impressions are pretty dark: Now here is the exact same stamps on a different notebook, but this time I've applied Wyosheen, a product that resists the antique. I applied the same antique and then wiped it off. Notice how their is greater contrast in the resisted notebook: Does that make sense? Bob Quote Share this post Link to post Share on other sites
Ski Report post Posted August 19, 2013 Makes perfect sense Bob, thank you. Quote Share this post Link to post Share on other sites
Ski Report post Posted September 5, 2013 Hi Chaps, Thanks to all your great input above, my embossing has improved dramatically in conjunction with proper casing and antiquing stain. My next hurdle is really the leather stretching. I cut a perfect circle out, emboss it with a pattern, now its egg shaped. Any tips? Quote Share this post Link to post Share on other sites
WScott Report post Posted September 5, 2013 Packing tape on flesh side or glue it to cardboard before embossing or tooling Quote Share this post Link to post Share on other sites