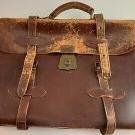
Members olenawills Posted November 17, 2014 Members Report Posted November 17, 2014 I continue to learn and practice. If someone can direct me to some tutorials about clutches, patterns, I will be very much appreciated. This time I decided to make my first clutch bag. I had a cheap, soft piece of brown goat leather, good enough to use for it. During process made a few mistakes, now just have to adjust a pattern, plus I think that I need a better stabilizer around edges. This type of leather was way to soft and stretchy. Bag color is brown, although it looks like black. Dark red cow lining, gunmetal hardware. Size: 6" x 9" x 2". Handle is 24" drop, removable. My old vintage handbag by MURRAY KRUGER was a huge help, I wasn't really sure how to attach a bottom and sides or if I made a correct pattern. As a result , I had to cut a new sides and bottom pieces. Old ones were used for a new phone case, that why it slightly short, but I need something to practice my hand saddle stitches. This is my vintage helper on the left with the picture of the inside of it. With the phone case Quote
Members olenawills Posted November 17, 2014 Author Members Report Posted November 17, 2014 I continue to learn and practice. If someone can direct me to some tutorials about clutches, patterns, I will be very much appreciated. This time I decided to make my first clutch bag. I had a cheap, soft piece of brown goat leather, good enough to use for it. During process made a few mistakes, now just have to adjust a pattern, plus I think that I need a better stabilizer around edges. This type of leather was way to soft and stretchy. Bag color is brown, although it looks like black. Dark red cow lining, gunmetal hardware. Size: 6" x 9" x 2". Handle is 24" drop, removable. My old vintage handbag by MURRAY KRUGER was a huge help, I wasn't really sure how to attach a bottom and sides or if I made a correct pattern. As a result , I had to cut a new sides and bottom pieces. Old ones were used for a new phone case, that why it slightly short, but I need something to practice my hand saddle stitches. This is my vintage helper on the left with the picture of the inside of it. With the phone case Quote
Members olenawills Posted November 17, 2014 Author Members Report Posted November 17, 2014 Handle can be long - on the shoulder, shorter if bag used as a cross body or really short if you wrap it ones around a flap. Quote
Members olenawills Posted November 17, 2014 Author Members Report Posted November 17, 2014 More photos of the process Quote
Members MonicaJacobson Posted November 17, 2014 Members Report Posted November 17, 2014 It looks amazing. Pretty much perfect. Great job! Quote http://monicajacobson.com/ https://www.etsy.com/shop/TrimGoTrix?ref=si_shop
Members olenawills Posted November 17, 2014 Author Members Report Posted November 17, 2014 Thank you, Monica. Quote
Members Erystawi Posted November 17, 2014 Members Report Posted November 17, 2014 Beautiful outside and inside Quote
Members DuaneS Posted November 17, 2014 Members Report Posted November 17, 2014 Hmmm..... I don't believe you need a tutorial, and in fact think you've just come pretty close to writing one! Quote
Members susiek Posted November 17, 2014 Members Report Posted November 17, 2014 Exactly what DuaneS Said - wonderful work - thanks for sharing Quote


Recommended Posts
Join the conversation
You can post now and register later. If you have an account, sign in now to post with your account.
Note: Your post will require moderator approval before it will be visible.