Members jrmz Posted December 15, 2014 Members Report Posted December 15, 2014 (edited) Hello everyone. First of all, I want to thank you all for so openly sharing your wisdom and insight to newcomers like myself. I got into leatherworking roughly about two months ago when looking for a belt pouch for a festival. Every pouch i saw fell into one of two categories: it was either wrong shape/right price or right shape/wrong price so i tought I could make a simple pouch myself. This was how the hobby started I was to generous with the pattern and the pouch ended being too bulky so tried again I was pleased with this one and decided to take step higher and make purse for my girlfriend, that way i wouldnt have to carrry al her stufff during the festival. Bear in mind that up to this point i hadnt found this forum and didnt know anything about leatherworking. I was working with what i thought could work and from looking at pictures so the pouches and purses looked functional, but, as i later discovered during the festival, not structurally sound. The dye rubbed off, the edges were fraying, the rivets were not set properly and the suede lacing came loose. When we returned from the festival i decided i could do better and started to really look into the process of working with leather and i came across this place. Big eye opener. Edited December 15, 2014 by jrmz Quote Jose
Members jrmz Posted December 15, 2014 Author Members Report Posted December 15, 2014 Next project First time wet molding leather, first time hand stitching and first time slicking the edges and first time using a swivel knife. Quote Jose
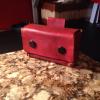
Members jrmz Posted December 15, 2014 Author Members Report Posted December 15, 2014 I got a belly dancing sword for my girlfriend but it came with no way to carry it around so it got me into my next project. Still struggling with the stitching and the overall shape is not right. Cut too much on some places when trying to even all 3 layers I decided to go back and make another flask holster I got a craftaid from tandy and it gave me more confidence with the toolling. Almost like painting with numbers Quote Jose
Members jrmz Posted December 15, 2014 Author Members Report Posted December 15, 2014 Christmas is coming up and i started thinking about what to give my brother in law. He is a bit of a cowboy so i thought a western belt might be appropiate. Besides it gave me an excuse to try something different. I think both my tooling and stitching are getting slightly better but im still struggling with the edges. Definitely have to try hidepounder's tutorial I'll post my projects as i finish them. Quote Jose
Northmount Posted December 15, 2014 Report Posted December 15, 2014 Wow, you are coming right along. Keep it up. Tom Quote
Members Wild Bill46 Posted December 15, 2014 Members Report Posted December 15, 2014 jrmz ----------------- Welcome . For a relitively short timer you are coming along fast, keep up the good looking work. ------------------ Wild Bill46 Quote
Members jrmz Posted December 16, 2014 Author Members Report Posted December 16, 2014 Thank you tom and thank you wild bill. If I have improved is because I found this place. So much information, tips, examples, critiques and so on and on, just trying to absorb as much as I can Quote Jose
Members jrmz Posted December 16, 2014 Author Members Report Posted December 16, 2014 More presents My two younger brother are really into video games so I wanted to use their favorite characters What I like: the warm colors, the stitching on the outside and my edges are looking a tiny bit better. Paraffin definitely makes a difference but I need to get some sandpaper What I don't like: inner stitching! I guess I didn't measure the liner correctly and the leather ended up being a fraction of a inch to big. Chewed up the edges in some parts Quote Jose
raysouth Posted December 16, 2014 Report Posted December 16, 2014 Hello Jrmz, You are certainly getting it down and doing a great job. Keep at it and you will be giving lessons to others. Happy to have you here. God Bless. Ray Quote
Members MonicaJacobson Posted December 17, 2014 Members Report Posted December 17, 2014 Wow, you're doing a great job. It's fun to see before and after pictures as you improve, too. Surprisingly, it makes it more impressive rather than the other way around. Love the flasks. Quote http://monicajacobson.com/ https://www.etsy.com/shop/TrimGoTrix?ref=si_shop


Recommended Posts
Join the conversation
You can post now and register later. If you have an account, sign in now to post with your account.
Note: Your post will require moderator approval before it will be visible.