splinters Posted June 22, 2016 Author Report Posted June 22, 2016 More good stuff Jeff. Thanks. Will print your comments off and put in my shop notebook for quick reference. I saw the layout on W/C of how the hide is sectioned which is more for the notebook. Quote
splinters Posted July 1, 2016 Author Report Posted July 1, 2016 I’m still reading and rereading “Sheridan Style Carving”. This is a wonderful book that is filled with very useful information and will be a life time reference for me. If you don’t have it then I would suggest you make the investment. It’s another quality tool for the inventory. I’m in the section on “Notes On Finishing Techniques” and would like to follow the finishing sequence of products applied in the text and shown with the pictured example. #1 Light coat of neatsfoot oil #2 Neat-Lac or other lacquer based finished #3 antique #4 Tan-Kote Now that Neat-Lac has gone by the way, in my time away, I understand that a product called Clear-Lac has taken its place. Are there any other sealers that could be used in place of Clear-Lac? Would really like to try the above on a practice test piece, but I’m sure not opposed to learning and trying another sequence of products that could be substituted. I would appreciate any comments or suggestions from you all. Thanks. Quote
splinters Posted July 4, 2016 Author Report Posted July 4, 2016 Since I haven’t received a response to the previous post about the Neat-Lac, Clear-Lac question I’m going to try a practice piece using Tan-Kote and another practice piece using "RTC Sheridan Resist" in the Sheridan Style Caring finish sequence. In my practicing to learn Sheridan Style Carving I’m fast becoming convinced that even the leather you practice with should be leather from a quality tannery such as Hermann Oak that has been properly cased. My thinking is one should be using leather that he or she will be using for projects in order to get the feel of the swivel knife, stamping and practice finish. May even save money instead of wrestling with unknown quality or portion of hide that came with a lessor price and ends in the waste basket. Quote
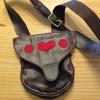
splinters Posted July 4, 2016 Author Report Posted July 4, 2016 Got some more practice in this afternoon and thought I would share with you all so you could see how I’m doing. If you have any comments or suggestions about the work please don't be shy. First I want to point out that I used Bob Park’s method to case the leather and what a difference I noticed although I think I may have bagged it a little to soon last night and it may have been a little damp to start the work. Since I had to stop for now I’m wondering how to store the practice piece for at least 24 hours since I will be out of town tomorrow. It’s back in the zip lock bag and I’m thinking of putting it in the frig until I return. Concerned about mold starting??? Anyway, here’s the work in four photos. Photo #1 is the pattern tracing, Photo #2 is the carving, Photo#3 is the border beveling and Photo #4 is a small bevel around the leaf. After some more beveling I’ll be stuck until I order more stamps which I plan on doing this coming week. Can hardly wait. I'm really enjoying the practice and learning. Quote
Contributing Member JLSleather Posted July 5, 2016 Contributing Member Report Posted July 5, 2016 Yep, tha's still awfully wet. "Smooshy" and heavily darkened where ya bopped it. Flip it over on the other side, and note the "negative" of the pattern on the other side. A wide, dark outline 'drawing' is a sure giveaway yer toolin' too wet. Yer pattern aint centered on the leather, but the cuts look purdy smooth .. not broken 'n' choppy. FYI,, FWIW kinda thing... I use a "shader' or "thumbprint" before a beveler (as a rule, more often than not) but each his own. And I AIM to get a project completely done once I start. On those times where it's not going to happen, I FINISH the part that I can. What i mean... I generally would use (on a pattern like that one), a 'shader' (likely 2 or 3 different ones), then bevel, then selective modeling (too long story to include at the moment), then camo tools, veins, then background and decorative cutting. So, if I know I'm running low on time, I might do the flower where you did, and all the stems / leaves leading up to that, and background, and cut, so that whole side is DONE, then cover the other side with a piece of (plastic) tracing film and leave it right where it is on the marble block. Come back tomorrow, uncover the work, and wait 'til it's ready. With marble under it and plastic over it, it AINT gonna dry out. Truth is, doing it 'in one shot" uses less time. Tooling, I know. But I didn't reply here cuz I don't know that resisty / paint / antstreak / wax off thing Quote "Observation is 9/10 of the law." IF what you do is something that ANYBODY can do, then don't be surprised when ANYBODY does.
Contributing Member Bob Blea Posted July 6, 2016 Contributing Member Report Posted July 6, 2016 Splinters, going back to your post about resists. Clear Lac is supposed to be the same thing as Neat Lac just a different brand name. There is also Wyosheen, which I use. It used to be sold by Sheridan Leather and now it's sold by Barry King. Again, it is supposed to be the same thing as Neat Lac or Clear Lac. RTC Sheridan Resist is supposed to be good too. I have a bottle I got recently but haven't tried it yet. Looking to give it a go on a small project here soon. Keep it up. Your knife cuts look great, but the leather does look a bit wet. Quote There are always possibilities.... Bob Blea C and B Leathercrafts Fort Collins, CO Visit my shop at http://www.etsy.com/shop/CandBLeather?ref=si_shop Instagram @bobbleacandbleather
splinters Posted July 6, 2016 Author Report Posted July 6, 2016 Jeff: Thanks very much for the critique and all the info. I really appreciate it. One thing I’m going to learn, if nothing else, is what the dryness of the leather should be before starting the work. I’ll keep plugging away. Bob: Thanks to you too for taking a look at my practice session, also the comments on the resists. I’ve decided that I should get a small bottle of the RTS Sheridan Resist and give it a try. Again, thanks to you both for taking a look and the comments. Much appreciated. Quote
splinters Posted July 10, 2016 Author Report Posted July 10, 2016 (edited) On 7/4/2016 at 7:41 PM, JLSleather said: Jeff, ( JLS Leather) I meant to also thank you for providing the photo of your beautiful work. Those are definitely examples to work toward. You are one of those that has a gift for outstanding carving! Again, thanks for your critique. Edited July 10, 2016 by splinters Quote
Contributing Member JLSleather Posted July 10, 2016 Contributing Member Report Posted July 10, 2016 Glad I was able to help. Honestly, tooling is quite simple. You DO need to start with good quality leather (or it won't matter much if you know how or not). But with a good chunk of leather, the only ones who can't tool are those who are telling themselves they can't! Gimme a good piece of leather, and I can teach a monkey to tool it -- long as he aint too drunk. But if you want to see REAL talent, check over there in the braiding section!! Quote "Observation is 9/10 of the law." IF what you do is something that ANYBODY can do, then don't be surprised when ANYBODY does.


Recommended Posts
Join the conversation
You can post now and register later. If you have an account, sign in now to post with your account.
Note: Your post will require moderator approval before it will be visible.